Showing posts with label pieced quilt. Show all posts

Saturday, June 1, 2013

Princess Feather Quilting


I designed the quilting to fit the fabric. Feathers won't show on the dark floral but were added anyway. The solid areas seemed to call for a wreath but not more feathers so I drew a Jacobean-style leaf with stems that extend to all corners of the solids.

Free-motion quilted wreaths on pastel fabrics
Detail of front. Feathers do not show on the dark.

Here's the lovely lavender sateen cotton for the back. Since it had such a wonderful shimmer I used rayon thread too, changing colors frequently.
It was fun to link this up with Leah Day's FMQ Friday. Technology makes it so easy to see what others are doing and share ideas and results. Thanks.

Free-motion quilted wreaths and feathers on pastel sateen
Back of Princess Feather showing all the thread color changes 

Fret not; enjoy the day.

Ann

Wednesday, May 29, 2013

The Woman Who Knew Too Much


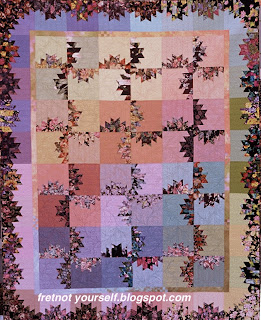
Here's an another example of how misguided I can be. Years ago someone wanted to trade these blocks in a fabric combination I knew would look terrible. But she was a good friend so I made a few, planning to piece the top and quietly give it to charity. Well, it looked much better than I thought. Changing my mind, I kept the top and donated something else. Oh, darn; there were only enough blocks for the center... because I knew so much.

Scrap quilt using black background florals and solid pastels.

It took a while to collect a variety of solids and even longer to find black background florals but I persevered. Colors kept getting brighter so the border fabrics are stronger than those in the center. Then there was a problem with the inner border. Nothing seemed to work until... We moved across country; my new friends wanted to dye fabric. Everyone else's looked fabulous; mine looked like five dirty dishrags. I knew it! I saved them even when we moved back to Texas where I finally hauled this top out determined to finally finish it.

When I can't figure a quilt out, I get all my fabric and successively pin it near the problem. I knew commercial solids and hand dyes didn't work well together. Good thing I followed my habit because the dishrags looked great. But none had sufficient yardage to make a border. So I pieced them. Where one fabric got mushy and dirty-colored I picked another hand dye and made little four patches to transition them better.

Using four-patches to soften change from one fabric to the next.
Dishrag lavender to dishrag peach

Adding the inner border meant the outer border needed to be a bit larger. Squares of the black florals in the corner solved that issue. Serendipitously the corner of each square blends with the other points! Lucky me; the top was finally completed.

The blocks are from Princess Feather and Mountain Reel Quilts by Nancy Daniel. It was one of the first designs for rotary cutters and it's an easy pattern. (This is not the quick cut Delectable Mountain. The light side is larger than the print side of this block.)

Fret not; enjoy the day.

Ann


Saturday, April 27, 2013

Ocean Waves Away

It's done! Putting it in a show was the incentive needed to finish Ocean Waves. This is one of the few quilts  I've made without a border. It looked odd at the show but looks great on the bed.

Queen-size Ocean Wave quilt with green,blue and tan scraps.

There are no photos from the beginning of this project but I started with lots of light blues, pinks and greens. Eventually I found this fabric in my stash which seemed to have many of the colors 'She Who Wore White' wanted.

Fabric (by Fabric Traditions) used for binding & color selection.

All the cut fabrics were placed next to it. Any (but not all) that didn't look good in this new color scheme were discarded. Then I added medium and dark blues, teal, greens from yellow-green to blue-green, darker browns and a few mustard, rusty orange, purple and black. Fabrics didn't have to match but they had to blend with the others. The lights run from white to tan. I like how the bright whites "pop" - something unexpected. Almost every print style is included: Civil War, 30's reproductions, baby fabrics, batiks, modern, stripes, plaids, geometrics, florals, etc. No solids, although some may appear to be.

Pebble quilting on muslin
Pebbled quilt edge

Feather quilting on muslin
A section with lighter triangles

With so much muslin on the front, the back had to be muslin to prevent shadowing. This is my first time using a wide fabric (108") for a back. I doubt I'll ever do it again. Although it is nice to have no seaming, it didn't have the same the quality. Ocean Waves drew up more than other quilts I've made. The top was 102" but after quilting it's 98". I'm uncertain if the cause was the thread, the backing, the construction or the heavy quilting. On previous quilts I've tried everything except the wide backing so perhaps the looser weave on the backing caused some of the shrinkage.

I free motion quilted with white YLI 100 weight silk on top and beige Soft Touch 60 weight cotton in the bobbin. These fine threads require shorter stitch length. (Thicker thread need larger designs and slightly longer stitches.) Make samples before starting.

Fret not; enjoy the day.

Ann

Sunday, April 14, 2013

Ocean Waves

Here's my revised Ocean Waves which may be more traditional. I've been (re)constructing it this past year... off and on. Each block has 49 pieces; it's not a beginner's pattern.

I chose a six inch center square. To make the triangles divide that number in half. The hypotenuse of these triangles finished 3 inches so I cut 4.25 inch squares and then cut two diagonals across the squares to get four QST (quarter square triangles.)

Piecing the blocks looked straightforward - alternate dark and light triangles. Not quite. You don't want to know how I did it but I assure you, it was the most difficult manner possible. I recently found very clear and much easier directions on Quiltville. As luck would have it her blocks are the same size as mine. Another advantage of Bonnie's method is the ability to check and trim the size of the squares as you progress. I wish I'd seen it earlier.


I'm slowly quilting the large squares. Feathers sound good but not a wreath.


Fret not; enjoy the day.

Ann

Thursday, April 11, 2013

The Wave That Never Was

Ocean Waves should have been finished a while ago. It was intended to be a wedding present. The couple planned the wedding for more than a year and I started the quilt in time but... Someone who wore white kept changing her mind. Naming no names, mind you.

First she wanted all pastels. I cut triangles. Then perhaps not so many pastels. I replaced triangles. Could I use fewer pinks? I made more triangles. What about teal and brown? More triangles. Are we seeing a pattern here? She wanted a soft blue center square. No, not that fabric. Not that one either. The third choice (which I'd pieced in fourteen blocks) wasn't quite right. That's when I put it aside.

Ocean Wave blocks with the wrong blue centers.

After the wedding I picked up some excellent muslin and recommenced piecing. I vowed not to show it until every stitch was done. Oops; I forgot. Guess what? She loves it but... They're planning to buy a larger bed. Will the quilt fit it? I hope so; the top was 102" square but will probably shrink from all the quilting.

I agree with the lady in white. This light blue center doesn't make it... although it might be a good choice for a baby quilt.

Fret not; enjoy the wedding. The quilt can wait.

Ann

Monday, April 8, 2013

What's the Center of Attention?

The next packet in the shoebox contained 25 khaki-and-white nine patches. At one time our bee exchanged blocks and I suggested these. Trading innocuous blocks (you know, the ones that don't look like much) might let everyone branch further in their individual styles. What could be more low-key than khaki? No one else liked the idea and the blocks went in the shoebox.

Simple khaki and white nine-patches on point alternate with dark red and chartreuse hourglasses to create the design of this quilt. A chartreuses and dark green inner border is followed by a dark brown outer border.
Nine-Patch Hourglass Lap Quilt
There was just enough dark red to make this lap quilt. I enlarged the 4.5" nine-patches with four red triangles and added alternate hourglass blocks. Chartreuse is the complement of the dark red. A couple of the nine patches have the greatest value contrast, but the eye focuses on the second most value contrast - the red/chartreuse areas - because it's larger. Sometimes the original block doesn't need to be the center of attention. I like the red lozenge shape and the chartreuse stretched stars.

Feathers, parallel lines, and stippling are highlighted in this quilt detail.
Detail of machine quilting
The border is flying geese but my first version looked a bit different. When I sketched this design on graph paper (yes, I still use the stuff) it looked great. It looked okay when pieced. But when I snapped a photo before quilting, it looked horrible. The longer I looked at the corners the worse they appeared. It had to be ripped out and replaced. Small change; big difference; worth the trouble.


Sketches I made for the quilting designs in the chartreuse hourglass and flying geese. Given the contrasting colors and values in this traditional styled quilt, I chose to change thread color too. I quilted a black feather in the outer border. It's not visible at all and was so hard to see while quilting that I turned the quilt over and quilted from the back.


The quilting thread is Metler Fine Embroidery and the batt is Mountain Mist Cream Rose, a lightweight batt very suitable for warm climates.

Fret not; enjoy the day.

Ann

<a href="https://www.bloglovin.com/blog/6844739/?claim=5pd3e3tmy5e">Follow my blog with Bloglovin</a>

Monday, April 1, 2013

Radiant Nine Patches

How often has this happened to you? I was cleaning a closet and found a shoebox of leftover nine patch blocks in the back. Oh, I remember them! First is a stack of ten radiant nine patches in blue. The pattern was published by Blanche Young. Catherine and I made a queen-size quilt for an auction and these were my leftovers... twenty years ago. Although we had lots of fun I wanted to wait a bit before beginning another. It's probably been long enough, don't you agree?

All values of green, blue and purple are paired in this quilt of six-inch nine-patch blocks.
Radiant Nine-Patch quilt
Because it's a value study the x's and o's should be very low contrast as you move from light to dark. We used an analogous color scheme I want to try again although greyed colors were the style back then. I chose mostly blue-green, blue & blue-violet from my stash. To emphasize the value changes rather than the fabrics, the blocks finish 4.5 inches which means each small square was cut two inches.
This nine-patch block demonstrates using fabrics of similar value to create the radiant effect of the larger quilt.
Example of a Radiant Nine-Patch block

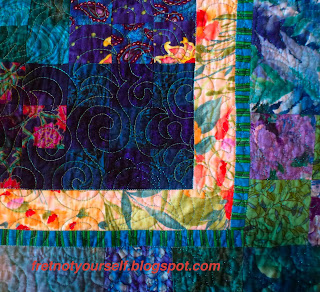
The innermost border is 1.5 inches of a lovely pink print while the next border is a half inch of blue and green stripe. The outer border is larger four-patch squares which shade from medium to darker values in the corners.

Three borders: a pink-backroung floral, a blue and green stripe and a large pieced outer border of blue, green and purple.
Detail of the border of a Radiant Nine-Patch quilt

This time I used metallic and rayon threads to add some shine. Since it looked aquatic, I quilted ammonites (I have to get some geology in here) and starfish with lots of waves and swirls.

A large ammonite is quilted in rayon and metallic threads.A large starfish is quilted with rayon and metallic threads.

It's still a lovely pattern, perfect for beginners too.

Fret not; enjoy the day.

Ann

Thursday, March 21, 2013

The Live Oak

My first post was a out of chronological order but I was so excited how well it was going! So let's start at the very beginning.

Ruth McDowell's work is spectacular. Additionally, she is one of the most generous teachers, sharing information in her books and classes. The Live Oak is the result of a two-day workshop.

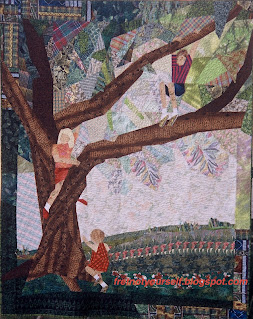
I wanted a quilt of my children climbing the tree in our front yard and had many photos to choose.  As I recall they could always be found in the tree or in the creek; but no photo had all of them in the tree at the same time. (Isn't that always the case?) The tree was sketched and photos enlarged by differing amounts to get the children to the same scale. Next the photos were positioned on the tree and overlaid with tracing paper to draw a line design. Then it had to be drafted into something sewable. At this point the class was over.

Working steadily at home the quilt was completed in two months and juried into the 2003 AQS Show in Paducah. It's still my favorite.

An original art quilt of three children climbing the live oak in their yard.
The Live Oak

Time passed. Although ideas kept running through my mind, the mantra was, "I'll do this when I retire." Now is the time.

Last spring I proposed a one year Book Study in my guild to jointly discuss Ruth's book, Piecing: Expanding the Basics. She re-wrote it as two books, Piecing Workshop and Design Workshop. We agreed to meet monthly with sketches, work finished or in-progress and two fabrics we found hard to use. The point was to study her techniques and determine how we could apply them to our own work. Five other quilters joined and we've had a blast. The group found solutions to drafting problems and explored uses of some of the ugliest fabrics ever! We progressed from the samples in Piecing Workshop to original designs of our own.

Here's the monthly outline I wrote from Ruth's books. They are such a rich source of topics, it was very difficult to narrow them to twelve.


1. Sew her sampler with straight seams, inset corners, linear elements, curved seams & inset pieces
2. Sew a small maple leaf quilt
3. Sew a small lily quilt
4. Sew a pieced & slipped landscape
5. Design a simple leaf
6. Design a tessellated block
7. Design a block with radial (wedge) structure
8. Sketch or sew some setting variations
9. Create a design with a different structure (such as log cabin, braid or clam shell)
10. Create a design with people, animals or man-made structures
11. Draft an original landscape 
12. Begin a series by abstracting or simplifying a previous sketch

Next time I'll show some of the steps in my recent work.

Fret not; enjoy the day.
Ann