Showing posts with label book study. Show all posts

Tuesday, September 29, 2015

Selvedge String Race Quilt and First AHIQ Link Up

This is why I keep my fabric in clear containers. When I decided to save selvedges, the only empty spot was a small drawer. Stuff kept going in; nothing came out; it was easy to forget. But now that it's come to light, I simply have to "make it or move it." My improv book study chose to work on strings again this past month. I have several ideas but these selvedges are screaming for attention. So I'm combining the two projects.

Selvedges stashed in a drawer are finally brought
 to light when the drawer no longer closes.

Problems:
  1. Huge variety of lengths. Some selvedges are one-eighth yard while others are three yards.
  2. I saved both sides of the fabric. One has printed information while the other may not have any white at all.
  3. Some selvedges are bound-edge while others are fringe-edge.
  4. I don't want to use a foundation. (The Hotter'n Hell Hundred helps explain my disinterest in thick quilts. No. I have not raced, but I have lived through these summers.) 
Racing reminded me. My sister made a Jelly Roll Race quilt at her guild retreat last year. I've never made one and don't buy jelly rolls but the fabric shape seemed similar enough. Sew long strips end to end making a very loooong strip. The ends are brought to the top so two sides can be sewn together to the fold. Cut and repeat until your quilt reaches the length/width combination you want.

Starting on the woven edge, I backstitched to keep it from unravelling when I cut the thread close then sewed off the cut side.

A new problem arose. Because the selvedges can only be sewn one way, that loooong strip has to be cut in half before sewing two strips on the side. That's manageable although the strip is as long as Rapunzel's hair.

I tried to pair both selvedges from each fabric but otherwise just used them as they came. Random selection. They range in width from a scant half-inch to three inches. Greater consistency would be better if I cut selvedges again - perhaps one-inch past the printed section or 1.5 inches total.

Here's what it looks like with the first two strips sewn.

Selvedges sewed end to end.
Then overlapped and sewed together.

The improv book study met the next day and I had only completed one more repetition. Mine is on the left in an accordion fold (Ten folds actually.) Look at the delicious results from everyone. Clockwise from mine, Tami alternated glorious golds with skinny navy strips. MN organized her strips into color groups and crosscut each with an X. She's almost finished binding this delightful small quilt. ML created wonderful mockups of different ideas using digital color photos. (She keeps them in a binder. I need to adopt this idea.) Now she's creating a table runner with large triangles of strips.

A second month of String tops 
from the Improv Book Study

I kept working that evening. Here it is after four rounds of cutting and sewing. Wow, a string sheet. The Race is on!

Use selvedge strings to create fabric.
Selvedge Race string sheet.

The sheet curves to the right rather than straight. I need to think some more.

It's time for our first Ad-Hoc Improv Quilt Link-up. Improv has so many different meanings. Although Kaja and I have written several posts recently, we are on tenterhooks to read your ideas and see how you've been working.

Enjoy the day, Ann

InLinkz removed because site was hacked.

Saturday, August 22, 2015

Improv Immersion: Rod Kiracofe Shows and my Study Group


Rod Kiracofe just gave a walk-through of Found/Made, his current show. He included works from several major collectors, contemporary artists, and quilters. There's a list on the San Jose Museum of Quilts and Textiles website. Rod can "charm the birds from the trees" as we'd say back home. Not only did he talk gallery owners and artists into contributing works, he convinced the owners of one quilt to take it off their bed so he could use it!

The works are much more nuanced in person that they could ever be in a mere photo. You can clearly see Rod's sophisticated and whimsical eye in the staging of this exhibit. He effortlessly highlights relationships between different artists causing viewers to consider what inspires them and how those touchstones thread through time. The show runs until November 1, 2015, so make plans to see it.

Quilt tops hung on a clothesline point the way to the entrance. The one in the middle is entirely double-knit polyester, very precisely cut and pieced. I wonder if it was made after 1979 when rotary cutters became available? Rod deliberately hung the one on the left backwards so visitors could see the sewing and seam allowances. You better believe I checked each seam closely. Extremely interesting but also a cautionary tale to quilters: "If you don't finish your tops, everyone can (and will) take a gander at your piecing!"

Quilt tops from Found Made, a quilt exhibit curated by Rod Kiracofe at the San Jose Museum of Quilts and Textiles
Rod Kiracofe at the entrance to Found/Made,
his exhibit at San Jose Museum of Quilts and Textiles.
Photo used with permission.

Rod has collected quilts since the 1970's. Among his many books, he wrote two seminal quilt histories. The American Quilt: A History of Cloth and Comfort 1750-1950 is an excellent chronological overview of quilting through those centuries. His newest book, Unconventional and Unexpected: American Quilts Under the Radar, 1950-2000 focuses on the eccentric, improvisational quilts dear to his heart. In my opinion, Okan Arts wrote the most interesting review.

This past April Rod curated Unconventional and Unexpected at the Sonoma Art Museum, juxtaposing quilts from his book with Shaker furniture and tools. Fan (partial view below) appears on page 146. Rod collected it from Wood County, Texas, which just happens to be the birthplace of my husband. How's that for coincidence?

From Unconventional and Unexpected, Sonoma Art Museum and the book of the same name by Rod Kiracofe.
Fan from Unconventional and Unexpected,
Sonoma Art Museum. Photo used with permission.

Pools of light emphasized the rich colors and textures of the quilts and brought the soft patinas of the wood into focus.  I was especially struck by the quilts he hung as if they were on a clothesline blowing in the breeze. Obviously, that image evokes strong, early family memories for both of us.

Unconventional and Unexpected,
Sonoma Art Museum.
Photo used with permission.

On a more personal note, four of us meet monthly to discuss sections of The Improv Handbook by Sherri Wood. We share our current project, inspirations, roadblocks, detours, and successes. Although we are working the same score, our results differ wildly, showing that artists and artisans working in community can sometimes reach greater heights than working in isolation.

Floating Squares from our study group.
Same score but four different results.
Last month we brought floating square tops. Clockwise from the left in the group photo above. Mine was large and scrappy; I already posted about it. MN grouped her green and red fabrics into strong color-blocks on a baby quilt. She's written two posts: the beginning and the finish. MKreative started a table runner of very sophisticated triangles that she wrote about here. Tami's selected aquas and purples from her scrap bag. She hasn't written a post yet but her blog is here.

After we've exhausted our discussion, taken photos, and enjoyed our tea, we choose what we want to explore next. While it's lovely to write back and forth with quilters in blogland it's even more fun to share, learn, and laugh in person. I'm very lucky to work with these talented women.

Enjoy the day, Ann

Friday, March 29, 2013

Aspen Leaves

Walk through aspen groves and listen to the wind rustling the leaves. To top it off aspen turn the most vivid colors in the fall. Entire hillsides of brilliant orange and yellow! These are some of my strongest memories of living in the Rocky Mountains. And I had a good assortment of just those colors in my stash.

For the straight line piecing assignment in our book study I chose to interpret these leaves. I had my recollections and some very old photos. But using out-of-focus or slightly faded photos allows more room for interpretation. (And my sister kindly emailed some current photos. Hooray!)

Original quilt - two aspen leaves in orange and yellow against a bright blue background
Aspen Leaves quilt

First I sketched and sketched and sketched. When the layout pleased me I enlarged it to 18 by 24 inches, the size of my sketchpad. This seemed like a reasonable size to sew.

Original Drawing for Aspen Leaves

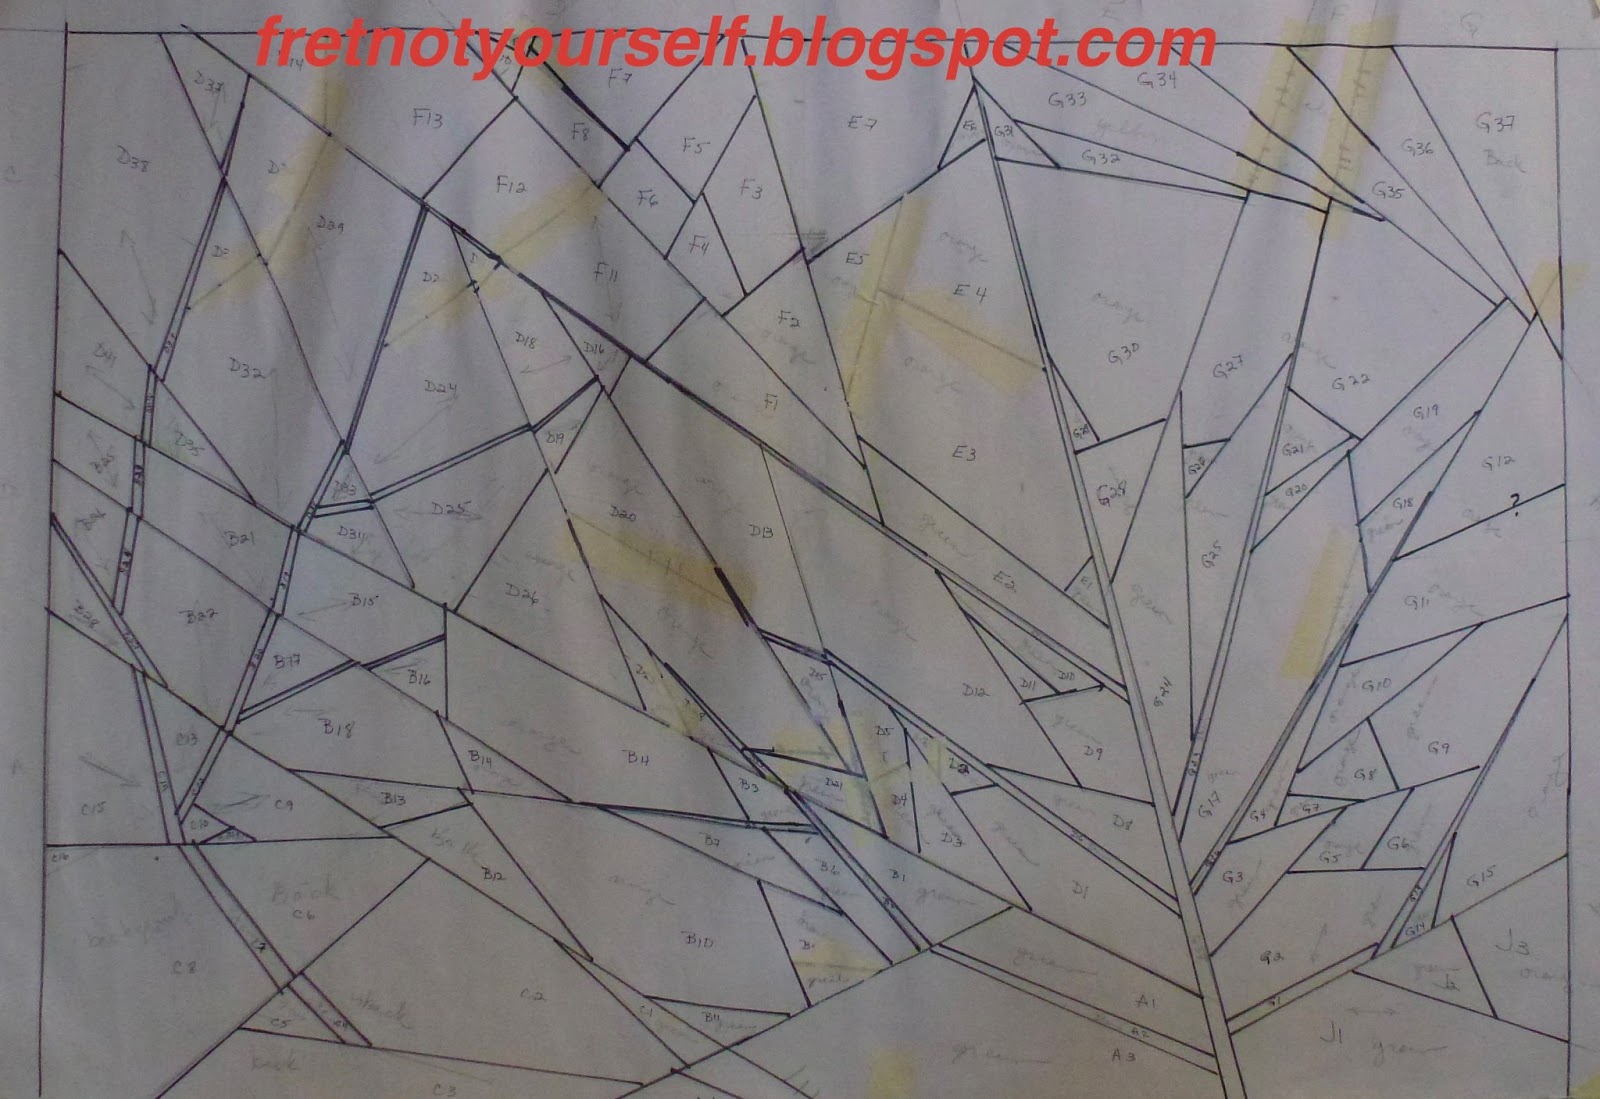
Next I drafted a sewable pattern by overlaying a second sheet of paper and drawing with a straight-edge.

Sewable Pattern for Aspen Leaves

Now for the fun part: choosing the fabrics! In reality aspen turn from green to orange and finally yellow. But no matter how I tried, the solid yellow leaf did not look right. So I fooled with Mother Nature. Can you find the orange slice fabric?

Here's a detail of the free motion quilting. All but two pieces came from my stash. Of course, now I'm out of orange... and need more yellow, too.

Detail of Aspen Leaves

Fret not; enjoy the day.

Ann


Friday, March 22, 2013

Creating A Daisy a Day

It's so interesting and helpful to me when people share some of their creative process that I want to do the same. The daisy quilt began with the book study assignment simple leaf and extended into radial structure. I scanned an old family photo, traced two daisies and enlarged the sketch to a workable size.


Drafting the pattern on tracing paper took several days. I discovered predilections for partial seams (Ruth McDowell's puzzle pieces) and drawing too many lines! Partial daisies filled in some blanks. Reversing the pattern put the taller daisy top left. Several iterations were needed to simplify sufficiently.


After labeling both sides of the draft, I heavily retraced all my lines on the back side. Now freezer paper will lay on top of a reversed pattern. All template markings are on the front (paper side) of the freezer paper so no ink bleeds from template to fabric. Later the draft can be turned to the front again to avoid confusion when piecing.
The ladybug was a potential pest. Unsure of the result, I made templates of her wedge and pieced it first. It's easy to rid a quilted garden of ill-behaved insects!


Here's my first ladybug. The second and back legs look fine but the front leg/head combination is really Ms. Pac-Man. Darn; that visualization will stay with me forever!


After three more attempts and one day searching the fabric stores (it's tough, but someone has to buy fabric) I pieced a ladybug I can live with. Time for fabric audition.


Daily photos tracked frequent fabrics changes and allowed more thoughtful reflection. For example, although the last layout is misaligned, it still reads as flowers and is more vibrant. Something to consider next time.


Here are several possibilities for the border. Which would you choose?


The pieced top is here. I'm still quilting it.

Fret not; enjoy the day.

Ann

Thursday, March 21, 2013

The Live Oak

My first post was a out of chronological order but I was so excited how well it was going! So let's start at the very beginning.

Ruth McDowell's work is spectacular. Additionally, she is one of the most generous teachers, sharing information in her books and classes. The Live Oak is the result of a two-day workshop.

I wanted a quilt of my children climbing the tree in our front yard and had many photos to choose.  As I recall they could always be found in the tree or in the creek; but no photo had all of them in the tree at the same time. (Isn't that always the case?) The tree was sketched and photos enlarged by differing amounts to get the children to the same scale. Next the photos were positioned on the tree and overlaid with tracing paper to draw a line design. Then it had to be drafted into something sewable. At this point the class was over.

Working steadily at home the quilt was completed in two months and juried into the 2003 AQS Show in Paducah. It's still my favorite.

An original art quilt of three children climbing the live oak in their yard.
The Live Oak

Time passed. Although ideas kept running through my mind, the mantra was, "I'll do this when I retire." Now is the time.

Last spring I proposed a one year Book Study in my guild to jointly discuss Ruth's book, Piecing: Expanding the Basics. She re-wrote it as two books, Piecing Workshop and Design Workshop. We agreed to meet monthly with sketches, work finished or in-progress and two fabrics we found hard to use. The point was to study her techniques and determine how we could apply them to our own work. Five other quilters joined and we've had a blast. The group found solutions to drafting problems and explored uses of some of the ugliest fabrics ever! We progressed from the samples in Piecing Workshop to original designs of our own.

Here's the monthly outline I wrote from Ruth's books. They are such a rich source of topics, it was very difficult to narrow them to twelve.


1. Sew her sampler with straight seams, inset corners, linear elements, curved seams & inset pieces
2. Sew a small maple leaf quilt
3. Sew a small lily quilt
4. Sew a pieced & slipped landscape
5. Design a simple leaf
6. Design a tessellated block
7. Design a block with radial (wedge) structure
8. Sketch or sew some setting variations
9. Create a design with a different structure (such as log cabin, braid or clam shell)
10. Create a design with people, animals or man-made structures
11. Draft an original landscape 
12. Begin a series by abstracting or simplifying a previous sketch

Next time I'll show some of the steps in my recent work.

Fret not; enjoy the day.
Ann