Showing posts with label ImprovHandbookQuilting. Show all posts

Saturday, February 13, 2016

Rhythmic Grid Results from the Study Group

Wow! This was one of our most successful scores. Everyone was so excited by their work, in part because we used our favorite fabrics and/or colors. All these tops blend so well, they could go into one quilt, couldn't they? Clockwise from upper left in the photo below are MK, Tami M-N, and mine.

Four variations of Rhythmic Grid score

M-N surrounded cream with beautiful blues. She and I read the directions to mean eyeball measuring each block. It took me several days to estimate the various widths and sew sashing so each was in the planned location. MK and Tami didn't worry about that aspect at all. Isn't it funny how differently we read {and hear and see} instructions?

MK picked up discarded fabrics at her last guild meeting. The squares were already cut so she spent time arranging the pieces to please herself. Love the cherry reds! Because her centers were the same size, it was easier to create a zigzag design with the sashing.

Tami's fabrics are her favorite colors. What a beauty! She used narrow strips of filler to fill openings along some of her rows. I hope she'll write a post about her process soon.
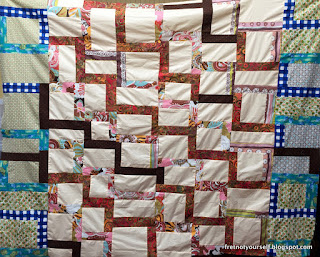
Here's my finished top.

Center section in cream, brown, orange, pink. Outer borders in green and blue
Rhythmic Grid top

I like the combination of creating strong borders with the blue gingham and softening the same borders by extending some dark browns across. Running out of the first green border fabric was another lucky event. The two replacements are even better choices. The tan on the right also softens the delineation of the border. Definitely a "yes, and..." experience.

I deliberately buy smaller amounts of fabric for this exact reason. Running out forces creativity IMO. This quilt used a total of ten fabrics, a very small number for me. All that remains is a fat eighth of the center cream and the blue gingham. How's that for using it up?

Enjoy the day, Ann

Tuesday, February 9, 2016

Bordering Rhythmic Grid

Adding the borders to Rhythmic Grid this week.

There wasn't enough fabric in original green centers (bottom left.) Someone had cut the piece on the diagonal and refolded the remnant. So I got to add two leftovers from kaleidoscope to fill it out. I like them even better than my first choice.

BTW, you can see at the top how I'm waiting to cut the final rectangle for the border until the other pieces are sewn. I want to make sure the width is close to what's needed.

Adding the border, Rhythmic Grid

But now the blue gingham jars. I replaced some with the last of the brown. It's coming along

Dark brown replaces some blue gingham
in the border of Rhythmic Grid.
Enjoy the day, Ann

Saturday, February 6, 2016

Rhythmic Grid Begins and AHIQ Wrap Up

Another great AHIQ link up. Kaja and I are delighted with the response. The projects cover a broad range of improvisation highlighting its diversity. Several people told us how happy they are to have a place to share their interest. We can tell: viewers click the links and leave insightful comments on many blogs. Conversations begin; others join in. Thank you so much for making this linkup a success. We look forward to our next one, February 22. What will you have to share?

This month's score in my study group was Rhythmic Grid. From the moment I saw it on the cover of Improv Handbook for Modern Quilters, Sherri's bold boxes in strong, clear blues and apple reds had me chomping at the bit to try it myself. However, the month got away from me. Okay, grandbaby cuddling took precedence but {I thought} I had a plan. Turns out I had a lot to learn.

The peachy-cream polished cotton came from the Britex sale room. It was supposed to be the border of my selvedge string quilt. The leaves looked good against the fabric but it did not work with the top. Not awful; just like they were two different tops.

Selvedge leaves as a possible border

The polished cotton should have gone into a box. Instead, it only made it as far as the to-be-filed pile where it caught my eye daily. When MK sent a reminder of the meeting, I knew I had to get busy. Starting here I pulled five other fabrics that {seemed to} go together but also had a definite color shift for the permeable border of rhythmic grid. And immediately forgot to take a photo.

The inner sashings were pink/green/tan stripe and brown with coral polka dots. When laid out, the brown had too much contrast. The stripe turned out to be a fat quarter and was almost gone.

Original row for Rhythmic Grid

Next I pulled a coral red batik and a large floral Alexander Henry. After unsewing one brown side, I set the others aside. That turned out to be a wise decision.

Adding the sixth row to Rhythmic Grid

As the quilt progressed, it needed some darker areas. Back came the original sections, reworked into diagonals. By the sixth row, only some floral and a bit of the cream solid remained.

Surprises:
  1. Not checking fabric amounts carefully before beginning.
  2. Quilt size affects the color values. The brown was too strong for a small section but perfect as the quilt increased in size.
Discoveries:
  1. Construction worked best for me when I cut the sashing strips first and then filled in the solid center. 
  2. Wait until the two-, three-, and four-sided units are sewn before determining the width of filler units, those with no colored strips on any side. All those seam allowances take more room than I planned. Good thing there was enough cream filler.
On to the borders!

Enjoy the day, Ann

Tuesday, January 26, 2016

Improv Rail Fence and AHIQ Link up #5

Like Kaja, it's been an unexpectedly busy month for me. Best? Visiting my new grandson.
Worst? Computer crash again. It's extremely hard to get any photos uploaded and impossible to follow links.

I finished quilting Improv Rail Fence. Again I squared the quilt with a ruler before binding. It seems to work better for me although it does remove more of the top than would happen with a more traditional pattern.

Improv Rail Fence

Striped binding seemed a good plan but there wasn't enough of either. So I used both.

Binding detail

Quilt Details
Size: 82"(H) x 59"(W)
Batting: Mountain Mist Cream Rose 100% cotton
Thread: Aurifil 50/2 cotton thread in pink
Quilting: Free motion swirls and flowers

Previous posts:
1. Another Improv String Quilt
2. Improv String Quilt, a Beginning

Enjoy the day, Ann

InLinkz removed because site was hacked.

Saturday, January 9, 2016

Floating Squares Finished

The top was pinned before Thanksgiving but I finally quilted it just before the new year. Very simple straight lines with a walking foot. Again I chose to square up the edges with the ruler.

I liked the challenge of using scraps to make the blocks and finding a way to put them together. One diagonal is roughly red/pink; the other green. I have several ideas about blending the edges of the blocks next time.

Floating Squares

There was almost enough of a brown and pink print for the binding. It needed a foot of light pink leftover from the Chinese Coins string to complete. You can see it at the top left of the photo below. Machine sewed on one side, hand stitched on the other.

Floating Squares, view of quilt back

The back used vintage yardage from my stash with 12.5" string block squares that were leftover from another project. I love using up the scraps. :-)


Quilt Details
Size: 60"(H) x 56"(W)
Pattern: Floating Squares from Improv Handbook for Modern Quilters
Batting: Mountain Mist Cream Rose 100% cotton
Thread: Gutermann 50 wt. cotton thread in pink (800 m spool)
Quilting: Walking foot on a Bernina 1230

This is a perfect size for a toddler, lap, or picnic quilt. Just waiting for a home...

Previous posts:
1. Floating Squares Begun
2. Floating Squares Top Complete

Enjoy the day, Ann

Tuesday, December 29, 2015

Metamorphosis and December AHIQ Linkup

I'm still working on the sawtooth quilt. As I wrote in my last post, the original thought was to alternate strips of triangles with a tan or beige sash. Part of the inspiration came from Serenity Now by Lara. Isn't this a calm, sophisticated quilt?  (Of course, she has diamonds that point lengthwise and no sashing.)

But then...
Sujata posted a photo on Facebook of a vintage Ghanaian textile, asking if it inspired anyone to make a quilt. Of course I loved it; it was RED. Narrow strips were woven then sewn together to create the width. Did you notice the areas where the weaver substituted white for red?

Esther Fitzgerald Rare Textiles
- early 20th century, Ewe people, Ghana

It could be interpreted in two sets of Seminole piecing, but that almost seems too literal.

The sawteeth were progressing. While sewing more units of six, I had an epiphany. These rectangular units compare to the red rectangles in the Ghana textile.

Testing different background fabrics
with the sawtooth units.

I pulled quiet cream/white fabrics, quickly deciding white was too severe. Next I pulled browns, tans, yellows or reds to create an insert. The Ghana textile called for bright red; the recipient called for neutral. After cutting a few samples, I got lucky. M-N suggested combining the red and yellow polka dots after dinner one evening. Later I remembered this quilt in Rod Kiracofe's last show.

Quilt from Found/Made show by Rod Kiracofe,
San Jose Museum of Quilts and Textiles.

The way the maker cut and seamed along half the polka dot, sometimes matching the colors of the dots and plaids, is masterful. Thank you for the guidance, M-N!

Deciding between dark red
and mustard yellow polka dots.

The yellow reverses to blue which added a subtle variation. Although I tried fussy cutting, the dots on my prints are much smaller than Rod's. My polka dots roam free.

Some sewed inserts with the reversible fabric.

I chose to keep as much of the sawtooth units as possible and optimized the cutting lines to that end.

Blue sawtooth sets on muslin background strung together by narrow strips of maroon, soft yellow or pale blue dotted fabrics.
Improv sawtooth quilt top

This quilt underwent a series of unexpected changes during construction. Evolution or metamorphosis? Did it change in response to external forces or was this quilt always there but needing time to develop? It was beneficial to look, listen, and ponder - steps I intend to do but frequently neglect to take the time. I'm so pleased with the top; the recipient likes it, too.

Detail of improv sawtooth quilt top.

It's on the design wall while I ponder quilting designs.

Enjoy the day, Ann


InLinkz removed because site was hacked.


Monday, December 21, 2015

Doodle Quilt

Our book study group is currently on the doodle quilt in Sherri Wood's Improv Handbook. One month we simply doodled in our sketchbooks. ML led the meeting, posed thoughtful questions and kept us (ok, me) on task. Clockwise from top left: Tami, MK, 5 pages by M-N, me.

Doodle sketches from Improv book study

Tami and I discovered our first sketches were quilting designs; we had to lift the pencil to create piecing designs. She chose to explore assembling orphan blocks and other leftovers and may use a round robin/medallion format.  MK decided her striation layers called for more study. I like the Housetops (or quarter log cabins) and want to repeat them in more colors. But my doodle blocks will start with long sawteeth or triangles.

M-N had the most interesting sketches. Starting with discrete units, she connected them with theatrically motivated designs and realized she had sketched The Odyssey! Hopefully she'll write a post about it soon.

We spent another month sewing some of these ideas. I considered restarting to center more on Sherri's guidelines but finally decided to continue with one design. I cut the rectangles freehand but used the ruler on the diagonals. 

In the mean time...

Another friend is graduating college this spring and wants a quilt. Since she attends LSU I expected purple and gold but instead she likes blue and neutrals. It seemed like a good idea to make the sawteeth in her color scheme.

Blue and cream fabrics cut into long triangles

Lots and lots blue and cream/beige sawteeth. My first thought was to sew rows of teeth the length of the quilt and separate them with long tan sashing. To emphasize the fabrics, I sewed pairs of matching triangles together. In fact, sets of 6-8 triangles in the same fabrics seemed to work best.

Repeated fabrics make 
strong sets of sawtooth triangles.

Enjoy the day, Ann

Tuesday, November 3, 2015

Two Improv Round Robins

It's certainly been a busy month with a couple of trips, visiting friends, several quilt meetings, and the PIQF show. Most of my quilting time was spent on the Lobster Boat quilt for my grandson-to-be.

CQFA (California Quilt and Fiber Artists) is a smaller group that takes turns leading workshops. Round Robin from Improv Handbook for Modern Quilters was suggested.  Because I'd previously taken this workshop from Sherri Lynn, when the day arrived I was the leader. What a great day we had! Each top passed to seven quilters. Their personalities show in the sections they added.

Here's the top I took home.

CQFA Improv Round Robin 

My signature fabric, which I used on each top, was the green and yellow large moon print next to the orange feathers. I like the way everyone balanced additions to this quilt. The two red columns are especially strong and pleasing to me. My one regret is that I grabbed leftovers rather than pulling fabric. These small scraps are wonderful but each was already ruler cut the widths you see in the quilt. Very rectangular piecing rather than freehand cut. Live and learn.

Two weeks later the Book Study group met for our Round Robin. We stopped after the first round to take a quick photo of our beginnings. (Thanks for the reminder, M-N!) Clockwise from my Finnish flags in the bottom right: Tami, M-N, and MK.

MK shared results from a Floating Squares workshop she took with Sherri Lynn. It's a good read.

Bron gave me the lavender and cream print I used in the HSTs and as my signature fabric. You can see it best at the bottom of the last photo. The selvedge says it's a 1998 Nancy Crow design. How styles have changed!

First round of Book Study Round Robin

We completed six rounds which meant we worked on some tops twice. The results are below.

Finished Round Robins for me and MK

Finished Round Robins for Tami and M-N

Our next Ad Hoc Improv Quilters Linkup will be November 24. It's always the last Tuesday of each month. We hope you will join us with a link or simply come to read the fabulous posts from other improv quilters.

Enjoy the day, Ann


Tuesday, October 27, 2015

Chinese Coins Improv String Finished and AHIQ Linkup #2

I chose to square off the edges with a ruler, then quilted and bound the Chinese Coins improv string with a very soft pink solid. Light bindings attract me more these days.

Chinese Coins Improv String quilt

My first quilting idea was a combination of lines and circles like one of these sketches but Tami suggested a freehand diamond grid. Much more in keeping with the quilt. (Thanks, Tami!)

Quilting design sketches
Detail photos.

Chinese Coins improv string detail with red column

Chinese Coins improv string detail with crosscut column

Quilt Details
Size: 65"(H) x 57"(W)
Pattern: Improvisational Chinese Coins
Batting: Mountain Mist Cream Rose 100% cotton
Thread: Auriful 50/2 cotton threads in pink
Quilting: Walking foot


More information about creating this quilt on these posts:
1. Beginning Improv String Quilt
2. Improv String Quilt Pieced

Enjoy the day,
Ann

InLinkz removed because site was hacked.

Friday, October 16, 2015

Selvedge String Quilt Resewn

The Selvedge String quilt is back together. Although most people won't notice any difference, I like it better.
Selvedge String quilt, resewn final seam

Here's what it looked like the first time. The lighting is better in this photo but the long selvedge from side to side bothered me. That's what I removed.

Selvedge String quilt, before resewing.

Because I added fillers, there are still places where they point in opposite directions when they meet, but it no longer feels like opening a book.

Selvedge String quilt, detail of final seam
Border next.

Enjoy the day, Ann

Tuesday, September 29, 2015

Selvedge String Race Quilt and First AHIQ Link Up

This is why I keep my fabric in clear containers. When I decided to save selvedges, the only empty spot was a small drawer. Stuff kept going in; nothing came out; it was easy to forget. But now that it's come to light, I simply have to "make it or move it." My improv book study chose to work on strings again this past month. I have several ideas but these selvedges are screaming for attention. So I'm combining the two projects.

Selvedges stashed in a drawer are finally brought
 to light when the drawer no longer closes.

Problems:
  1. Huge variety of lengths. Some selvedges are one-eighth yard while others are three yards.
  2. I saved both sides of the fabric. One has printed information while the other may not have any white at all.
  3. Some selvedges are bound-edge while others are fringe-edge.
  4. I don't want to use a foundation. (The Hotter'n Hell Hundred helps explain my disinterest in thick quilts. No. I have not raced, but I have lived through these summers.) 
Racing reminded me. My sister made a Jelly Roll Race quilt at her guild retreat last year. I've never made one and don't buy jelly rolls but the fabric shape seemed similar enough. Sew long strips end to end making a very loooong strip. The ends are brought to the top so two sides can be sewn together to the fold. Cut and repeat until your quilt reaches the length/width combination you want.

Starting on the woven edge, I backstitched to keep it from unravelling when I cut the thread close then sewed off the cut side.

A new problem arose. Because the selvedges can only be sewn one way, that loooong strip has to be cut in half before sewing two strips on the side. That's manageable although the strip is as long as Rapunzel's hair.

I tried to pair both selvedges from each fabric but otherwise just used them as they came. Random selection. They range in width from a scant half-inch to three inches. Greater consistency would be better if I cut selvedges again - perhaps one-inch past the printed section or 1.5 inches total.

Here's what it looks like with the first two strips sewn.

Selvedges sewed end to end.
Then overlapped and sewed together.

The improv book study met the next day and I had only completed one more repetition. Mine is on the left in an accordion fold (Ten folds actually.) Look at the delicious results from everyone. Clockwise from mine, Tami alternated glorious golds with skinny navy strips. MN organized her strips into color groups and crosscut each with an X. She's almost finished binding this delightful small quilt. ML created wonderful mockups of different ideas using digital color photos. (She keeps them in a binder. I need to adopt this idea.) Now she's creating a table runner with large triangles of strips.

A second month of String tops 
from the Improv Book Study

I kept working that evening. Here it is after four rounds of cutting and sewing. Wow, a string sheet. The Race is on!

Use selvedge strings to create fabric.
Selvedge Race string sheet.

The sheet curves to the right rather than straight. I need to think some more.

It's time for our first Ad-Hoc Improv Quilt Link-up. Improv has so many different meanings. Although Kaja and I have written several posts recently, we are on tenterhooks to read your ideas and see how you've been working.

Enjoy the day, Ann

InLinkz removed because site was hacked.

Saturday, September 5, 2015

Another String Improv Quilt: Rail Fence

You probably realized there were {a few} extra string sheets from my previous quilt. Actually, there were enough to make an even larger quilt. Fortunately, that first one sparked several ideas for future quilts. String 1 reminds me of Chinese Coins with long bands of similar colors and all stripes pointing in the same direction. I want the stripes to point in both directions in String 2. What's an easy way to do that? Rail Fence.

Improvisational Rail Fence quilt

Although it's one of the most common string quilt designs, I'm sure recent examples nudged my consciousness. Sujata Shah has a delightful quilt along of her version of this pattern. I made one as a graduation present for my youngest.  Earlier this summer I saw Drew Steinbrecher's Line Study #4. Wow! Gloriously clear colors with stripes pointing in both directions... like a rail fence. Bill Volckening shows a rail fence from 1975 on this post. Plummer Pettway of Gee's Bend created this version she called Crazy Quilt documented by Auburn University. It's frequently listed as Roman Stripe but looks like rail fence to me.

First, I laid out most of the leftovers to get an idea of size. Sherri suggests this in her book, IHMQ, as a great way to determine approximate amounts of fabric. Many of these are already cut into pseudo-squares but some are still long sheets.

Leftovers from Improv String 1

Then I moved some sections. Basically a rail fence at this point. I want to experiment by varying block sizes more.

Beginning String 2

As usual, I started sewing sections together in rows from the top left. Wrong move. The quilt becomes columns. That worked for the previous quilt but not this time. Section lines can be hidden by building up several distinct areas. Sherri (Daintytime) mentions this in the Floating Squares score as does Amanda (Crazy Mom Quilts) in Scrap Vortex. So I went back and put some smaller pieces together, building larger and larger sections. Sometimes two small blocks join to one larger block.

The colors were becoming mushy as the section sizes increased. A lavender-and-white-stripe home decor fabric and three darker blues from the discarded set increased the value range. Some strata are too long; I plan to cut them. Others, I left whole. To mask long fillers, Sherri suggests strips pieced from multiple fabrics (IHMQ, p. 29.) Amanda uses a similar method to equalize larger blocks. Pre-sewing a few pieced, skinny, filler strips might keep me from adding overly long pieces. {Didn't I say that last time?} Where to find some...

Adding lavender and white stripe

The paper pieced remnant below was my first attempt at an inner border on the watermelon string quilt. It didn't work there and it doesn't work any better here. Oddly enough, the only place it has fit is the Round Robin quilt - cut into three parts.

Leftover paper piecing as a possible filler strip

Another dive into the scrap bag brought some string-pieced triangular crumbs. I made them a few months ago, thought they were ugly and tossed them in the bag. Not only do they fit here, they also are those pieced, skinny, filler strips needed to join larger sections.

Reworking the layout; adding pieced triangles

The final scrap of a sawtooth border print only works because of the other triangles and the added blues. It's on the right. Do you see it?

Sewing sections together

I love, love, love different stripes. Especially red. Some of my striped fabrics are printed along the warp, others along the weft. In both cases, I cut across the fabric width (weft-wise as it were.) It might have been better to cut across the stripe whichever way it fell. Something to consider.

Kaja's post this week suggests starting an improv quilt with a single shape. What are your fabrics suggesting to you?

Enjoy the day, Ann

Saturday, August 22, 2015

Improv Immersion: Rod Kiracofe Shows and my Study Group


Rod Kiracofe just gave a walk-through of Found/Made, his current show. He included works from several major collectors, contemporary artists, and quilters. There's a list on the San Jose Museum of Quilts and Textiles website. Rod can "charm the birds from the trees" as we'd say back home. Not only did he talk gallery owners and artists into contributing works, he convinced the owners of one quilt to take it off their bed so he could use it!

The works are much more nuanced in person that they could ever be in a mere photo. You can clearly see Rod's sophisticated and whimsical eye in the staging of this exhibit. He effortlessly highlights relationships between different artists causing viewers to consider what inspires them and how those touchstones thread through time. The show runs until November 1, 2015, so make plans to see it.

Quilt tops hung on a clothesline point the way to the entrance. The one in the middle is entirely double-knit polyester, very precisely cut and pieced. I wonder if it was made after 1979 when rotary cutters became available? Rod deliberately hung the one on the left backwards so visitors could see the sewing and seam allowances. You better believe I checked each seam closely. Extremely interesting but also a cautionary tale to quilters: "If you don't finish your tops, everyone can (and will) take a gander at your piecing!"

Quilt tops from Found Made, a quilt exhibit curated by Rod Kiracofe at the San Jose Museum of Quilts and Textiles
Rod Kiracofe at the entrance to Found/Made,
his exhibit at San Jose Museum of Quilts and Textiles.
Photo used with permission.

Rod has collected quilts since the 1970's. Among his many books, he wrote two seminal quilt histories. The American Quilt: A History of Cloth and Comfort 1750-1950 is an excellent chronological overview of quilting through those centuries. His newest book, Unconventional and Unexpected: American Quilts Under the Radar, 1950-2000 focuses on the eccentric, improvisational quilts dear to his heart. In my opinion, Okan Arts wrote the most interesting review.

This past April Rod curated Unconventional and Unexpected at the Sonoma Art Museum, juxtaposing quilts from his book with Shaker furniture and tools. Fan (partial view below) appears on page 146. Rod collected it from Wood County, Texas, which just happens to be the birthplace of my husband. How's that for coincidence?

From Unconventional and Unexpected, Sonoma Art Museum and the book of the same name by Rod Kiracofe.
Fan from Unconventional and Unexpected,
Sonoma Art Museum. Photo used with permission.

Pools of light emphasized the rich colors and textures of the quilts and brought the soft patinas of the wood into focus.  I was especially struck by the quilts he hung as if they were on a clothesline blowing in the breeze. Obviously, that image evokes strong, early family memories for both of us.

Unconventional and Unexpected,
Sonoma Art Museum.
Photo used with permission.

On a more personal note, four of us meet monthly to discuss sections of The Improv Handbook by Sherri Wood. We share our current project, inspirations, roadblocks, detours, and successes. Although we are working the same score, our results differ wildly, showing that artists and artisans working in community can sometimes reach greater heights than working in isolation.

Floating Squares from our study group.
Same score but four different results.
Last month we brought floating square tops. Clockwise from the left in the group photo above. Mine was large and scrappy; I already posted about it. MN grouped her green and red fabrics into strong color-blocks on a baby quilt. She's written two posts: the beginning and the finish. MKreative started a table runner of very sophisticated triangles that she wrote about here. Tami's selected aquas and purples from her scrap bag. She hasn't written a post yet but her blog is here.

After we've exhausted our discussion, taken photos, and enjoyed our tea, we choose what we want to explore next. While it's lovely to write back and forth with quilters in blogland it's even more fun to share, learn, and laugh in person. I'm very lucky to work with these talented women.

Enjoy the day, Ann

Saturday, August 15, 2015

Improv String Quilt Pieced

I was more restrained with the final two string sets for the String Score. About half the sheets are Group 1 (blue/green) with a quarter each Group 2 (red) and Group 3 (light). Colors overlap between groups but each single fabric is only in one group. The widest sheet was 40". The others are 15-20" wide. They were very manageable although I pieced them to get sections long enough for this quilt.

Improv string quilt, Chinese Coins, red, sky blue, green
Improv String 1 finished

Last month I decided to empty the scrap bag. I've been pulling from it for two years and there was a growing bunch of really dull pieces in it. {The swash zone of leftovers.} As a last attempt to use everything, I string pieced some twelve inch blocks (like those used in this quilt.) There weren't enough to make a top and the dark ones were particularly ugly. The light blocks had possibilities here. I sewed three together in a row (12" x 36") then cross cut them and sewed those into the lights. Some of the print fabrics are indistinct, especially when sewed next to each other. But when strong colors/patterns alternated with a light fabric, the crosscuts draw the eye in another direction. Hmm.

String sets with crosscut sets inserted

Perhaps more of the string should have been solid. This style compares with Trip Around the World. Adjacent large scale fabrics blend together and lose the design - strings in this one, squares on the diagonal in Trips. (This idea could be a future string variation: soft or strong lines based on the type of print used.)

Improv quilt made from columns of strings. Chinese Coins
Eight sections cut for this String quilt

Here are the eight sections of this quilt. I liked those crosscut inserts so much I finally added the vertical blue strip to utilize the last of them. Stripes and plaids add life to the sheets. The striped fabric really pleases me. I'd like them to run in the other direction, too. (The crosscut inserts do that somewhat but they are much more subtle.)

Sherri wrote that the seam line is stronger (more apparent) than any color in these strips. But when I first laid the light and green sections together I thought they were too similar. So I cut a few medium blues from the discarded group and used them to join parts of the shorter sheets. You can see them in the third column from the left. They actually caused these sections to blend more. Compare them to the columns on the right.

Sections were pinned together
before cutting along the sewing line

The long sections were butted against each other with as little overlap as possible. The sections moved while cutting along the future seam line so I pinned the overlap as a cutting guide. Cut slowly to avoid nicking your scissors with the pins.

Inserting fabric into Improv string quilt, Chinese Coins
Possible vertical inserts

The previous post about this quilt is here.

Enjoy the day, Ann