Kaja and I plan some changes to AHIQ this year to help newer quilters embrace this movement. Even experienced quilters have written of their diffidence with improvisation so we hope you'll enjoy our Invitational, too.
We invite you join us as we start a new quilt idea {or kernel} each quarter. The first month will introduce our quarterly theme. We'll share our progress the second month as well as our improvisational ideas. There could be finished tops to share by the third month. We hope you will write and link posts on your progress monthly.
Participation in our AHIQ 2017 Invitational is entirely optional. Continue to post your current improvisational or utility quilting, too. It wouldn't be improv otherwise.
#AHIQChineseCoins
I'm starting this party with a Chinese Coins strippy quilt. While making one last year, several more ideas occurred to me, always a good sign. This design can easily combine scrap quilting and improvisation. It's friendly to both traditional and artistic styles, beginners and experienced quilters, and has more variation than you might expect.
Chinese Coins or Roman Coins probably refers to the fact that these highly developed civilizations created standard coins quite early. At its most basic, rectangular scraps sewn together like stacks of coins form columns. These are sashed with lengths of a single fabric... or not.
There are few exact instructions. The strips can be any width or height as can the sashing and these can vary from one column to the next. You can even omit the sashing. Columns can be turned vertically or horizontally. I've seen strip columns made of crazy piecing, UFO blocks, and selvedges. {Some people would classify these types as strippy quilts but let's be more general.} Repeating the sashing fabric in some of the strips gives an
open grid design.
Traditional Example
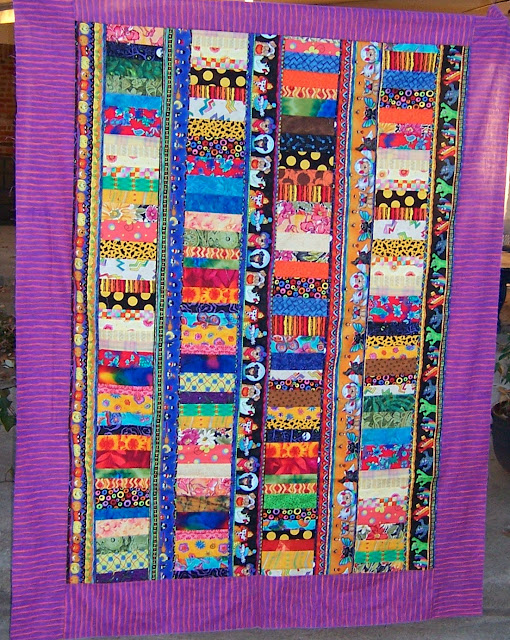
This is a philanthropy quilt I made years ago. The sashing was cut from a single striped Halloween fabric. Six-inch-wide coins of various heights were sewn together randomly until they matched the length of the Halloween fabric. Everything was cut with rotary tools. Notice the same fabrics appear in each column.
 |
| Halloween Chinese Coins scrap quilt |
Improvisational Example
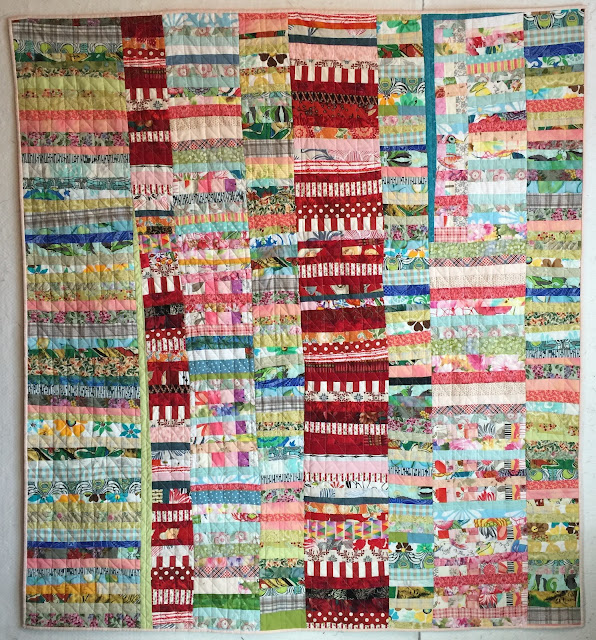
Next is a more improvisational version of Chinese Coins. Each column contains only one of three sets of fabric. Many of these came from my scrap bag but there are also remnants and yardage in it. I used both rotary tools and scissors to cut the strips. Once the columns were sewn, I butted them together to trim overlap and determine where vertical strips were needed to fill empty spaces. More notes about this quilt on posts listed
here.
 |
| Chinese Coin Improv string quilt |
More Examples Across the Internet
Here are a variety of quilts that push the boundaries of Chinese Coins classification. Some are more improvisational than others. Most of them have additional aspects so their makers may not consider them Chinese Coins. I group them because they have a basic design of stacked strips in columns (or rows).
Sometimes the simplest construction highlights the most masterful quilting. These are listed first because of their straightforward {basic} construction. But make no mistake. Each of these is a masterwork of fabric, layout, and style.
 |
| Chinese Coins by Freddy Moran, used with permission. Photo by M Beach |
- Freddy Moran made this Chinese Coins with her signature colorful fabric.
- Gina Abayan of the Philippines created her quilt from solid fabrics only. She rotated her work 90 degrees so the coins are vertical. Her columns (now rows) appear to be hand-cut but about equal width.
- Wanda at Exuberant Color also rotated hers. She organized her printed fabrics by value so well that you can almost see the sun highlighting this quilt.
- Cassandra Ellis lists the variety of "found fabrics" used in Katie's Quilt in her post. It's also rotated. {Am I seeing a theme?}
- Edeltraud Ewert created one of my favorites which seamlessly crosses boundaries between traditional, improvisational, and even modern. Art at it's best.
Applique can easily be incorporated into this design.
- All a Flutter by Judy Crane appliques trees, leaves, and birds on a Chinese Coin background. Notice the strips are divided by color and the coins are rotated again.
- Mel Beach used a McCall's pattern to applique cheerful floral vines with cute buttons on the sashing between her Coins. As usual, her color sense delights.
If you want to try more challenging improvisation or think Chinese Coins is too simple, look at these three quilts.
- Kaja's Build Me a Wall incorporates vertical strips (rather than sashing) and reverse applique squares into a basic columnar Coin layout. Her middle section divides into two columns at the top. Notice the visibility of each column despite the fabric repetition. The vertical seams create their own boundaries. Her borders unify the composition without encasing it.
- Sue Kelly recently made a top based on Point Reyes seashore. Her final version reminds me of horizontal Chinese Coins with sashing strips in several colors and widths.
- Nettie Young of Gee's Bend created Stacked Bricks in 1928. Her quilt is composed of rotated double brick (or coins) columns that are sashed and posted.
Do you need still more inspiration? Check out my
Chinese Coins Pinterest board or Google "Chinese Coins", "Stacked Coins", or "Strippy quilts."
Getting Started
Although we are approaching this improvisationally, I was planning to write instructions to aid beginners until I found Mary Johnson at
MaryQuilts and
HeartStringsQuiltProject already posted great directions. Her traditional version guides you through the basic construction.
- Overview on Chinese Coins quilt.
- Construction directions.
How much fabric? Assuming a 50"x60" quilt {without borders or sashing} and 2"x5"finished coins, you will need between 2.75 and 3 yards of fabric. Changing the coin sizes, adding sashing, or any other variations will alter the yardage requirements.
Are you in? Then go through your scraps, remnants, and yardage for the colors and fabric that speak to you. Try sewing some coin blocks or units. You don't need to sew an entire column all at once. Let's meet back here next month to share where we are, what we've discovered, and any questions we have.
Be sure to tag your photos with the hashtags #AHIQ2017Invitational and #AHIQChineseCoins so everyone can find them more easily on social media.
Enjoy the day,
Ann
InLinkz removed because it was hacked.


