Showing posts with label Steam Punk quilt. Show all posts

Wednesday, March 25, 2015

Final Tour: Propellers and Planes with a List of Previous Posts

Propellers and Planes, my Steam Punk, hung in our guild show this week along with many fabulous quilts by members of SCVQA and BAM. It's the first, and probably only, photo of the entire quilt. The colors aren't quite right; they are much truer in the previous posts, but at least you can see the entire layout of the quilt.

Steam Punk quilt blocks grouped in fours with sawtooth sashing of dark blue and white is bordered with chartreuse
Propellers and Planes quilt

Here it is again in lighting that shows the colors better. But it's not hung high enough. This really is a softly colored quilt with small bits of bright fabrics on occasion.

This scrap quilt features many conversational prints, scale change of block, sawtooth sashing
Propellers and Planes quilt

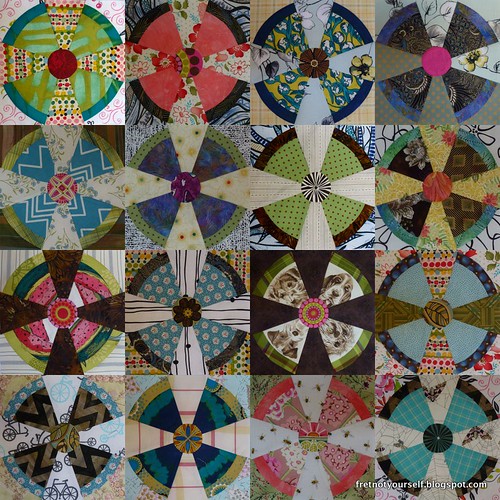
There is a huge variety of fabrics in this quilt. The oldest was purchased in Boston about twenty-five years ago. The newest were purchased last year. Sue Benner gave me one of her hand-dyed pieces. After being saved (and petted) for more than a decade I used it here. There are scraps from quilts I made for my children, my new daughter-in-law, my parents and my dear friends. Some, like the 50's mannequins, simply make me laugh. All bring back memories of people and places I know and love. Now we sleep under it. What great good fortune. I wish everyone could wrap themselves in cherished memories every night.

A collage of some of the fabrics incorporated in Propellers and Planes

Not wanting to piece batts, I looked for a really large cotton one. There were not many choices but Pellon (yes, the interfacing company) makes one. It's 100% cotton with a very flat, almost felt-like appearance that reminded me of Warm and Natural. It is also warm, heavy and has a beautiful drape - think brocade. It would be a great choice for a wall quilt. Unfortunately, it was only 120" in one direction and I had to piece about four inches of batt in the other direction. Grr.

I used YLI invisible thread (nylon monofilament) for ditch stitching along the sashing then switched to Aurifil Mako 50/2 in grey and light green for the rest of the quilting.

Here are links to previous posts.

Steam Punk Blocks, February 2014
Second Set, March 2014
Third Set, June 2014
Fourth Set, July 2014
Fifth Set with Construction Notes, July 2014
Final Set, July 2014
Putting Steam Punk Together with Sashing Notes, August 2014
Where Do You Get Your Ideas, August 2014
Steam Punk Back, August 2014
Enlarging Circular Blocks (How I Made the Large Propellers), December 2014
Quilting Steam Punk, January 2015
More Quilting, January 2015
Binding, February 2015
Quilt Show Ready, February 2015

Wow. A year of work and fifteen posts. I like to read about your processes and hope you like this much information, too.

Enjoy the day, Ann

Saturday, March 14, 2015

Pi Day 3.14.15 @ 9.26.53

It's Pi(e) Day. Another crazy reason to celebrate.

Pi is the ratio of the circumference of a circle to its diameter. It's an irrational number (which just means it can't be written as a fraction because the digits don't end or repeat) whose first few digits are 3.141592653... March 14 is extra special this year because we can correlate those digits to a specific time down to seconds. Nerds are thrilled.

It seems like a good day to celebrate circles in quilting. My favorite circles are my quilt guilds: currently SCVQA and QGGH. I've joined a guild everywhere I lived. They are always a source of friendship, inspiration and education. I hope you have a group of friends as inclusive and supportive.

On to circular quilts.

Although New York Beauty isn't finished, there is some progress. Only sixteen more. Even though these blocks are a decade old, I still like the colors and the pattern. {Why, oh why, didn't I finish it with the millenium?}

Red, pink, green and blue quilt blocks with quarter circles and five teeth.
New York Beauty in progress

All my quilts in the show this weekend have circles or curves. There have been many photos, but here's a new one. I used this fabric (a decade ago) to applique on t-shirt quilts for my daughter and her friends who all had dogs. This is the last of it. Does that make Propellers and Planes a scrap quilt?

Four brown and cream dog faces form the blades of this propeller shape. The outer band is a green plaid.
Steam Punk quilt block
from Propellers and Planes
with dog face conversation prints

Windmills is my current project. The block has slight curves. I'm echo quilting a quarter circle over the top.

Multicolored fabrics are improvisationally cut to form windmill blocks.
Quarter circle curves echo quilted across Windmills

The quilting shows up better from the back.

Windmills back with leftover blocks. 

I drew one line on the quilt using my cutting ruler. I placed it in one corner, rotated the ruler and marked with chalk at intervals. Then I connected those dots. That was my first quilting line. Subsequent lines are a walking foot away. This seemed like a better idea than starting in the corner.

Mark the first arc 24" away from the corner. Use the walking foot to echo that curve.
Example of marking the first line of quilting on Windmills

And we're having lemon meringue pie for dinner. Yum.

Enjoy the (pi) day, Ann

Friday, February 27, 2015

Quilt Show Ready

As you know, there are so many little details before a quilt is truly finished: burying threads, binding, label, sleeve (if it's in a show), washing, blocking. But finally, all three quilts are ready for the SCVQA quilt show March 14-15 at the Santa Clara Convention Center.  It's not judged; simply a way to share what we've been working on the last two years. And Bay Area Modern has a section, too. If you're in the area I hope you will come.

My entries are Round Robin Improv (workshop), Curved Improv and Propellers and Planes. There's no room in my house to get a photo of the entire quilt. Hopefully I can get one at the show. And that will be my last photo of this quilt. Promise!

Steam Punk blocks and enlarged propeller blocks on point with sawtooth sashing.
Propellers and Planes (118"x118"), partial view.

Now to clean up the sewing room, relax a bit and then see what I can do with those New York Beauty blocks. Don't forget Pi Day! 3.141592653... translates to March 14, 2015 at 9:26.53 AM. How are you celebrating?

Enjoy the day,

Sunday, February 8, 2015

Binding Propellers and Planes (Steam Punk)

Propellers is finally quilted. Wavy free motion lines about a finger width apart fill the border. It's an easy, relaxing design which I needed after wrestling with the bulk of this large quilt. Maintaining a relatively constant width was the hardest part. Do you find that your line spacing grows and shrinks depending on the day? I certainly do.

Propellers and Planes quilt detail

When we visited friends in Berkeley last fall, I took the opportunity to purchase the binding and border at New Pieces. The binding is cut on the bias to create diagonal stripes. The first side of the binding is attached (by machine) and I'm hand stitching the back in the evenings.

It still needs a label, hanging sleeve and a good soak and block. It will be in the SCVQA quilt show at the Santa Clara Convention Center March 14-15. If you're in the area, please stop by. It would be so delightful to meet in person.

Some of my backs are unusual, even downright ugly. In my opinion, people only see one side of bed and wall quilts. That's my excuse to cobble those backs from leftovers and older fabrics. Propellers is a good case in point. The squadron of planes on the back used up many quarter yard remnants. These are good quality fabrics; many were used on the front. Most of the back's sashing is leftover from previous quilts. This keeps my stash and scrap bag in stasis. And it amuses me to think I'm providing fodder for future quilt historians.

Here's a view of most of the back...

Prop planes in formation, back of Propellers and Planes quilt

followed by a detail of one single prop plane.

Prop plane quilt block


The quilting shows up better in the detail, don't you think? All the quilting is Aurifil Mako 50/2 except the ditch quilting which is YLI Wonder invisible Nylon in Smoke on top and Aurifil in the bobbin. Smoke show less with medium to dark fabric values.

Sketch of airplane block here.

Lucky me. I recently culled some fabrics from my stash but forgot to take them to the guild meeting. They will make good hanging sleeves.

Enjoy the day, Ann

Friday, January 16, 2015

Photography Class and Propellers (Steam Punk Quilt)

There are many talented photographers in my family but I am not one. They very kindly take photos for me on all occasions. However, with everyone scattered across the country they are rarely on hand.

My youngest sister and I signed up for Ricky Tims' year-long online photography class. It was all her idea. I will learn basic photography skills such as how to do anything fancier than point-and-shoot. Baby Sis can improve hers since the class includes composition and photo editing.

Meanwhile, on the quilting front... I finished all the straight lines on Propellers (the name for my Steam Punk quilt.) Here's a photo of my worst straight line quilting. This block is near the center so was much harder to manage. I tried many methods to get the lines straight: walking foot, marking lines with pen and chalk, darning foot alone, ruler work (without the proper foot) and painters tape. All these methods work very well on a smaller quilt or closer to the edge of this behemoth (it's 116" square.) Just manhandling the quilt under the small throat plate made most of them ineffective closer to the center.

All propeller blades quilted.

I think I'll quilt around the blades next. More or less than the straight lines? Would you use 'swirls and pebbles', stippling, McTavishing or something else? In true Scarlett O'Hara fashion, "I'll think about that tomorrow."

Enjoy the day, Ann

Sunday, January 11, 2015

Quilting Steam Punk

Steam Punk's been pinned all fall. I even ditch stitched the sashing to stabilize the quilt with dark YLI invisible thread in the top and grey Aurifil 50/2 in the bobbin. Then I was stuck. A quilt this large and heavy needs more quilting simply to keep it together during use. I wanted some straight lines but not the same grid used on Trip Around the Block.  Life intervened: several family events, trips, and colds were a perfect excuse to set it aside for a while.

When I restarted last week, I decided to put straight lines on the blades. I marked endpoints on each blade and drew lines with a washable blue pen or white chalk, whichever showed up better. I only mark four blocks at a time and always start with the chalked marks since they seem to disappear quickly. By starting where the blades of two propeller blocks meet, I can work my way around all four without stopping. This saves times in starts and stops as well as having fewer threads to bury. I used grey Aurifil 50/2 cotton thread in the top and bobbin for the FMQ.

By starting where two propellers meet,
I can work my way around
all four blocks in this set
before stopping.

Because the ditch work subdivided the quilt into 18" sections, I started on an outside row. It's easier to work out problems there rather than in the center of such a large quilt.

Do you know how much I hate marking? What a chore; then it's still hard to see. But... the straight lines provide such a contrast. I usually use my walking foot to make straight lines; however, it was not possible to turn the quilt so frequently (and bunch so much under the quilt arm.) So I've been thinking about ruler work.

Detail of one propeller blade on Steam Punk block

Amy's Free Motion Quilting blog has a wonderful section on ruler work with a stationary machine. Her posts share loads of information about how to work with the rulers, which feet to buy or how to adjust your feet so they don't slide under the ruler. My question is how well this will work with my older machine (Bernina 1230.)  The throat plate is less than eight inches. Something to ponder.

After all the blades are quilted with straight lines I'll add curved free-motion quilting behind them, finish quilting the sashing, and do something in the border. Not sure what; time will tell.

Enjoy the day, Ann

Sunday, December 21, 2014

Enlarging (or Decreasing) Circular Blocks

Several people have asked how I drafted the larger blocks in my Steam Punk quilt. It's an application of basic high school geometry. No kidding. The geometric principle is this: similar figures have proportional lengths and congruent angles. That means you always multiply lengths by the same amount while angles stay the same.

Steam Punk quilt with larger and small blocks
How do you do it?

1. Measure your original block and decide how large or small you want the new block.

I won't give the exact measurements of Steam Punk; you'll have to buy that pattern. But let's pretend the original finished block was 4" and the blades intersect the side 1.25" from the corners (Fig. 1 below.)

Fig. 1 - example of original block at 4-inches

2. Calculate the scale factor (new finished block size/original block size) to determine how long the new segments will be. My new block finishes 8" so my scale factor (8/4) is 2.

Draw a new block 8" on each side (4" x 2) and mark the center of the block. Using the scale factor already!

Mark points on all four sides 2.5" from the corners (1.25" x 2). Scale factor again!

Fig. 2 - example of drafting an enlarged circle block

3. Draw lines from the center to these points on the side. (Fig. 3)

Using a compass with the sharp point in the center of the block and the pencil at the side point 2.5" from the corner, draw new curves for the blades. If your compass won't expand that far, use your ruler. Place the end on the center of the block and align the ruler through that 2.5" point.

Notice the measurement on the ruler. On my example it's about 4.25".

Fig. 3 - enlarged block with main lines drawn

4. Now rotate the ruler slowly in an arc, keeping the center at the ruler endpoint. Use your pencil to mark many small dots at the same length until you reach the 2.5" mark on the next side (Figs. 4 and 5.) Connect all those points to mark the blade curve.

Note: If you're making a really large block, use your rotary ruler. This tiny ruler just made the photo easier to shoot and see.

Fig. 4 - drawing a circle or arc on an enlarged block

Fig. 5 - enlarged arc is drawn

Once your block is drafted, check the central angles by placing your original blade and triangle templates on the new block pattern at the center. The sides should line up perfectly. The templates are just shorter than your new length.

The radius of the center circle will also be multiplied by the scale factor. So if it was one-half inch originally, it will be one inch in this example (1/2" x 2).

Trace each template, add seam allowances and you're ready to go!

Hope this helps. Let me know if you have questions.

Enjoy the day, the holidays and the New Year!
Ann

Saturday, August 30, 2014

Steam Punk Back

My husband thinks Steam Punk blocks look like those old television station test patterns. I see propellers. With that in mind I drafted thirty-inch airplanes to fly across the back. Of course they are made with leftovers from this project and bits from the scrap bag.

Planes of leftovers for the quilt back

It's amazing how hard accuracy is with such large blocks. They are bigger than my cutting mat and ruler. All these years I thought small blocks were more difficult.

Here are my sketches on graph paper. The airplane is fifteen grid lines across so I simply scaled each as two inches to create a thirty-inch block. You could multiply by a different scalar for another size.

Two sketches for back blocks:
Airplane or Old TV

Don't the blades of that Steam Punk block (in the first photo) remind you of the Polyphemus moth? It didn't fit in the top and doesn't seem like a good addition to the back either. Perhaps it will make a baby quilt. (I need another project like a hole in the head.)

Enjoy the day, Ann

Saturday, August 23, 2014

Where Do You Get Your Ideas?

Steam Punk is rolling along. Here's a quick snap on the design wall.

Quilt in shades of blue, chartreuse, green,  brown, red, grey, orange, pink
Steam Punk quilt top with sawtooth sashing

So many people wrote very supportive comments as previous photos were posted. Thank you all very much. A few said they would never have thought of this arrangement. That's the same way I feel when I look at your quilts. Isn't that why we're posting and blogging? To share ideas and build an artistic community.

This spring I read Steal Like an Artist by Austin Kleon. He posted his rules here. I see these guidelines as a tongue-in-cheek 21st-century rewording of John Donne:

    "No man is an island,
     Entire of itself.
     Each man is a piece of the continent,
     A part of the main."

So we go to shows and galleries, read books and blogs, attend guild meetings, interact with others. Mull over what strikes our fancy and let it morph into a new creation. This is not wholesale copying but rather a synthesis of ideas and techniques in the manner of the Impressionists. While each was unique, all were inspired by the interaction of color and light. They lived, worked and exhibited together. They shared models, locations and design layouts. You probably know this story about Mary Cassatt and Andre Degas but it's always fun to read. Their courage to break new ground came from their common bonds.

I've known about traditional New York Beauty quilts for years. Some of the best examples are in Bill Volckening's collection. He generously shared many at the San Jose Quilt Museum exhibit in 2013. Multicolored teeth, cogs instead of teeth, reverse colorways, elaborate or plain quilting. My favorite was set at an odd angle with crude patches in places before the border was added. What caused that design decision? Did a dog chew it or did the original maker die? My sashing is my first attempt to incorporate what I learned from this show.

The four 18-inch Steam Punk blocks

Large-scale prints that needed a showcase led me to draft some larger blocks. Kona Bay fish, Alexander Henry cherry blossoms, Kaffe Fassett floral and a batik. Some centers are this exceptionally bold print; the maker is not on the selvage.

Fabric used for some propeller centers

But Ruth McDowell's Pattern on Pattern (printed in 1991) must have also played a part. She updated traditional quilts with scale change, overlays and transparency.

My copy of Pattern on Pattern by Ruth McDowell

When I got stuck during construction, these ideas emerged. It's my work but it wasn't invented in a vacuum. Your quilts are just as unique a synthesis. That's why we love to read about the processes. What do you think?

Enjoy the day, Ann

Saturday, August 16, 2014

Putting Steam Punk Together

This quilt continues to be a delight! My two remaining decisions were whether nor not to sash the blocks and whether to set them straight or on point. Matching up all the propeller points didn't sound like fun. The block construction makes a thick lump of seams when they are sewed without sashing. Without sashing, the quilt looked better straight set. Everyone who commented preferred on point. But the density of the sets I previously posted still attracted me. So I did both: some blocks set together, some sashed.

Steam Punk in two sizes with single Sawtooth sashing

The propeller quartets keep the feel of my original sets, a few extra-large propellers add a change of scale and the sashing pumps it up. Happy dance!

I reduced the seam lumps a little by carefully unsewing all intersections that extended into the seam allowance. This top will not lend itself to straight line quilting but the sashing can be ditch quilted.

Originally I sketched the double sawtooth sashing of historic New York Beauties with its wide inner sash (in a color or muslin) and many little sawteeth on both sides. It's as labor intensive as the block - master quilter's work. This seemed too busy for Steam Punk so I switched to large triangles.
The base and height of the triangles are 2.25" which is the diameter of the propeller centers. I thought I might put circles in the posts but they were again too much.

Paper pieced sawtooth border

The triangles were drawn on graph paper, scanned and copied. I steamed each triangle after it was added, then turned the paper over and steamed again. By the time the sashing was done the paper tore off easily. I trimmed the sashing before removing the paper. It's easy to trim from the back with a rotary cutter since you already know your points are perfect.

This will be another huge quilt. It will take a while to sew together and even longer to figure out how and where to photograph it. I'll keep you posted.

Thanks for all the support and opinions, everyone!

Enjoy the day, Ann

Tuesday, July 29, 2014

Steam Punk Blocks: Final Set

Hooray! This is my last set. Some of the fabrics are from 'My Precious' pile. For example, the blade fabric in the second from left bottom row is from Sue Benner. Her work is glorious and I have treasured the scrap she gave me. I finally had the courage to cut it. Isn't it an improvement to be seen and enjoyed in this quilt rather than hidden in my stash?

Three blocks are made of leftover pieces from previous blocks... just to use them up. It makes this set livelier than the previous ones. Hopefully these odd blocks will be good blenders.

Steam Punk quilt blocks #81-96

The next task is deciding the final layout. I'm still debating straight set versus on-point as well as sashing (or not.) My original plan was straight set without sashing but I've had a few more thoughts. The original pattern was set on point with grey sashing. Jeannette at Gone Aussie Quilting started a SteamPunk QAL that now has 194 members. These fabulous quilters have posted an exciting variety of blocks, sets and quilts. Many of them are straight set... at least while they are being posted. Take a look. What setting would you use?

Enjoy the day, Ann

Thursday, July 17, 2014

Steam Punk Quilt Blocks - Fifth Set with Construction Notes

The Steam Punk blocks are almost done. Just a few more and then on to the sashing!

Propeller blocks in pinks, greens, blues and reds.
Steam Punk Quilt blocks 65-80

I've been taking photos of each block as they are finished and cropping the edges. That makes it very easy to create these collages in Picasa. Each collage inspires a slightly different set of blocks: lighter, darker, brighter, quieter. Previously I simply took photos of layouts on my design wall. Cropping and collaging with Picasa is a big improvement because it approximates the sewing edge. You can even add a sashing effect with any solid color by increasing the grid spacing.

Nine Propeller blocks in green, blue, brown and pink/red.
Steam Punk blocks with sashing

While we hope our blocks finish square that is not always the case. Especially curved seam blocks. After making a few I decided to alter my cutting method for the quarter circle corner pieces by cutting the outer sides of those pieces slightly larger than the template. I didn't change any other templates and still sewed quarter-inch seams.

Plastic template is positioned on fabric to show how larger outer seam allowance was cut.
Quarter Circle piece cut with larger outer seams

The extra seam allowance in the outer corners leaves enough room to square the blocks even when my sewing pulls one corner in.

Marimekko fabric in greens and blues is used with browns and yellows to create a Steam Punk block.
Top right corner of this block is not square. But larger seam allowance allows trimming.

Then I use my square ruler to trim the block to 9.5 inches with a quarter-inch seam allowance past the blade edges.

Steam Punk block ready to trim to size

I considered extending the seam allowance on the triangles also but using the correct size helped ensure the blades didn't get too big.

Here are my previous posts on this quilt:
First Set with Tutorial
Second Set
Third Set
Fourth Set

Enjoy the day, Ann

Monday, July 7, 2014

Steam Punk Quilt Blocks - Fourth Set

These Steam Punk blocks are rolling along now that I'm in the groove. Loving the novelty prints - bicycles, bees, koi and phones!

Steam Punk blocks with geometrics and novelty prints
Steam Punk blocks 49-64

Enjoy the day, Ann

Wednesday, June 25, 2014

Steam Punk Quilt Blocks - Third Set

My third set of Steam Punk quilt blocks. I still love the pattern.

Steam Punk quilt blocks in blues, greens and browns
Steam Punk blocks 33-48

Fret not; enjoy the day.
Ann

Friday, March 7, 2014

Steam Punk Quilt Blocks - Second Set

The first 32 blocks are done. It's been such fun, I wish I'd started last year. But perhaps I wouldn't enjoy the process as much if the UFO's weren't cleared out.

SteamPunkCollage2 by abbru
Steam Punk quilt blocks 17-32.
Enjoy the day!

Ann

Friday, February 28, 2014

Steam Punk Blocks

Quilting

For years I've wanted to make an airplane propeller quilt. Is it because of the curves? Or because, having sons, I am always looking for masculine patterns? Or because my grandfather loved to take us to the airport to watch planes? Not sure; but it's perennially attractive. Jeannette Bruce of Gone Aussie Quilting posted an invitation to join the Steam Punk QAL Flickr group last year. And guess what Steam Punk looks like? Yes! A propeller. So I joined and thoroughly enjoyed all the fabric combinations everyone made but... I had so many UFOs to finish first. This week I've finally started.

These nine-inch blocks resemble airplane propeller and are made with strongly patterned prints.
My first completed Steam Punk quilt blocks

The pattern by Australian Jen Kingwell came from Amitie Textiles. It arrived in the US less than a week after I placed my order. (Wow! Very quick.)

Then with unusual wisdom, I had a set of templates made by Rodney Shimogawa in Woodinville, Washington. His Etsy shop is Customplastic. What a meticulous craftsman! They are perfectly made with the template letter and a quarter-inch seam allowance etched on each thick acrylic template. And they arrived within a week, too! Honestly, I could rave for paragraphs about the templates. Why haven't I used them before? It just takes a small rotary cutter to cut around the curves.

My third super-smart idea was to order Bigger Perfect Circles by Karen Kay Buckley from Amazon. (I usually choose the hardest way. Can you tell I'm thrilled with all this uncommon brilliance?) The smallest template in this packet is the finished size of Jen's center, 2.25". So I cut the circles with the thick acrylic templates then I sewed a wide running stitch on my machine (everyone else does this by hand) and gathered them over the Perfect Circles. See this YouTube video by Karen Johnson for directions. And they are... perfect!

Here's what I learned sewing these first blocks. Curved pieces and odd angles mean the ends do not line up. If you're accustomed to squares this can throw you off. Pin liberally.

Sewing the propeller

1. Pin it! For the propeller, propeller edge and corners, fold the pieces in half and crease the center. Then mark with a pin and match the centers.

Mark the center of these pieces with a pin

2. Pin it! For each curve, pin the centers together first.

3. Then use a pin at the seam line of each edge. Notice that the fabric edges on the "straight" sides don't match up. They won't. Just make sure the corners of the seam line do.

4. Once you have a pin straight through the corners, use another pin to hold it in place.

5. Then pin halfway from each side and the center. Add more pins to help keep the back from pleating. I prefer to sew with the concave side down against the feed dogs and the convex side up. Do what works for you.

6. When both curves are sewn, gently press with a dry iron or finger press.

Pinning & sewing sequence from left to right.
Use the same process for both curves of the propeller edge.

Sewing the propeller to the background wedge.

7. The propeller and the background wedges are NOT the same angle so the ends do NOT match up. Pin it! Put a pin in at the sewing line of the propeller center and then through the sewing line of the background center. Look carefully at the arrow at the top of the photo below. There is a little "rabbit ear" where different angled pieces join.

8. Put a pin in at the sewing line of the propeller edge. It should be along the arc of the propeller edge. Then pin through the sewing line of the background edge. Look at the bottom left arrow to see very slight "dog ears"... not a long as the rabbit ear ;-). The top fabric in the example on the right is bent back a bit. Sorry.

9. Sew from center to edge to keep center from shifting.

Pin the propeller wedge to the background wedge.
Notice narrower width of the background wedge.

Sewing the propeller together.

10. Since the propeller and background wedges are different sizes, you can't butt the seams together when joining pairs.  (Yes, together they form a 90 degree angle but each one is NOT 45 degrees.) Pin the center seam line of one to the same point on another. Then pin the outside edge at the seamline. Notice they don't quite match up.

11. Add more pins to the side and sew from center to side.

12. Repeat for the other half of the block.

13. Finger press the seams in one direction.

14. Pin the centers at the point where the wedges meet. Then pin the edges. Sew from side to side.

Top left: Wedges are not the same angle.
Bottom left: Pin by matching seam line intersection points.
Right: Sew halves together, carefully matching center.

15. Unsew the middle inside the seam line and finger press in the same direction as the seams.

16. Press gently.
Unsew the center and spin it.
Press seams in one direction.

I hope this helps as you make these delightful blocks.

Edit: Here are two later posts. First a revised construction idea and next the finished quilt.

1. Having trouble sewing the block to size? Try this.
2. Finished Propellers and Planes quilt.

Enjoy the day!
Ann