Quilting
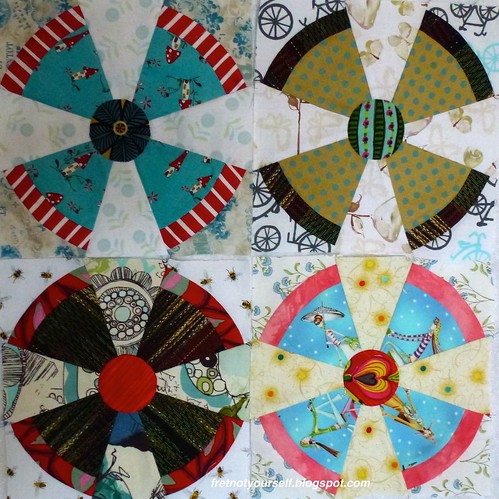
For years I've wanted to make an airplane propeller quilt. Is it because of the curves? Or because, having sons, I am always looking for masculine patterns? Or because my grandfather loved to take us to the airport to watch planes? Not sure; but it's perennially attractive. Jeannette Bruce of Gone Aussie Quilting posted an invitation to join the Steam Punk QAL Flickr group last year. And guess what Steam Punk looks like? Yes! A propeller. So I joined and thoroughly enjoyed all the fabric combinations everyone made but... I had so many UFOs to finish first. This week I've finally started. |
| My first completed Steam Punk quilt blocks |
The pattern by Australian Jen Kingwell came from Amitie Textiles. It arrived in the US less than a week after I placed my order. (Wow! Very quick.)
Then with unusual wisdom, I had a set of templates made by Rodney Shimogawa in Woodinville, Washington. His Etsy shop is Customplastic. What a meticulous craftsman! They are perfectly made with the template letter and a quarter-inch seam allowance etched on each thick acrylic template. And they arrived within a week, too! Honestly, I could rave for paragraphs about the templates. Why haven't I used them before? It just takes a small rotary cutter to cut around the curves.
My third super-smart idea was to order Bigger Perfect Circles by Karen Kay Buckley from Amazon. (I usually choose the hardest way. Can you tell I'm thrilled with all this uncommon brilliance?) The smallest template in this packet is the finished size of Jen's center, 2.25". So I cut the circles with the thick acrylic templates then I sewed a wide running stitch on my machine (everyone else does this by hand) and gathered them over the Perfect Circles. See this YouTube video by Karen Johnson for directions. And they are... perfect!
Here's what I learned sewing these first blocks. Curved pieces and odd angles mean the ends do not line up. If you're accustomed to squares this can throw you off. Pin liberally.
Sewing the propeller
1. Pin it! For the propeller, propeller edge and corners, fold the pieces in half and crease the center. Then mark with a pin and match the centers.
 |
| Mark the center of these pieces with a pin |
2. Pin it! For each curve, pin the centers together first.
3. Then use a pin at the seam line of each edge. Notice that the fabric edges on the "straight" sides don't match up. They won't. Just make sure the corners of the seam line do.
4. Once you have a pin straight through the corners, use another pin to hold it in place.
5. Then pin halfway from each side and the center. Add more pins to help keep the back from pleating. I prefer to sew with the concave side down against the feed dogs and the convex side up. Do what works for you.
6. When both curves are sewn, gently press with a dry iron or finger press.
 |
| Pinning & sewing sequence from left to right. Use the same process for both curves of the propeller edge. |
Sewing the propeller to the background wedge.
7. The propeller and the background wedges are NOT the same angle so the ends do NOT match up. Pin it! Put a pin in at the sewing line of the propeller center and then through the sewing line of the background center. Look carefully at the arrow at the top of the photo below. There is a little "rabbit ear" where different angled pieces join.
8. Put a pin in at the sewing line of the propeller edge. It should be along the arc of the propeller edge. Then pin through the sewing line of the background edge. Look at the bottom left arrow to see very slight "dog ears"... not a long as the rabbit ear ;-). The top fabric in the example on the right is bent back a bit. Sorry.
9. Sew from center to edge to keep center from shifting.
 |
| Pin the propeller wedge to the background wedge. Notice narrower width of the background wedge. |
Sewing the propeller together.
10. Since the propeller and background wedges are different sizes, you can't butt the seams together when joining pairs. (Yes, together they form a 90 degree angle but each one is NOT 45 degrees.) Pin the center seam line of one to the same point on another. Then pin the outside edge at the seamline. Notice they don't quite match up.
11. Add more pins to the side and sew from center to side.
12. Repeat for the other half of the block.
13. Finger press the seams in one direction.
14. Pin the centers at the point where the wedges meet. Then pin the edges. Sew from side to side.
 |
| Top left: Wedges are not the same angle. Bottom left: Pin by matching seam line intersection points. Right: Sew halves together, carefully matching center. |
15. Unsew the middle inside the seam line and finger press in the same direction as the seams.
16. Press gently.
 |
| Unsew the center and spin it. Press seams in one direction. |
I hope this helps as you make these delightful blocks.
Edit: Here are two later posts. First a revised construction idea and next the finished quilt.
1. Having trouble sewing the block to size? Try this.
2. Finished Propellers and Planes quilt.
Enjoy the day!
Ann
1. Having trouble sewing the block to size? Try this.
2. Finished Propellers and Planes quilt.
Enjoy the day!
Ann