Showing posts with label stash quilt. Show all posts

Tuesday, September 1, 2020

Turquoise and Red Lone Star Quilt Finished

Ninety-nine percent of failure comes from people who have the habit of making excuses.
~George Washington Carver

Quilting

This quilt was a surprise for my newest grandchild. The turquoise/aqua colors match {or at least blend with} the mint in his older sister's quilt while the red is a stronger version of peach. Hopefully they will look well together like the beloved family they are. 

This variation looks amazingly like a kaleidoscope. A real one, not the quilt. ;-)

Main star in red, turquoise, black and green with smaller red and aqua stars around the sides
Lone Star quilt in Turquoise and Red

The easiest design for the central small diamonds was Orange Peel. It feels very comfortable to sew and was a quick start. Reaching the green border, I chose a repeating S-shape, similar to orange peel but one that makes better use of the space. I could/should(?) have quilted it closer but didn't want that section to become "background" like the stipple quilting on the white fabrics.

S shapes are free motion quilted along the length of the green border
Quilting detail on green border

The diamonds of corner and side stars are larger than the center diamonds and I wanted to try something new. After rewatching Angela Walters' recent "Help How Do I Quilt It?" series, the swirl hook design was the best choice. In the corner blocks they all swirl the same way and I found that filled the area most evenly. Both aqua and red fabrics are quilted with light blue thread. 

Swirl hooks fill each diamond of the corners stars
Quilting detail of corner stars

The side half-stars have the same swirl hook design but they mirror each other from one side to the other. The center pair almost looks like a heart. With four sides there's one heart for each parent, his sister, and me. Cute as a button for the baby who's stolen our hearts. 
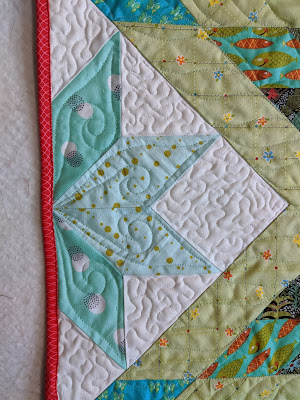
Swirl hooks quilted into the diamond shapes are reflected on each side
Quilting detail of side stars

The remaining green that formed the border of the lone star didn't fill all the back so turquoise and aqua fabrics were added to each side. It's always fun to see quilt backs; the designs usually show up much better here. This is not quite the last of each of these because the trimmed-off bits are now in the scrap bag. This is how it constantly refills. 
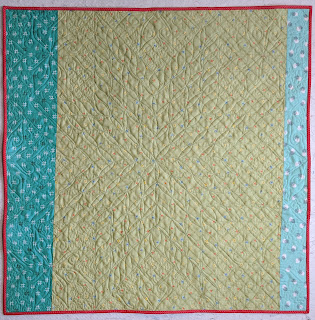
Light green print with aqua prints to each side create the quilt back
Turquoise and Red Lone Star quilt back

The brilliant red binding was waiting in the binding box. How was there enough to fit all the way around in one fabric? IDK but I'm not complaining. It's such a treat to "find" binding cut, pressed and read to apply - even though I'm the one who did all that work.

The quilt back highlights details of the free motion quilting
Quilting detail from the back

Washed and dried, it crinkled up a bit more. Just the way I like it. Due to health concerns, it was mailed to my dear fellow grandmother who kindly rewashed it before giving to the baby. No germs here.

Quilt is folded so corner star shows along with part of the green back and the red binding
Lone Star quilt folded

One more beauty shot just to see both sides and the binding. 

Quilt Specifics
Size: 38"x38"
Design: Lone Star
Batting: Mountain Mist Cream Rose 100% cotton
Thread: Gutermann 50 wt white, green, and red cotton
Quilting: FMQ and SID with walking foot
Approximate yardage: 5.75 yd

Previous posts:

Reading

I finished Circe by Madeleine Miller this week. What an excellent retelling {and reimagining} of a few lines in Homer's Odyssey. Raised on the classics, Madeleine not only brings the nymph turned witch to life but creates a full-bodied character. It brings home how little significance women are given in the classics and indeed, throughout history. By the end of this book I was completely in sympathy with this woman, cheering her growth and delighted she found a full life. 

In the postcripts Madeleine calls the Greek gods a cautionary tale. They "reflect what happens to humans when we see only ourselves and our own needs.... They have forgotten what it's like to be told no and it has turned them into monsters."

This NPR review encouraged me to read find the book. Now I can't wait to read her previous one. And BTW, her name is pronounced KIRR-kee or KEER-kee although many English speakers {including me} say SIR-kee. I'll try to change my habit. 

Enjoy the day, Ann

Tuesday, August 4, 2020

Why Do I Ever Think Construction will be Easy?

"Opportunity's favorite disguise is trouble."
~Frank Tyger

Quilting

Another baby quilt will be needed next month and even though there are ten previous stars, I thought up  another Lone Star variation. Small stars in the corners and partial stars on the sides means it won't need as much of a single fabric for the background. 

Last time the mother wanted mint and coral. This time I'm not asking. There's several mints in my stash, one red, and a couple of red diamonds leftover from previous Lone Stars. Using those as a start, I added some greens and a dark print to round it out. 

Fabric choices for Lone Star quilt

Even though the additional stars in the corners is a traditional design, I want the main star to read more contemporary so I chose to cut the light green print into long parallelograms rather than diamonds. Then I placed some darker fabrics on the outside and tried several variations of reds for the center.

The centers of these Lone Stars vary in the arrangement of red and pale blue diamonds
Laying out Lone Star variations

Thinking the center was complete, I looked at two minor variations on the outer row and didn't like either.

Turquoise and dark green alternate in these two layouts for the outer row
Two variations of the outer row of the Lone Star quilt

Finally I decided they were in the wrong place altogether. Exchanging their location with the light green parallelograms made an enormous difference. But back to the drawing board to get the center correct. 

Lone Star 11 comparing center changes

Finally it's time to place stars around the sides. Remember the small diamonds were cut from 2.5" strips so they finish at two inches. That makes the corner squares 11.25" finished so the outer diamonds are slightly larger. I cut mine 2.875" to finish 2.375". Then I had to determine the best placement. 

Of course, I thought more red would be better but that was a mistake. None of these photos shows a complete layout. They are just to get an idea of what looks better. I occasionally use a folding mirror to "see" the entire idea. It saves laying them all out.

How much red does a border need?

And here's the final layout. Way less red than I'd ever have thought. 

There is a good mix of new and very old fabrics. Traditional, conversation, and contemporary. I like the touches of red paired with a range of turquoise/aqua values. The dark print adds needed depth and the Kona white background makes it all so clear.

Lone Star 11 quilt - mint and red

This quilt has been loads of fun to create but it was not the cakewalk I expected. Simply using a new collection of fabrics {even if some are leftovers from previous projects} changes the needs of the quilt. It's always good to keep an open mind. 

Last week Nann's husband offered an extra copy of String Too Short to be Saved {the story I mentioned here.} What a surprise to find a very large and heavy box on my doorstep two days later. I knew the book was fairly small and couldn't imagine what was in it. Look! Three bags of scraps, too! It's a treat to receive some new fabrics to work with and is sparking my imagination.

I enjoy having my own copy as it's worth rereading regularly. And now there are some new scraps for my next scrap quilt foray. Thanks, Nann!  

Gardening 
Fresh veggies

The squash and beans have been coming in. What fun to run out and pick fresh vegetables for lunch. My friend gave me several varieties of beans including these purple ones that turn dark green when steamed. 

Voting and Census


Our national election scheduled for November 3 is 91 days away, just less than three months. The deadline for registering is fast approaching and is a prerequisite for voting. 

Help your community by completing the Census and encouraging your neighbors to do so, too. It helps support hospital services, transportation funding, and other community projects as well as Congressional representation. Everyone who lives in the US counts in the Census whether they are a citizen or not because everyone who lives in the US impacts the infrastructure. The current Executive branch recently decided to close the Census early (September 31) so please help everyone you know complete it. 

Enjoy the day, Ann

Tuesday, May 5, 2020

Heading for the Border

Make the best use of what is in your power and take the rest as it comes. If you seek truth, you will not seek victory by dishonorable means; and if you find truth, you will become invincible.
~Epictetus

Quilting

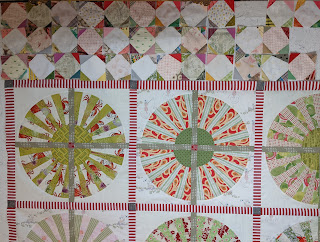
I used a dark brown to post the stripe at the corners of the wheel blocks. The value is quite a bit darker but the pieces are so small they don't overpower the softness of the rest of the top. Well, soft for me.

Wheel composed of four fan blocks with alternating pale red and green blades sashed with tan are in turn sashed with red and white stripe in this low volume quilt
Center of the wheel quilt sewn

Now for the border. My original plan was to create a grey/tan and white hourglass inner border and sew the rest of the wedges as Coins in an outer border. Eventually I noticed that sequence {or at least the Coins} has occurred in several of my quilts, including Chinese Coins II, III, and CCIV, and the Polka Dot. It's time for a new idea.

One that I've wanted to try for a while is the snowball. Again, examples abound in current and vintage work: Sujata's book, Audrey's Scrappy Tulips, Julierose's Autumn Snowballs. A photo of Yoko Saito's glorious taupe Snowballs is here.

Snowballs work as a sixteen-patch as well as a nine-patch. Those definitions just locate the grid a block fits into. Each side divides into four equal parts for a sixteen-patch while a nine-patch divides into three equal parts. Of course, I'm not going to measure my corners. Somewhere between those will work just fine.

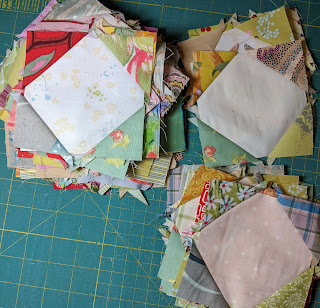
The backgrounds are squares of pink, white, cream, tan, and a couple of light yellows. I raided my overflowing scrap bin for corner fabrics and that's where the trouble arose. This first pass included any fabrics that seemed to go but mostly dark values. Too dark. It's overpowering the soft wheels.

In this snowball border, the corners of the blocks are too dark for the center of the quilt
Snowball corners in darker fabrics

So I removed the darkest by pulling out my trusty Value Finder. In years past I always used it to select fabrics but haven't needed it for a while. This helps me calculate the range of values that will work: 8-10 for snowballs, 5-7 for corners {with perhaps a few 4s.} This second iteration is better but still too bright. The corners need to be quieter still.

In this version of the snowball border, the corners of the blocks have too many bright fabrics
Lighter snowball corners with several brights

My next battle was removing the brighter brights - even if they are reds - and the blues. I'm not sure why I thought those would work. Looking carefully at all the wheels, the prints include orange, tan, brown, grey, yellow, purple, and pink in addition to red and green. When the border is reduced to these colors in quiet{er} hues within the value range it starts to work. Boy! Lots of hedging in that previous sentence.

This version of the snowball borders has corners that closely match the colors and values of the Wheel blocks in the center of the quilt
Snowball corners that work with the quilt center

Finally I can start a little production line {because these babies are very fiddly and time-consuming.} That's what happened the rest of the week and I'm only halfway through. Funny how hard it is for me to use scraps in the corners and actually have them fill the entire corner {and have a bit showing once the seam allowances are in, too.}

Improvisational snowball blocks sewn and pressed, waiting to be trimmed
Snowballs sewn and pressed waiting to be trimmed

In order to keep the various fabrics fairly evenly distributed it seemed best to divide them into four groups - one for each side. I'm sewing each on its own. One is done. These are the snowballs for the second side. Slower than molasses in January... and it's May.

Quilt borders of three rows of pale snowball blocks with soft colors in the corners are in the process of being constructed
Snowball borders in progress

Masks and Gowns

My final thirteen masks are made and shared with neighbors; 263 in all... I think. No more lining fabric right now. But work on isolation gowns continues. Six this week for a running total of 19. As I wrote before, they a delivered to a variety of sites: hospitals, social workers doing home health checks. For more information, check Sewing 4 Good.

Enjoy the day, Ann

Tuesday, April 28, 2020

Choosing Backgrounds

Blessedness is what can be snatched out of the passing day, and put away to think of afterwards.
~Ellis Peters in The Leper of St. Giles

Quilting


I collaged some photos of different fabric pulls for the next step in the fan quilt.  The top shows choices for posts and possibly a secondary sashing. Bottom left is background and more sashing ideas. Although a bunch of reds and greens were pulled for the wedges, the pile mysteriously decreased over time as other projects took precedence. When the wheels restarted, there were not enough soft reds. The crab prints on the right made me laugh. They might work as wedges; they certainly won't look the same cut into small strips.

Sashing, post, and background fabric choices for the fan/wheel blocks plus detail of crab fabric
Some fabric choices

Eventually I found two two-yard pieces of quietly printed cream fabrics in my stash {bottom left photo.} One includes a girl in a hat fishing. Now is the perfect time to use it.

This is improv so you won't be surprised to find I cut the fans down quite a bit. Why? At the larger size, only three background could be cut from WOF with lots of waste. That wasn't so bad {Scraps!} but I don't have enough fabric to create all the backgrounds. Decreasing the block size let me fit four across. Problem solved.

Paper pattern laid on fan to properly trim down the block
Trimming the fans to a smaller template size

There's also a simple trick to pinning: don't pin the seam allowances. Pinning between or near them lets them move and allows the new seam to curve rather than jerk from point to point.

Pin curves of the fan blades between seam allowances to create a smooth seam line
Pin curves of the fan between seam allowances

As usual, I cut the outer background with half-inch seam allowances on the two straight sides to give me some wiggle room when squaring the block. I find it doesn't help to make every template larger, just that final outer one.

Selectively oversizing the seams of some pieces gives more room to square the block
Squaring a fan quilt block

With the fans sewn it was time to settle the sashing. Another long-held idea was to use the red-and-white stripe. When the wheels were arranged it was too much for all the sashing. So... either between the arcs or around the wheels but not both. A light grey-brown worked as the alternate sashing, contrasting with everything else but not screaming for attention. It's not the same fabric as my original background plan but it's in the same family. So my color idea wasn't completely whacky.

Testing two fabric, red stripe and tan, to determine which looks better between the fan blocks and which looks better between the wheel blocks
Sashing layout choices

Next I had to pick a post and went with the lighter red on the right. Now I can sew the quarter-circle blocks into larger wheel blocks and contemplate a post for the stripe. {Those reds won't work.} These are not easy blocks for me nor have I seriously worked at low{er} volume before.

Testing a darker and a brighter red for posts in the Wheel quilt
Choosing between two reds for the post

Reading

The book cover features the ghostly image a St. Winifred in the foreground with Brother Cadfael under an arch behind her and a line of five monks in the background.

I started rereading the Cadfael chronicles, a successful 12th century mystery series by Ellis Peters which also adapted for television. In A Morbid Taste for Bones, Shrewsbury Abbey seeks to increase their prominence by acquiring the bones of a Welsh saint. When the leader of the local community objects, he is soon found murdered and Brother Cadfael must resolve the issues. It's even better than I remembered. This time I appreciated the descriptions of and the differences between the societal structures of the two countries as well as noticing the variations of religious practices, albeit both being Catholic. Of course, I devoured the maps of the region, city and Abbey.

Monthly FUR (Fabric Use Rate)

The 26 yards of isolation gown material did not come from my stash. {I sewed it but am not counting it in my rate.} Masks total 250. This month's total took 7 more yards while the pillowcases used 7.5 yds. April = 14.5 yards. YTD = 62.5 yards.

Enjoy the day, Ann

Tuesday, April 21, 2020

Helping

The most precious thing you can give someone is your time because you can never get it back.
When you don't think about getting it back, you've given it in love.
~Mitch Alborn in Finding Chika

Quilting

Just a bit of quilting this week. Sort of. No sewing, only arranging the arcs. They required lots of moving/adjusting. Because the values occupy a narrow band, the colors blend into grey-ness. {That's not a word but you can see what I mean. The greens and reds seem to blend rather than contrast.}

Fan blocks set as wheels are arranged on the design wall in two ways
Arranging the wheel blocks into a quilt

But now... the original background doesn't work. It's much too strong against the sewn arcs. And there's nowhere near enough yardage either. Darn. This shot cotton in grey and brown has been pulled for every project for the last three years and never fit. Such a funky non-color. Of course I cut several before figuring this out. Audrey mentioned how much waste arcs leave - big melon shaped lozenges. She saved hers for an appliqué project. Mine are going into a bag for the future, too. They are simply too good to toss.

Sample of brown shot cotton background is place next to some of the fan blocks
This grey-brown is too dark for the background

Masks and Gowns


I made fourteen more masks and am almost out of cotton knit for the lining. Then a friend asked me to join a non-profit group sewing isolation gowns. There is little I can do to help right now other than stay home so I was honored to join. The group provided the fabric, velcro, and elastic. We provided polyester sewing thread. I sewed twelve this week. They need 10,000.

Cutting out, sewing, and finished isolation gowns for area hospitals during CoVID emergency
The design is very basic but the protective treatment on the fabric means we cannot iron it. Finger pressing bias strips for necklines and ties while wearing masks and gloves. The masks aren't difficult to use but I have trouble pinning and finger pressing in gloves.

The good news is this first batch is on its way to a New York hospital. Even though new cases are declining, staff is seriously short of gear and these should help until commercial manufacturers can ramp up.

Coronavirus Study

Stanford Medicine started a daily survey to predict future outbreaks and help direct medical resources. You can help if you live in the United States. Here's the link for more information and to sign up. It took me about two minutes to fill out the original questions and less than a minute for the daily update.


Reading

Once the gowns were finished I was, too. For relaxation I read The Secret Commonwealth, the second book in Phillip Pullman's Book of Dust series. When Pan witnesses a murder the victim entrusts him with his wallet which brings echoes of their old adventures. The clues lead twenty year old Lyra on a search for a city haunted by daemons.

Enjoy the day, Ann

Tuesday, April 14, 2020

Taking the Wheel

"You may not lie idly expecting the second coming of anybody now,
because the world is yours and it is up to you.
Now especially since man has the strength to destroy this world,
it is the responsibility of man to keep it alive, in all its beauty and marvelous joy."
~Susan Cooper in The Silver on the Tree

Quilting

Combining regular spring cleaning with the deep cleaning pushed me to sort and cull. Clothing, dishes, books, cleaning supplies. Everything is getting a second look. Is it being used? Is it needed? Does it need replacing? Of course, cleaning also brought a bunch of UFOs to the surface. Like this one.

It's been a while since starting the first wheel. The plan was to make a very scrappy wheel but the narrow wedge ruler I found seemed a better way to start/practice. So I quickly sewed one up... and what a mess. The middle was loose; the background was missing. I finally unsewed them into quarters with the idea of re-sewing the circle after the background was attached. I pulled a variety of pale yellowish greens {not chartreuse} and red-on-white prints that intrigued me. And that's when it sank into a UFO.

Red and white stripe for sashing is paired with brown shot cotton and a Burberry-style plaid for possible background to the fan arcs in the quilt
Possible backgrounds and sashing for the fan/wheel block

Last year Sujata proposed the UandU QAL to recreate a quilt from Rod Kiracofe's fabulous book, Unconventional and Unexpected. There are so many to choose from and every time someone posts their own progress I want to make that one, too. Looking through it last week I was struck by three quilts with the same design - just like my old sample. Sort of. Well, enough to make me dig through the pile.
Three pages of quilt photos from Rod Kiracofe's book show three examples of fan and wheel blocks made into improvisational quilts
Unconventional and Unexpected: 
Wheel of Fortune, p 66
and Fan, p 146

The one with the Lone Star reminds me of last year's baby quilts. I want to make more but am running out of sufficient yardage to make the background. Here's a possible way to get away with less of a single fabric.

Wheel and fan quilts are traditional blocks that have been revived recently. Several people have created designs with unique names which are still the same basic block: a small center {quarter} circle, a wide arc sewn with wedges, and a curved background to square them up. The difference I see between wheel and fan is the center sashing. Also, wheels are frequently appliqued to a single background.

My original plan was to make very large wheels, 20-25" wide but the ruler was shorter. Clockwise from top left. After cutting ten-inch WOF I laid the wedge ruler on top with my regular ruler next to it. Removing the wedge ruler gave me a long side to cut. Next I replaced the wedge ruler, lined up the longer ruler to its left, removed the wedge ruler and cut the left side of the wedge fabric.

A collage of four photos show how to extend a short ruler with a longer one for accurate cutting
Extending a short ruler with my regular ruler for cutting

Despite a very limited color palette, or perhaps because of it, there are special issues to address. Value becomes even more important. Fabrics work differently after they are cut than they did when they were originally grouped. The darks and the lights below paired up well until they were cut. Then there was too little contrast within a single fan and too much contrast from one fan to the next.

The blades of the fans are moved around to create more contrast between pairs of blades and less contrast between the fans themselves
Changing out blades of the fan block

My solution was to move the blades around until the values of all the fans were closer. These were switched between four sets to balance them better. Almost done cutting blades.

Adding green centers to the fan arcs before sewing them together
Laying out parts of the stash fan blocks

Taking the bull by the horns or the circle by the quarters. It's finally moving forward.

Masks

Still making masks. Sixty-two more this week brings the total to 127 and more to come. I made significant progress on DH's t-shirt quilt as the leftover material made mask lining. Most of the large logos are stabilized.

Reading

The Dark is Rising series by Susan Cooper is on my shelf but this is a re-read for me. It's another series catalogued as children's books. While on a Cornish holiday, three human siblings join their great-uncle Merry, Will Stanton {Old Ones}, and later, Bran Davies, searching for artifacts of power that enable the Light to defeat the Dark. Cooper blends English folklore and Arthurian legends with Celtic and Norse mythologies to create a new tale of mankind's passage to adulthood. That's what I read in the quote that begins this post and why this is a relevant set of books for adults to read also.

Of the five contemporary fantasy novels the first received a Newbery Honor while the fourth won the Newbery Medal as well as the first Welsh Tir na n-Og award and the final book also received a Tir na n-Og award.

Stay safe. Enjoy the day, Ann

Tuesday, February 11, 2020

A Done Deal

"Ambition is enthusiasm with a purpose."
~Frank Tyger

When looking ahead there seem to be so many long, time-consuming steps to finish a quilt. Between that and anxiety about our quilting, it's no wonder we set tops aside. This one is finally finished. It's a perfect size to snuggle under during this cold weather. I'm keeping it.

Medallion scrap quilt has The Square Deal block in the center surrounded by a narrow, white inner border and an outer border of two rows of lattice blocks in shades of red, pink, blue, and green
The Square Deal quilt

As I mentioned earlier I divided the quilt into three sections: the Square Deal center, the sashing, and the outer border. After simple SID around the sashing, each section was quilted with its own designs. The sashing was the simplest - just wishbones - and that finished the quilting.

Wishbone quilting in the sashing of the Square Deal

Binding is the next step. I pulled several fabrics and laid some under the edge of the quilt to see how they might look. I thought light blue or green would work best but chose the pink.

Photo collage of fabric choices for binding The Square Deal: pink, blue, green prints
Binding choices for the Square Deal quilt

There was just enough. Only four inches overlap. How's that for using every last bit?

Binding pinned and ready to attach to the quilt

Here's a detail of the binding and back.

Folded quilt shows parts of the front, back, and binding of The Square Deal
Binding and backing for The Square Deal quilt

Quilt Specifics
Size: 71" x 71"
Design: The Square Deal (with leftover Chinese Coin units) and Lattice
Batting: Mountain Mist Cream Rose cotton
Thread: 50 wt Gutermann light blue, Metler red, and Aurifil white cotton
Quilting: SID, FMQ curves, feathers, wishbones, and parallel lines
Approximate yardage: 13.5 yds

The quilt started with some leftover Chinese Coin strips. Well, they weren't exactly leftover. The quilt they were supposed to become looked terrible. And there were too many to waste. And I didn't want to put them in the scrap bag because "I'm going to use it up now." Haha.

The lattice border was a collection of blocks that never got sewed up. I guess they were in the Parts Department that Gwen and Freddy espouse. They all fit together beautifully {only six extras were made for this quilt and you can tell which they are because the Xs are much wider} and reinforce my opinion that everything from our own stash will work together because we each have an innate and individual sense of color and pattern.

Previous posts:
  1. The beginning
  2. Finding border blocks among the leftovers
  3. Choosing the sashing
  4. Designing the border
  5. More border work
  6. Finalizing the border
  7. Using the leftovers as a baby quilt
  8. The back for the baby quilt
  9. Finished Square Deal baby quilt
  10. Quilting on original Square Deal begins
  11. Quilting continues
We viewed an interesting exhibit at SF MOMA by Turkish-German artist Nevin Aladag who incorporates a variety of musical instruments into her sculptures. Here's a video of musicians playing her Resonator which includes drums, chimes, harp, didgeridoos, acoustic and bass guitars, and parts of a mandolin.

Resonator sculpture with Social Fabric:
Percussion in the background.
Both by Nevin Aladag

The wall hanging, which at a distance appeared to be a detailed painting, is composed of precisely cut rugs and carpets. {She must have a very sharp knife.}

The museum also has a room of Alexander Calder's mobiles with several of his sculptures on the adjacent terrace. This mobile entitled Double Gong includes two mallets which makes sounds when the wind moves it. {No breezes in the museum though.}

Sculpture and mobile by Alexander Calder

I first enjoyed Alexander's work at the Museum of Contemporary Art in Chicago where we found the Catmobile. {Dada dada dada dada. Who remembers that theme song?}

Chat-mobile by Alexander Calder, 1956.

With all the reds and pinks, the Square Deal makes a lovely Valentine. I wish you all a Happy Valentine's this week.

Enjoy the day, Ann


Tuesday, January 28, 2020

Hourglass Reprise

"The trouble with our times is that the future is not what it used to be."
~ Paul Valéry

Quilting


This quilt went together more easily if only because most of the parts were already sewn and ended up a repeat of the previous one. I thought about making something very different but... all the hourglasses with polka dots were already sewn and it needed to be gifted this week so time was of the essence. Time; hourglass. Somehow appropriate. Plus, it uses up all these specific pinks, aquas, and the second black print in my stash {which has been lurking for a while because it never fit anything else.} There's several more yards of the stripe since I purchased it for bindings. The last excuse is that the quilts will reside in different states and their owners most likely will never meet.

I enjoyed working with hourglasses as both a central block and a border. There are a few more ideas running through my mind {aren't there always} that I may flesh out in the spring. We'll see.

Nine sets of four to nine small hourglass blocks are separated by black and white striped sashing and surrounded by a larger round of hourglasses for a border.
Improv Hourglass quilt 2

The pink with red polka dot triangles were short one to finish the center {more or less} identically to the previous one. I dug through the stash and scrap bags for a bit more to no avail. Something had to change and the very center seemed the likeliest. Perhaps a different block should have been used but the design needed to be centered in the block like an Ohio Star with the hourglasses turned into star points. After cutting the beautiful birds below {which are laid out in the opposite arrangement in this photo} their backgrounds were obviously too strong for the rest of the quilt. A single bird in the center was even worse. Like a wart on the end of your nose. I didn't even pause to snap a photo.

Testing the quilt center combining five hourglasses with four alternate blocks of printed bird fabric
Possible quilt center with bird fabric

One reason I felt comfortable with this diffuse design is that I've done something similar before. Not every quilt needs spectacular blocks. The sashing or the border can grab your eye first. Because we start with the block, sometimes we focus too much on making them the focus {how's that for a pun?} rather than letting them become part of the background.

The quilting is almost identical to the previous one except for SID at the inner border - a more felicitous choice because my machine is home again - and quilted spirals in all the inner hourglasses. The straight lines in the border quilting add a bit of contrast and actually show against the prints. Wonders never cease.

The hourglass border has pink prints to the inside, blue prints on the sides and a black print on the outside to form a strong frame for the quilt
Detail of Improv Hourglass quilt 2 border 

Pink micro-check gingham became the best choice for the border interior. The black is printed with turquoise and grey so a dark grey with pink dots made a good binding. It blends into the black triangles well and makes a simple, strong edge to this quilt.

When folding the quilt for views of the front and back together, I unfortunately lined up the edge with the inner border. Now it looks like a different front. Oh, well. The back is the same fabrics as the previous quilt and that finishes all of them, too.

Folded quilt shows the pink, blue, and black hourglass border and the peach fabrics on the back of the Improv Hourglass quilt.
Border and back of Improv Hourglass 2

From the original mistake of low contrast pink and blue fabrics, these two quilts made a good recovery and have become some of my favorites. The striped sashing helps enliven the quilt but the black outer border adds confidence... or gravitas.

Folded quilt shows front, back, and binding of Hourglass 2 quilt
Detail of front, back and binding of Improv Hourglass 2

Again, this quilt was also gifted "warm from the dryer" and the parents liked it very much. For a change, it arrived before the baby. Ha.

Quilt Specifics
Size: 42"x42"
Design: Hourglass
Batting: Mountain Mist Cream Rose cotton
Thread: Gutermann 50 wt light blue, pink, and white cotton
Quilting: FMQ spirals, SID, parallel lines
Approximate yardage: 5 yd


Monthly FUR (Fabric Use Rate) 
For my records, January saw two finished quilts = 10 yds. Roll on, February.

Enjoy the day, Ann