Saturday, March 21, 2015

Improv Curve Quilt Finished

Here's the final photo of my Curved Improv quilt. It was in the guild quilt show last weekend.

Improvisational quilt of large curves of pink, coral, cream strips with smaller touches of green, blue and red circle and loop across the surface.
Improv Curve quilt

Because the sides are definitely not straight of grain, I wanted a straight edge binding. But the circle at the bottom needed bias binding. So I used bias on that curve only and switched to straight of the rest of the quilt. So far so good. I think it helps stabilize the quilt and minimize waviness.

Although the curve sections look may look like they are uniform width, that's not quite true. For each curve I started on one side or the other stitching parallel with a walking foot. Then I echoed that curve until I ran off the section. That side has quilting lines that run into it. This is probably the first quilt that I did NOT stitch-in-the-ditch. It was pretty scary to start quilting without the stabilization ditch quilting provides but it turned out well. Sometimes we need to try something different.

Because of the improvisational nature of this quilt, a few tucks developed. Each time I re-stitched some of the blades (by machine or hand) to re-flatten the quilt top. One of them appeared while I was quilting. That was a new experience but wasn't too difficult to fix.

The thread is Aurifil 50/2 cotton in beige, pink, green, blue, red and grey. The batting is Mountain Mist Blue Ribbon Cotton. The back is the same two fabrics as the binding. The quilt finished 50" by 58".

When I had trouble deciding how much to trim the sides of this quilt, Lara B. suggested cropping photos to test different amounts. That was a great idea. Here are some of those examples.

This first one has a bit more taken off the sides than the finished piece. Although this is my favorite view, I simply couldn't bring myself to cut off so much of the top.

First possible crop
of Improv Curve

 I wondered if cropping part of the large circle would make the quilt more active.
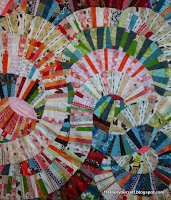
Second possible crop
of Improv Curve

Or if the blue circle would be missed.

Third possible crop
of Improv Curve

Here are links to previous posts about this quilt (in reverse order.)

1. How I Finally Sewed the Curves
2. Curves Continued
3. Curve Quilt Progress
4. Curve Quilt

What Sherri Lynn Wood wrote about her Mod Mood quilts here inspired me to try this process. I'm so glad I did!

Enjoy the day, Ann

25 comments:

Lara B. said...

Oh Wow Ann! I whooped quite loudly when I opened your blog and startled the pups. This is an amazing quilt! I could and have been staring at it for quite awhile. It reminds me of life. Both in the way it looks and in the way you met challenges and invented ways to do things along the way. All the colors remind me of emotions and the blades remind me of steps along our paths. And of course the curves remind me of paths turning and crossing. It is also just simply beautiful to look at!
(I think you cropped it perfectly by the way.)

Lara B. said...

PS - I have a very emotional response when looking at it.

Linda said...

Stunning. Wish I had been able to see it in person. So inspiriring.

Radka said...

Wow,beautiful!
xx

Laurier said...

Great job...and the curve binding at the bottom is inspired.

Ann said...

Lara. This is exactly why I like to read your blog. You have such skill wordsmithing. I'm delighted you liked this quilt so much. You'll have to try something similar. It was amazingly freeing and easy to develop my own method of dealing with the curves. And to work so abstractly felt like a fresh breeze.

Ann said...

Thanks, Linda. I wish you had seen it, too. Why don't you try something similar? I think you'd be pleased with the process and results.

Ann said...

Thanks, Radka

Ann said...

Thanks, Laurie. Right now the binding change seems great. Remind me to post how wear it has worn in a couple of years. I have no idea if it will work in the longer term.

Mystic Quilter said...

Absolutely stunning!! I was so excited to see this quilt finished. Love that you kept the curve bottom right. I very much doubt that I would attempt this but I most certainly have to buy her book!! Congratulations on a truly beautiful quilt.

Stephie said...

Wow, fantastic! I love the way your quilting has really brought this one to life Ann; sometimes working in new ways results in such exciting serendipity. I absolutely love this quilt, and it looks amazing on the black background. How do you finish them up so quickly though - I need some lessons from you!

Ann said...

Thanks, Stephie. Isn't this a reminder to think about the background of our photos. I usually lay them on the kitchen floor or sometimes the design wall. Both have dark corners. Sigh. These last few got "goosed along" because of the quilt show. The next few I'm working on are graduation presents. Yikes, I must get a wiggle on. Deadlines help me focus. And I machine quilt while you mostly hand quilt. This one's kind of small, too. A child's nap quilt size. Propellers took a long time but it could have been four lap quilts.

audrey said...

Very impressive! This looks to be the kind of quilt that would be easy to stand in front of for quite a long time.:) And so interesting to see the different viewpoints, possible close cropped etc. Your quilting really brings it to life even more. LOVE it!

Ann said...

Thanks, Audrey. I enjoyed making this quilt and figuring out how to put it together. I didn't think some of the curves would work as well as they do. The quilt changed so much while I was making it. Lara's suggestion to crop photos for trimming ideas was inspired.

Kaja said...

I love this Ann. I like that you have left that bottom curve, love how the quilting works, and see new things each time I see it. It has also been interesting to see what issues working this way has raised for you and the solutions you have found. Also, I am struck by the thought that although this is quite different from your other quilts that I have followed along on, I still would have guessed it was yours.

Cathy said...

I had to take the time to read all about the process. Thanks for that. I've always loved snake quilts but never knew how to go about making one. It looked like a snake pit when I looked at it. So what does that say about my mood???

Anyway...I've never seen a more gorgeous snake pit! Awesome piece of work!

Ann said...

Thanks, Kaja. It means a lot to me that you took the time to look at the details of this quilt. I like reading how other quilters design tops and resolve issues so I'm glad several of us feel this way. My husband also says he can recognize my work. Interesting because I usually think I don't have a "recognizable style."

Ann said...

How funny! I'm thinking of Indiana Jones' snake pits. Hope your mood is better now!

LA Paylor said...

Oooh I love the cropped photo idea. I know about that trimming thing. I went thru that with Tequila Sunrise. Two things... you can use the cropped bits in a new quilt, and proportion is elusive and very important to a finished piece of art. I just love this quilt Ann.
LEeAnna at not afraid of color

Sherri ~ daintytime said...

Beautiful! You have to post it in the improv handbook facebook group. Good work!

Ann said...

Thanks, LeeAnna. I should have thought about using the cropped sections later. It was interesting to see how cropping changed the quilt.

Ann said...

Thanks, Sherri for the compliment and for posting the original idea. It was fun to read through your technique and see what I could make from it. I learned so much making this quilt and have ideas for another one.

Teresa Duryea Wong said...

I love this improv circles - especially the circle on lower right breaking the plane. So cool!

Ann said...

Thanks, Teresa. As I was laying them out, it became very obvious a second circle was needed. What an experience to work so improvisationally!

Nifty Quilts said...

Wow! Don't know how I missed this one. Fantastic!