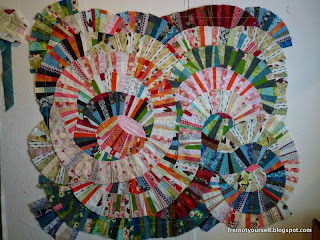
Finished size of curve quilt |
Then I thought of using string to outline a rectangle. It's a bit more visible in the photo below. Basically, I'll square up the quilt near those lines but at least I'm aiming at a general size now.
Detail of string used to outline the perimeter of the quilt |
I was planning to make some straight-ish sections to fill in the background but most of the quilt was already filled once I marked an area with the string. So I just made a few more to finish the corners.
I also rotated the bottom right curve. Q just wasn't cutting it. (That's what last week's photo looks like to me.) This layout connects with the rest of the quilt better. I'm still thinking about the other curves.
Enjoy the day, Ann
I also rotated the bottom right curve. Q just wasn't cutting it. (That's what last week's photo looks like to me.) This layout connects with the rest of the quilt better. I'm still thinking about the other curves.
Enjoy the day, Ann
6 comments:
That curve does look better Ann. The whole quilt is absolutely astonishing to me! String is a great idea. Perhaps if you try cropping the photo in various ways that would help you know where you want the edges to be too.
I do love this curvaceous quilt. What will be the approximate size when squared off?
That's a great idea to use the camera. At least now that I have s stopping line!
You know, I never measured it till you asked. It's about 60" wide by 55" high. Hmm. A bit larger than my original idea (which was 36" by 24".) Will Rogers famously said he never met a man he didn't like. I never made a quilt that didn't end up very large.
Oh wow, that's an amazing quilt. I love curves and circles in quilts.
My quilts tend to grow and grow too; I hadn't thought of either of these ideas but they are both great ways of keeping the size under control. I think the bottom right-hand corner looks better than last time. Really looking forward to seeing the final version.
Post a Comment