Showing posts with label curve piecing. Show all posts

Sunday, October 25, 2015

Propellers and Planes in the Fall 2015 Blogger's Quilt Festival

I've always wanted to make an airplane quilt - partly from memories of watching them with my grandfather and more recently because I have sons. When I saw some blocks made with the Steam Punk pattern, I knew it was time to start. I pulled all my vintage/special fabrics, bought more, and combined them into a personal memory quilt. Spurring me on... I desperately need a quilt large enough for our California king bed.

Propellers and Planes quilt

Upon completing a few blocks I loved the density of the fabrics when the blocks are set side by side without sashing.

Propeller quilt blocks
Collage 2 of Steam Punk quilt blocks

However, that layout would be a piecing nightmare with so many points to be matched and thick seams pointing the same direction. Additionally, I wanted more variation on such a large quilt. So I drafted some larger blocks and sawtooth sashing, combining them with groups of four small blocks.

For more fun, I drafted and improvisationally pieced a squadron of 30" planes for the back. I've never gotten a photo of the entire back but I snapped several partial views at our guild show.

A squadron of single prop planes flies across the quilt back.

When you make a quilt "just for you" it's always scary to send it out into the world. What will other people think? I've been honored that so many people have stopped to talk with me about the fabric combinations. There is something for almost everyone on it: bicycles, models, dogs, birds, fish and flowers, vintage and modern. Those novelty prints plus remnants from gifts made for family and friends make it my perfect memory quilt. I am blessed to sleep under it every night.

A selection of the fabrics in this quilt

Here is my last post about this quilt with links to many construction steps.

Quilt Details
Size: 118"(H) x 118"(W)
Pattern: Based on Steam Punk 
Batting: Pellon cotton
Thread: Auriful 50/2 cotton sewing threads
Quilting: Free motion quilting on a home machine

I'm entering it in the Large Quilt category of the Blogger's Festival at Amy's Creative Side. Take the time to look at all the wonderfully diverse quilts.

Enjoy the day, Ann

Sunday, January 25, 2015

A Very Special Pi Day

Carpe diem! This past Friday was National Pie Day in the States. Quite delicious. But another Pi Day (3.14159...) is coming in March. This year we'll see 3-14-15. Quilters can celebrate by making quilts with circles instead of (or in addition to) eating pie!

New York Beauty blocks, 2000

These blocks were tucked in my stash along with some fabrics I planned to use. Pi Day is the new deadline. Propellers and the curve pieced tops should be quilted by then, too. Lots of pi for me!

What about you? How will you celebrate Pi Day?

Enjoy the day, Ann

Sunday, January 4, 2015

How I Finally Sewed the Curves: A Third Method

Here's a closeup of some of the curves in my curve pieced quilt. Everything looked straightforward but there were a few issues.

Whenever I took pairs of curves off the wall to sew them together, the darn things grew! They never fit back in the right place. There was always a gap to the left, the right or between the sewn section and what remained on the wall! Finally I pinned all the curves to each other.

But when I removed the top from the wall, showers of pins scattered across the floor. I must have picked up a thousand pins.

Curves overlapping each other,
before trimming and turning the seam allowance

So I put it back on the wall. See how the curved edges are slightly uneven in the photo above? As I turned the seam allowance under, almost every short wedge left a gap in the top. I hadn't overlapped the curves enough and the uneven raw edges hid that fact. Trim both inside and outside curves evenly first!

With a clean raw edge, turning was much more successful. I pinned parallel and as close to the curve as possible before steam pressing the top.

Curves with seam allowance
turned under and pinned on the outside

Next, I grabbed part of the seam allowances on the wrong side of the top between my thumbnail and index finger. Then I removed the pin on top with my other hand and repinned it along the pressed seam line. I repeated this process until the seam was pinned along the fold line on the inside of the quilt top. See the photo below.

Curves pinned on the inside
I sewed along the fold line, removing pins as the needle reached them. It's easier to remove the pins if they point towards the needle.

Machine sewing the curves
along the pinned seam allowance

I pressed the seam again when the stitching was done and then trimmed the seam allowances to a quarter inch.

Improvisational curve quilt in shades of pink, coral, red, blue, green and white

It's neither Sherri Lynn's nor Vikki's method but it worked for me.

Enjoy the day, Ann

Friday, December 12, 2014

Curves Continued

One of my difficulties with this quilt has been limiting the size. I can't see the edges of the quilt. At one time it seemed it might not stop before the edge of the design wall. Yikes.

Improvisational curve quilt in shades of pink, coral, red, blue, green and white
Finished size of curve quilt

Then I thought of using string to outline a rectangle. It's a bit more visible in the photo below. Basically, I'll square up the quilt near those lines but at least I'm aiming at a general size now.

Detail of string used to outline the perimeter of the quilt

I was planning to make some straight-ish sections to fill in the background but most of the quilt was already filled once I marked an area with the string. So I just made a few more to finish the corners.

I also rotated the bottom right curve. Q just wasn't cutting it. (That's what last week's photo looks like to me.) This layout connects with the rest of the quilt better. I'm still thinking about the other curves.

Enjoy the day, Ann

Friday, December 5, 2014

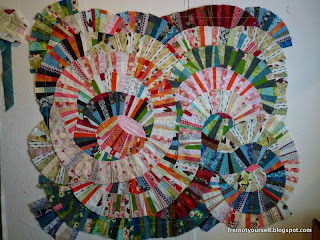
Curve Quilt Progress

I'm learning so much while working on this quilt.  More of these sections need to be sewn together but it's almost impossible to take one off the design wall and get it back in the exact same place. I machined the coral/orange white circle and interior but may switch to hand sewing or Vikki Pignatelli's method for sewing curves.

Vikki machine appliques the curves with Invisifil thread: 100-wt. 2-ply polyester. My takeaway from her Crazy About Curves class was to turn narrow seams on the top layer and blind stitch from the top (although I recall using nylon monofilament at the time.)

Curve Quilt detail

Tight and gentle curves  and some straight sections are all needed. Most of mine are mid-range radius. More curve variation would help.

I thought Sherri Lynn meant to assign a specific mood to each single color based on how one felt that day. I chose these colors but felt the mood assignment was artificial. Anyway, here's my explanation:
  1. red - energy
  2. coral - happy
  3. orange - annoyed
  4. green - health
  5. white - tired/sleepy
  6. blue - peaceful
  7. yellow - questioning
Upon re-reading her post I realized her moods are more general, covering a section of values and shades rather than an individual color. This makes more sense to me; a group of values conveys my mood more than an individual color. 

There is very little yellow in my stash. Rather than buy fabric I removed that color. Then I used a bit of each of the remaining colors and sewed some curves. The curves are too ambiguous. If all the colors are in each curve, it's hard to distinguish one curve from another. So I switched to smaller groups of two to four colors. Each color can have one or more fabrics. This is working better.

It's obvious in the photo below which curves were sewn first and which were sewn later. I also decided I needed a new, discrete section rather than having everything unfold from a single center. That's how the Q appeared in the bottom right. It may be too disconnected from the rest; we'll see.

Curve Quilt in Progress

Every time I add a curve, the quilt gets bigger. It's a bit like children - we keep them once they arrive. :-) I don't want to trim any of them away but I don't want a large quilt. Continually adding curves is not helping me square it up. Perhaps I should piece strips in straight-ish sections to finish it out. Another point to ponder.

The technical points are starting to pile up. I'm deliberately not looking at anyone else's postings again until mine is sewn in order to see how I work this out. It will be fun to compare later. And having completed one, I'll have a better understanding of how and why others made their decisions.

Enjoy the day!
Ann

Friday, November 28, 2014

Curve Quilt

I finally have a few days to quilt! Although several projects are basted I'm not in the mood. Instead, I want to make a curve piece scrap quilt. Sherry Lynn Wood showed some when she spoke at our guild. She also has instructions on her website. Look for the Mod Mood Quilt button on the side. Other people have posted theirs on her Facebook group, Improv Handbook for Modern Quilters. In particular, Sue Kelly posted an interesting photo and explains more in her blog, Sizzlewaggle.

Since I don't have many solids, mine will look quite different. That's ok with me. Here's what I finished today. There's one green solid and a tiny bit of hand-dyed coral, pink and blue. I'm now officially out of solid.

Curve Piece Strip quilt

First I pulled some fabric.

First fabric pull

Then I culled it.

Starting fabrics

The colors in this set were too limited so I added a few fabrics back in. I cut 6.5" widths then subcut into wedges.

Enjoy the day, Ann