Showing posts with label spiderweb quilt. Show all posts

Tuesday, March 6, 2018

Spiderweb 3 Quilted and Gifted

The third spiderweb quilt, the one with the blue stars finished quickly once I decided on the spiral quilting design.

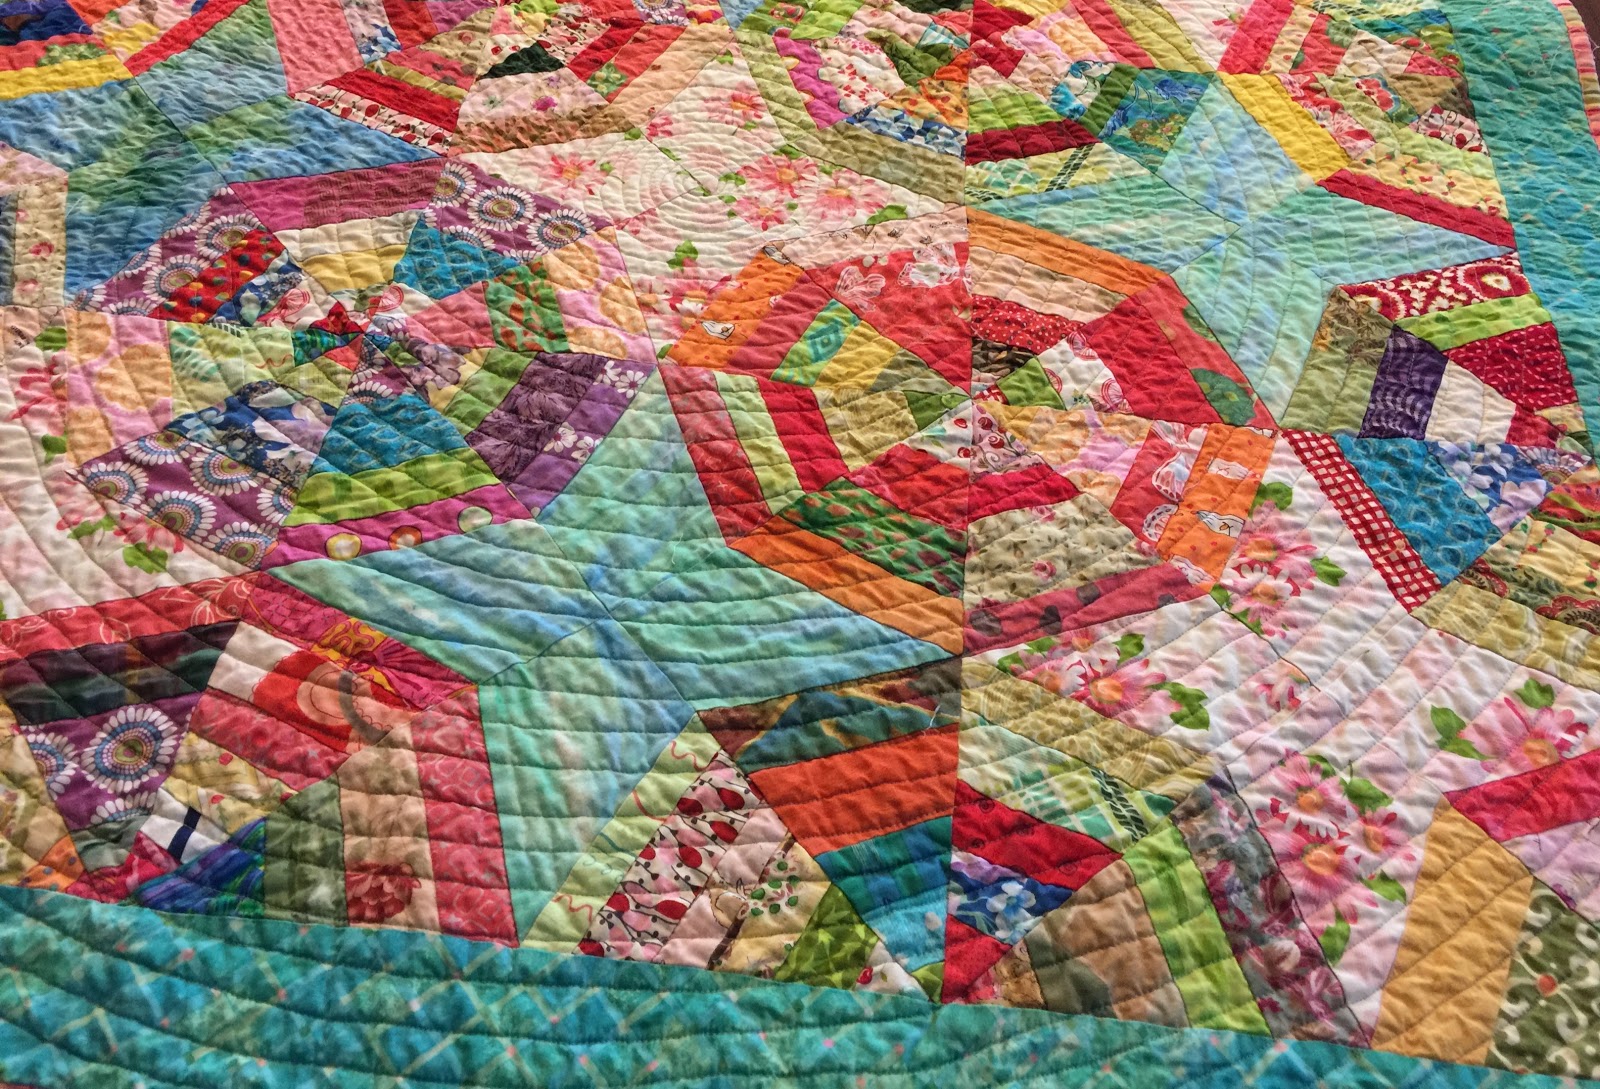
Spiderweb quilt with blue stars

Nothing but parallel or echo quilting will show on all these busy prints. Plus I expect the quilt to receive constant use.

I started the spiral a bit too close but like it anyway.

Starting the spiral quilting

Even better, this time there are no waves on the edges. I quilted more slowly {although it only took the afternoon} and made sure to not pull the quilt on the bias. Success. Previous spiral result here.

The circles aren't perfect but I think the stitch length is a bit more uniform.

Spiral quilting on Spiderweb quilt

Because of all the bias edges, this top did not pin as flat as most of mine. Choosing a quilting design without crossing lines always helps scoot those bubbly areas into the quilt without tucks. Think this spiral, echo quilting or {best of all} meander or stipple quilting. Parallel quilting lines may be okay or may simply "push" the excess along a create bias stretch waves between rows of quilting.

Due to bias edges on the blocks,
the top of this quilt is not flat.

The back is a single fabric remnant and the binding is almost the last of the pink and green stripe used in Strippy Nine Patch border and Bars 2 binding.  And there's still some left in the binding box. Always a joy to have binding ready at hand.

Binding and backing on Spiderweb quilt

Previous posts:
  1. Starting with leftovers from previous spiderweb
  2. Changing the border
Quilt Details
Size: 40.5"" x 40.5"
Design: Spiderweb 
Batting: Mountain Mist Blue Ribbon100% cotton
Thread: Aqua Aurifil cotton 50/2 thread
Quilting: Free motion spiral 

Spirals remind me of circles which remind me of Dale Fleming's method for making circles. It looks like applique although it's pieced. Instructions were on an old Simply Quilts episode that Patty mentioned a while ago. She used it to mend a quilt of vintage wool; I used it to mend a hole in this quilt.

Circular mend in a palm tree

The technique inspires me to consider making more Quilty365 blocks. Those are on my to-do list this year.

Enjoy the day, Ann

Tuesday, December 19, 2017

Christmas Stockings on the Mantle, Spiderweb on the Wall

Christmas Stockings
now decorate the grandchildren's mantle so I can share photos of these most recent additions.
.
Velveteen Christmas stocking with beads, sequins, jingle bells,.and events in outer space.
Velveteen Christmas stockings for grandchildren
Loud and proud. As usual.

Funny how frequently we forget all the finishing details. While it takes time, beading the ornaments isn't that difficult. But then you have to
  1. Attach them to the front,
  2. And add snowflakes or other details with reinforcing fabric on the inside,
  3. And sew the stocking together,
  4. And the lining.
  5. And shape the cuff.
  6. And bead names on the cuff.
  7. And cut the scallops.
  8. And make the hanging loop.
  9. And attach the cuff and loop and lining.
  10. And sew fourteen bells on.
  11. And package it so the velvet doesn't crease.
  12. And mail it before the rush. Oh, too late for that.
Somehow this reminds me of childbirth. Oh, how quickly we forget all the details there, too. And what bundles of joy at the end.

Previous posts:
1. The Fairmont and our Christmas stockings
2. Beading the stockings


Scrap Spiderweb Quilt
In the meanwhile, the scrap bag is filling up and I need a baby quilt. I had a few spiderweb kites and string triangles left from my own spiderweb. It seemed like it would be easy to make a few more.

Scrap triangles for spiderweb quilt
Here they are.

Spiderwebs laid out for a small quilt
Scrap spiderwebs layout

After adding twenty blue kites, some of the triangles seemed too dark so I changed them out. Now I have more leftover triangles, probably as many as I started with. Grr.

Blue stars added to scrap spiderweb quilt

I could have cut more blue but liked the white of the design wall better. And I had a bit of leftover white and pink print.

Scrap spiderweb quilt with blue and white stars 

Now it's partially sewn and I'm not sure if I should have made only blue stars. Ah, well. The baby will like it.

DH took me on a quick trip to New Orleans this weekend. Our flight was cancelled last week; snow closed the airport. With snowfall only once a decade or so, they don't purchase snow removal equipment anywhere in the state.

We breakfasted at Cafe Beignet. The chairs are duplicates of a set my grandparents owned. Their chandeliers had lovely prisms. The interior roofline reminded me of old subway tunnels.

Cafe Beignet, New Orleans

We visited the WWII Museum to see the newly opened Road to Tokyo section

World War II Museum, New Orleans

and finished at Sacred Grinds across Canal Street from the Hurricane Katrina memorial and in the middle of acres of cemeteries. They advertise coffee "good enough to wake the dead." It's the best coffee I've had in years; my latte was deliciously smooth. I'd be there daily if I lived closer.

Sacred Grinds Coffee Shop, Canal Street, New Orleans
Sacred Grinds Coffee Shop, New Orleans

Enjoy the day, Ann

Thursday, September 21, 2017

Bloggers Quilt Festival Entry

The online festival slipped my mind until I saw Linda and Audrey's entries. They looked so lovely I had to post along with them. So here's my Spiderweb quilt.

Spiderweb string quilt

This quilt started with the vintage floral that make the background stars in the center. I drafted my own version of the Spiderweb block so I could play with the web layouts. By encircling the outer ring with a single color and including more shades of that color inside the webs they sparkle like jewels.  (The photo below shows the true colors of the quilt.)

Spiderweb string quilt, detail

Taking the vintage background as a sign I decided to applique a border, something I haven't done in years. What fun to make a beefy vine for the cardinals to sit on. Colors like no leaf ever added more joy. It's all machine applique. The vine is a tube; the leaves and birds were treated by Lara's method in Crafted Applique.

The quilt needed more {at least, to me} so there are rows of casually cut triangles in two sizes.

Then I started quilting: spiderwebs and spirals inside,

Spiderweb and spiral quilting designs

feathers, loops, and free motion doodles in the borders. Those loops were a blast. And very easy. I marked the midline so I'd close each loop in time and just went for it.


Thanks to Amy for again hosting and arranging all the details for this Bloggers Quilt Festival.

Previous posts about this quilt here.

Enjoy the day, Ann

Wednesday, May 31, 2017

Kaleidoscope of Butterflies 17 and Spiderweb Finish

I was sick during the show but finally found a way to take a photo of the entire Spiderweb quilt with decent colors. {The colors are the top are more accurate than those at the bottom.}

Multi-colored spiderwebs on pale blue background with vine applique, toile, and sawtooth borders.
Spiderweb quilt 

Each spiderweb contains fabric in mostly one color. Although there are other scraps, the outer row is a {fairly} uniform color to enhance the shape. They have simple webbed quilting which was actually quite difficult on a home machine in the center of the quilt.

Multi-color spiderwebs with pale blue star background
Spiderweb details

The borders were the most fun. I just let loose with triangles, vines, and cardinals. One sawtooth border wasn't enough. At the top and bottom there's a smaller sawtooth border inside the larger ones.
It makes a good transition from the smaller leaves to the larger triangles. Now I think it looks like fallen leaves.

Mulit-color spiderwebs with pale blue background enhanced with vine applique and sawtooth borders
Border details on Spiderweb quilt

One border mixed toile with vines. Why? There wasn't enough of either background fabric. What a fortuitous event.

Mulit-color spiderwebs with pale blue background enhanced with vine applique and sawtooth borders
Border details on Spiderweb quilt

The final outer triangles were simply outline stitched a quarter-inch from the seam lines in a darker green. The light green used elsewhere was too pale for these stronger colors.


The light green binding with purple dots looks good. There are so many details this quilt needed a very soft binding that almost disappears into the rest of the quilt. But I love the fresh look it adds with its variety of greens and purples.

Sawtooth border and feather quilting details

Just when I thought I was done, I noticed a small cut in one of the border triangles. No idea when it happened - before or after sewing. Fortunately, Stephie at Dawn Chorus Studio sent a scrap of print with some darling birds. I used Lara's method from her book, Crafted Applique,  to prep and sew it over the cut. Shh. It's our little secret.

Applique bird covers a small tear

I started this scrap quilt three years ago. This fall it was finally time to have some fun bordering and quilting. It's one I plan to keep for myself.

Quilt Details
Size: 95" x 99"
Design: Spiderweb
Batting: Mountain Mist Cream Rose 100%cotton
Thread: Aurifil 50/2, Guterman, YLI Invisible Nylon
Quilting: Walking foot and freemotion quilting, various designs

Previous posts:
1. Beginning
2. Working on the center
3. Center finished
4. Choosing a background for applique border
5. Toile and applique border plan
6. Drafting cardinals
7. Applique complete
8. Improv sawtooth border
9. Second sawtooth border
10. First sawtooth border attached
11. Overview of border choices
12. Ditch quilting with invisible thread
13. Outlining the stars
14. Spiderweb quilting 1
15. FMQ in the stars
16. Border quilting


My friend Joni made her own spiderweb quilt in blues and reds. Love the glorious colors and the charming kite with tail. It looks like her niece does, too.

Can you believe the number of caterpillars here? They extended for several yards along the Cumbres-Toltec rail line. I'm not sure if they were trying to migrate south or just emerged from eggs right there. What a swarm. How many will become butterflies? {Or moths.}

Caterpillars along the Cumbres-Toltec rail line


Enjoy the day, Ann

InLinkz linup removed because it was hacked.

Tuesday, March 21, 2017

Spiderweb Borders

Border quilting is much better than the webs. {Frankly anything is better than the webs.} The plastic overlay helped me choose quilting designs.

Using plastic overlay to practice quilting designs

The toile needs a lacy, open design that won't overpower its printed design. I found an idea in Luann Kessi's sketchbook. Links to the entire sketchbook are found on her blog which is also a wonderful inspiration for art quilts. After much practice on paper and plastic, I quilted it over these two borders and simply outlined the birds. I tried to keep the leaves even smaller than Luann's in deference to the small leaves on the toile.

Lacy quilting on the toile, idea from Luann Kessi

Mel Beach suggested the loops on the smaller triangle row. Amazingly easy and good looking. Thanks, Mel!

Loop quilting

I had to have some feathers: a favorite and I can usually do them well. I considered both light and dark outer triangles but decided on the inner triangles.

A view of the quilting on all three borders

Here's a view from the back of all the work. You can see how the birds were outlined.

Free motion quilting from the back

All that's left is some outline stitching on the outer triangles which will reprise the outline stitching on the stars. Oh, yes. And binding, washing, blocking...

Enjoy the day, Ann

"The whole art of government consists in the art of being honest." Thomas Jefferson

Saturday, March 11, 2017

Quilting Stars

I switched to a simple spiderweb design for the full webs although it may need some cross lines. This design is working better than the petals although the half-petals around the border are okay. I plan to keep them since that would be a major unsewing job.

Free motion spirals in stars.
Webs and flowers in spiderwebs

On the other hand, the spirals in the stars are lovely. These smaller units are easier to handle on a domestic machine. {I don't know why I forgot how difficult it is to create smooth arcs longer than the space under the machine.}

Then I'll head to the border. Several ideas are floating around my brain and surely one will work well. This needs to be finished soon. It's supposed to hang in our guild show April 1 and 2. If you're in the Bay Area, please come. Lots of talent in this guild.

Enjoy the day, Ann

Tuesday, March 7, 2017

Quilting the Spiderwebs and Random Coins

The plan was to use the same design to quilt my spiderwebs as I'd used on Suhavi's toddler quilt. But this quilt is more than four times larger. Even though I marked the inflection points with washable marker rather than straight pins, my struggles with the weight and bulk certainly show in the wobbliness of the curves.

Spiderweb with petal quilting

Only a few webs are quilted and they are all near the center. It seemed better to start there since the rest of the quilt is softer and squishier. But I'm not "warmed up" enough and it shows.

I've set it aside for a few days while I decide whether to redo the worst areas or take it all out. Here's a possible spiderweb design that might work better.

Possible spiderweb design

Meanwhile, I started another Chinese Coins. Currently I'm using the scrap bag. That thing is packed to overflowing.

Sewing small Chinese Coin sets

Wanting to try the boxing effect, I framed sets of one to four coins with red.

Boxing Chinese Coins in red

There's too much red. Back to the drawing board.

I next sorted by colors and have been making trios of mostly blues and greens {after a short foray into pinks.} They are arranged vertically so I force myself to try a new direction.

Chinese Coin sets arranged vertically

Finally something is working although I'm not sure where it's going.

Enjoy the day, Ann

Saturday, February 25, 2017

Outlining the Stars

 I bordered the stars with straight stitching. Each star has its own stitching. Lots of threads to tie off.

Stars bordered with walking foot stitching
Here's the view from the back.

View of stitching from the back

Next step will be to fill in the spiderwebs and stars. I may use the same method for the spiderwebs as Suhavi's Stars but I'm thinking about different FMQ designs for the stars themselves.

I'm plugging away on the Sampler quilt. Someone suggested I fold and baste the edges to keep them from fraying and the batting from becoming dirty. 

Edges folded and basted to keep them tidy and clean

Given that this quilt is twenty-nine years old and still unfinished, that's the best advice I've ever been given!

Tuesday is our next AHIQ linkup. I have #AHIQChineseCoins to share. Do you?


See you then.

Enjoy the day, Ann

Saturday, February 4, 2017

Spiderweb Borders Complete

The top is finally finished. It measures over ninety inches in each direction which is good for a queen-size bed. The lighting is off. I tried all hours of the day but couldn't get the colors to photograph properly. {And you know it no longer fits on the kitchen floor.}

Scrap spiderweb blocks on a light blue printed background with three borders.
Spiderweb with all borders

Taking the wider triangles out of the narrow sawtooth border made the rest more coherent. The background of the small triangles is yellow while the outer background is pale green. It makes a nice change from the center.

In many ways these borders remind me of heavily carved antique Spanish picture frames I enjoyed at the Dallas Museum of Art. They are "important" enough to set off the center but they also stand on their own, not an afterthought. The homey, slightly awkward construction pushes it towards 19th century American folk art.

Here's a detail of the color change and the borders. These colors are very close to the actual quilt.

Spiderweb quilt border, detail

The improvisational style of the triangles is more apparent in this photo. Especially on the narrow border, the width of the triangles as well as their points vary. On the outer border the triangles were cut close to thirty degrees. The width and height still vary but not as much as the inner triangles. Because of the similar angle it was easier to exchange foreground and background within the rectangles. {Important discovery: It's very fabric-expensive when you can't change any pieces around but always have to cut new ones.}

Since everyone's taste differs, other people may have stopped at a different place or moved in a different direction. This quilt could have easily expressed several styles.

For instance, here's the spiderwebs alone. This might be the stopping point for a true scrap quilt.

Spiderwebs with no borders

While here it is with only the plain border. A quieter quilt that could highlight elaborate quilting in the border.

Spiderweb quilt with plain border only

With only the applique it could move to a very traditional finish - with our without a second border.

Cardinal rest on the applique vine border of this scrap spiderweb quilt.
Spiderweb quilt with applique border only

Finally, I photoshopped this to see what the quilt would look like with sawteeth pointing out.

Spiderwebs with sawteeth pointing out,
photoshopped detail

It's interesting to discover the crossroads of quilt construction, the places where your decisions change the style of the quilt. And what a joy that we can each make quilts to please ourselves if we take the time to verbalize our reasoning. Thanks for all the help. You pushed me to articulation; I needed that.

Enjoy the day, Ann

Wednesday, February 1, 2017

Kaleidoscope of Butterflies #13

Cathy and I use this monthly linkup to spread the word about butterflies, their beauty, and what we can do to keep them around. While this may not be the month to see many in our areas, we can start some preparations for spring.

If you don't already have milkweed plants, this is a good time to purchase seeds since cold stratification helps them germinate. Here's a good article on growing milkweed from seed.

Save Our Monarchs is currently offering asclepias incarnata milkweed seeds free. Please add a donation so they can continue their efforts. This variety (swamp milkweed) is native to parts of eastern Canada and the lower 48 except the Pacific coast states, Arizona, and Mississippi. See this map for details.

If you check reputable suppliers in your area you'll be doing the greatest good. Buying varieties that are native to your county means they bloom at the "right" time encouraging butterfly migration. Those butterflies have a long journey and need sustenance all along the way. Although the article speaks about Texas varieties, the principle applies everywhere. Here's a list of varieties found in different states.

On the quilting front, the first sawtooth border is sewed to my latest spiderweb. It's looks much better than the original layout after culling the "wider" triangles. There were too many itty bitty triangles to move but I intended to preview some type of floater border once the strip was sewed. In my rush to "get to a stopping point" I forgot. On balance, I'm okay with this. A yellow floater would just make these triangle points a bit further from the vines. A contrasting floater would add emphasis where it's not needed. That's my story now because I'm not unsewing this row.  :-)

While spiderweb is not a kaleidoscope, it's made with a kaleidoscope ruler. And I'm really trying to focus on one project at a time. Well, one and one UFO and one new top. Unless I get sidetracked. Squirrel!

Spiderweb with first sawtooth border attached

I found the limit of my kitchen floor. Not sure where I will be able to take a photo next.

These pretty butterfly fabrics made their way into the triangles.

Butterfly fabrics used in spiderweb
Cathy has a charming tutorial to create butterflies from waste triangles. Take a look.

Enjoy the day, Ann

InLinkz removed because it was hacked.