Showing posts with label spiderweb. Show all posts

Thursday, September 21, 2017

Bloggers Quilt Festival Entry

The online festival slipped my mind until I saw Linda and Audrey's entries. They looked so lovely I had to post along with them. So here's my Spiderweb quilt.

Spiderweb string quilt

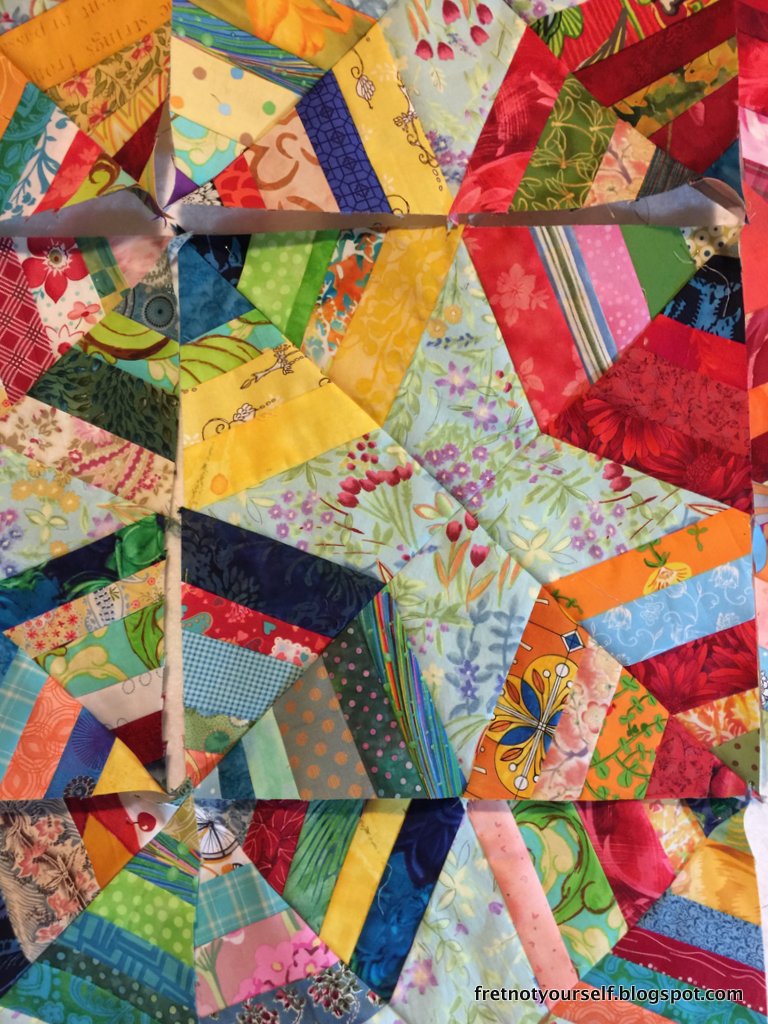
This quilt started with the vintage floral that make the background stars in the center. I drafted my own version of the Spiderweb block so I could play with the web layouts. By encircling the outer ring with a single color and including more shades of that color inside the webs they sparkle like jewels.  (The photo below shows the true colors of the quilt.)

Spiderweb string quilt, detail

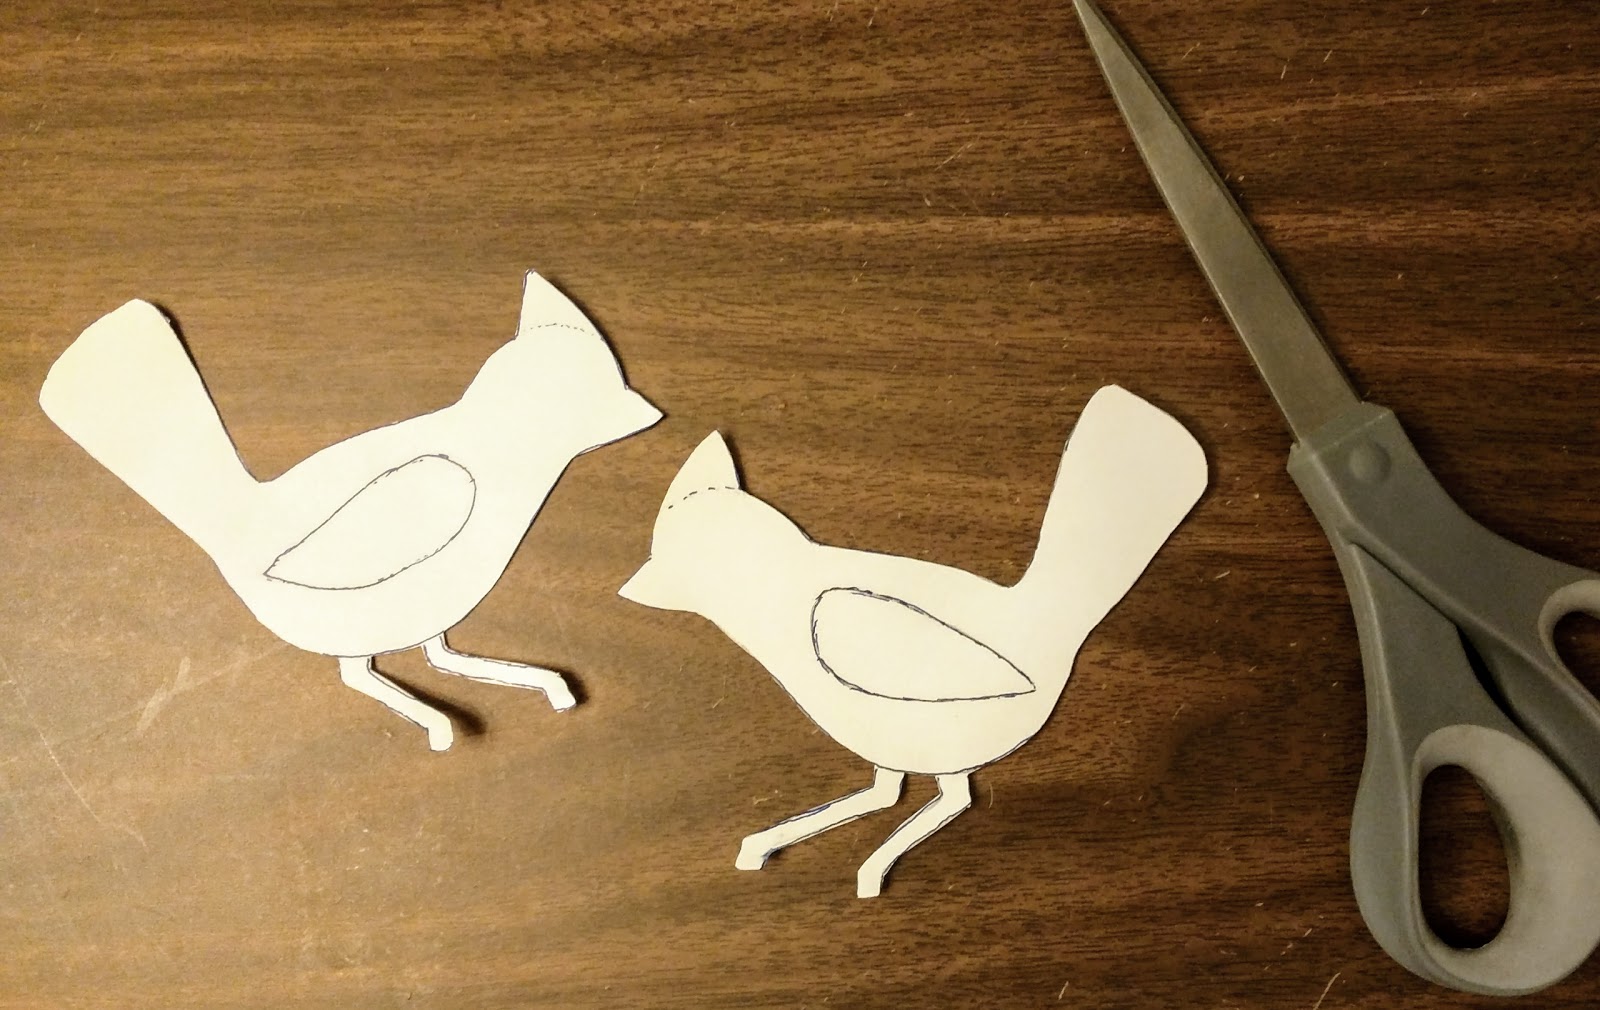
Taking the vintage background as a sign I decided to applique a border, something I haven't done in years. What fun to make a beefy vine for the cardinals to sit on. Colors like no leaf ever added more joy. It's all machine applique. The vine is a tube; the leaves and birds were treated by Lara's method in Crafted Applique.

The quilt needed more {at least, to me} so there are rows of casually cut triangles in two sizes.

Then I started quilting: spiderwebs and spirals inside,

Spiderweb and spiral quilting designs

feathers, loops, and free motion doodles in the borders. Those loops were a blast. And very easy. I marked the midline so I'd close each loop in time and just went for it.


Thanks to Amy for again hosting and arranging all the details for this Bloggers Quilt Festival.

Previous posts about this quilt here.

Enjoy the day, Ann

Tuesday, March 21, 2017

Spiderweb Borders

Border quilting is much better than the webs. {Frankly anything is better than the webs.} The plastic overlay helped me choose quilting designs.

Using plastic overlay to practice quilting designs

The toile needs a lacy, open design that won't overpower its printed design. I found an idea in Luann Kessi's sketchbook. Links to the entire sketchbook are found on her blog which is also a wonderful inspiration for art quilts. After much practice on paper and plastic, I quilted it over these two borders and simply outlined the birds. I tried to keep the leaves even smaller than Luann's in deference to the small leaves on the toile.

Lacy quilting on the toile, idea from Luann Kessi

Mel Beach suggested the loops on the smaller triangle row. Amazingly easy and good looking. Thanks, Mel!

Loop quilting

I had to have some feathers: a favorite and I can usually do them well. I considered both light and dark outer triangles but decided on the inner triangles.

A view of the quilting on all three borders

Here's a view from the back of all the work. You can see how the birds were outlined.

Free motion quilting from the back

All that's left is some outline stitching on the outer triangles which will reprise the outline stitching on the stars. Oh, yes. And binding, washing, blocking...

Enjoy the day, Ann

"The whole art of government consists in the art of being honest." Thomas Jefferson

Tuesday, March 7, 2017

Quilting the Spiderwebs and Random Coins

The plan was to use the same design to quilt my spiderwebs as I'd used on Suhavi's toddler quilt. But this quilt is more than four times larger. Even though I marked the inflection points with washable marker rather than straight pins, my struggles with the weight and bulk certainly show in the wobbliness of the curves.

Spiderweb with petal quilting

Only a few webs are quilted and they are all near the center. It seemed better to start there since the rest of the quilt is softer and squishier. But I'm not "warmed up" enough and it shows.

I've set it aside for a few days while I decide whether to redo the worst areas or take it all out. Here's a possible spiderweb design that might work better.

Possible spiderweb design

Meanwhile, I started another Chinese Coins. Currently I'm using the scrap bag. That thing is packed to overflowing.

Sewing small Chinese Coin sets

Wanting to try the boxing effect, I framed sets of one to four coins with red.

Boxing Chinese Coins in red

There's too much red. Back to the drawing board.

I next sorted by colors and have been making trios of mostly blues and greens {after a short foray into pinks.} They are arranged vertically so I force myself to try a new direction.

Chinese Coin sets arranged vertically

Finally something is working although I'm not sure where it's going.

Enjoy the day, Ann

Tuesday, February 14, 2017

Into the Ditch

As many of you know, I quilt on an older domestic Bernina with a fairly small throat plate. With a large quilt, it helps to stitch in the ditch along major seam lines.

I started by stitching the block boundaries vertically and horizontally. Each block contains a "star," not a spiderweb. This stitching starts and stops which also means loads of thread tails to bury. Next I stitched the border seams. Now I'm stitching around each spiderweb by rotating as the needle moves from point to point. With care, you can turn the quilt when reaching the borders. That translates to only two threads to bury. Yay!

These photos may help visualize what I did: Sew across the X where two spiderwebs meet.

Sew across the X where two spiderwebs meet
Turn at the inside of the star.

Turn at the inside of the star.

Fortunately I have two machines so while I quilt on my Bernina, I can still sew Coins on my Featherweight. Not both at once, you understand. But no time wasted changing needles and thread.

Here are some more possible Coin pairs. The yellow floral with brown/yellow/white plaid is not working for me. I don't think I'll use it.

Possible Chinese Coin pairs.

Although I haven't written about this in a while, I'm still working on my old Sampler quilt - usually while listening to the news at night. This is the final block to be hand quilted but it's still a long way from done. Twenty-nine years and counting.

Sampler quilt {still}in the hoop

Of course, if I'd worked on it regularly it would have been finished years ago.

Enjoy the day, Ann

Saturday, January 14, 2017

Leafing Out

The vine is sewn; the cardinals will fit. I only want a few of them but perhaps a bit more upright.

Pinning cardinals and leaves on vine border

I pinned some leaves to check the angles and the spacing. Would some look good directly under the cardinals?

The vine was easy to sew but I'm having more trouble with the leaves. My stitches wobble very far from the edge at times. I try slower speeds {and even the half-speed button} but before too long I'm back in the Grand Prix. Changing to the overlock foot helps a bit {except for my speeding tendencies.} When the wire on the right is positioned along the raw edge, it creates an eighth-inch seam... until I sew too rapidly. "Slow down on curves" is not sinking in.

Attaching leaves by machine applique

Mary at Mary and Patch is machine stitching raw edge applique by sewing around each piece twice. Also, Cathi at Gertrude Made used this same technique to applique her lovely bird. The casual feel of the stitching is very appealing. Too bad some of my leaves are sewn and tied off. I hate thinking about redoing them but dislike even more my current poor technique. At least I found a possible solution before it's quilted.  Gotta love that.

Making haste slowly but I'm still sticking to one project at a time. For now. I will need another Grandmother quilt next month and plan to quilt the red and yellow string top soon.

Red and yellow string quilt top

The green string was quilted with channels, the blue with double row checkerboard. I'm trying to figure out another simple no-marking quilting design to try.

Enjoy the day, Ann

Saturday, January 7, 2017

Dieting Cardinals

Putting those chubby cardinals on a quick diet was easier than expected. I traced part of my first design but slimmed their heads and tummies. The outline is also an easier curve. If I keep this up I'll be ready for art school soon. 😉 The Slender Cardinal Template PDF is now on my tutorial page.

Slender Cardinal templates

DH and I had a very quiet holiday but managed to travel several times. We finally visited Hearst Castle. My last visit was many years ago. How many? Well, there was only one tour at the time so my mother and I walked all over the place.

This visit turned out like a scene from L.A. Story. Steve Martin's character wanted to go take a trip with his girlfriend but he was the weekend weatherman. He prerecorded his spots because "it's always sunny and seventy in LA." Of course, it stormed all weekend and he was out of a job. We chose the worst day to visit: stormy, blowing, cold {for California.} The hills run straight down to the Pacific from the house but we couldn't see it. We couldn't even see ten feet in front of us so touring the gardens and grounds was out of the question. Nevertheless, the rooms are stunning and we enjoyed our visit.

Hearst hired architect and civil engineer, Julia Morgan, to build La Cuesta Encantada with reinforced concrete to withstand an 8.2 earthquake.  I was particularly taken with the ceilings. Some were from Spanish monasteries and European castles. Shipping them amazed me and then Julia installed the ceilings in new rooms designed to their dimensions. Other ceilings were contemporary plasterwork.

Antique painted wood and contemporary plaster ceilings at Hearst Castle.
Ceilings at Hearst Castle

Hearst and Morgan also installed contemporary and antique tiles throughout the house and grounds. I loved the rooster and donkey window screens in a tower bedroom.

The lower right tile is in the kitchen and contains a Latin motto... with a typo. It either reads "Sine ipso factiv est nihil" meaning "without him nothing was productive" or "sine ipso facto est nihil" meaning "without him nothing was done." Which do you prefer?

Hearst Castle tiles and window screen, 

The lamp with statuette was in one of the guest houses while the lampshades were in Hearst's personal suite. They were made of old vellum in such poor condition they weren't able to be rebound into a book. The top one is a record of indentured servitude while the bottom is a musical score. Can you say cutter quilt?

Desk lamp with statuette and two lampshades of antique vellum

Enjoy the day, Ann

Sunday, January 1, 2017

It's All About the Cardinals and KofB #12

Happy New Year! Wishing everyone good health, good friends, and safety in 2017.

QS informed me this quilt needs cardinals - the favorite birds of our sister and grandmother. I'm not sure how they will fit in but know I need them on hand before sewing the vine. Since my drawing skills are lacking {or at least my confidence in those skills is lacking} I combed the web for easy bird outlines. The final two choices were:
  1. Beth Donaldson posted a number of free quilt blocks from old newspapers, including the Cedar Waxwing and Hermit Thrush.
  2. There are too many "bird on a wire" silhouettes to list. Best thing? Very few have legs... and they look good. That should make it easier.
  3. EDIT: How could I forget Barb's bird when it's part of her blog header? Love the way she added part of the wing in silhouette.
It took the whole evening to draft simple cardinals. I planned to cut the crest off some for other birds or perhaps draft hummingbirds.

Cardinal Silhouette templates ready to use

My t-shirt quilt friend sent the beautiful flowers for Christmas. The bouquet contains lilies, carnations, and roses with special additions of pine and bright red berries. The berries are "the berries." Perfect. What a kind gesture.

Looking at the quilt top again, my cardinals are too fat. Those toile birds are sleek and streamlined. Back to the drawing board.

In case I change my mind, I placed a pdf of the cardinal template  on the Tutorial page downloading. Let me know if there are problems. This is my first attempt at pdfs in Blogger.

Streamlined toile bird silhouettes

At 6.75" this border is more narrow than I hoped. I'm not sure how to curve the vine and also avoid tiny leaves on the outer curve. {Like most beginners} my eye is caught by the most elaborate applique. Quite beyond my expertise.

Possible vine ideas were distilled to simpler, diffuse ones that might better fit the style of my quilt.
  1. The border on Stamp of Approval by Tonya Alexander. Easy curved vine, nice big leaves, yoyo berries. Now I wonder if the leaves are too fat. They match my chubby cardinals but everything may need to go on a diet.
  2.  Is there a way I can incorporate Susan McCord's string pieced leaves? Their longer, skinnier style matches trim birds.
  3. Quilted with Grace posted her first hand applique. I love the multicolored leaves and the groups of berries on this vine.
  4. Of course, Aunt Millie's Garden by Piece o'Cake has two beautiful vine borders. The first is too wide for my border but the narrower is a charming way to make leaf-like flowers.
  5. Jan Hutchison made a quilt from Applique Affair by Edyta Sitar. Jan's second photo shows a section with only a few leaves, a bud, some berries and a bird. Hmm. All the elements I want.
After rereading parts of Collaborative Quilting by Freddy Moran and Gwen Marston, I cut my vine fabric 1.5" before folding. The final width ranges from one-half to five-eighths inches.

I pinned it in a very curvy fashion. Too curvy for the relatively narrow border so it will be changed next week. I think diffuse leaves all the same size will be a good first vine.

This vine is too curvy for the border width.

How do spiderwebs fit with butterflies? I designed the triangles of the webs with my kaleidoscope ruler. Weak, but there it is.

Want something a bit more butterfly-y? Janie at Crazy Victoriana pointed me to Missouri Star Quilt Company's latest YouTube video, Easy Strip Butterflies. It looks like a great way to use some remnants. I see a baby quilt in the near future.

Enjoy the day, Ann

InLinkz removed because it was hacked.

Tuesday, December 27, 2016

Bordering Plan and AHIQ December 2016

As several people noted there's not enough fabric to extend onto all sides. The solution is to use different borders. Thanks for all the great comments on my previous post; they gave me several ideas for incorporating different borders and adding applique.

Julie reminded me of Susan McCord string pieced leaves border on Barbara Brackman's blog. Love the graceful way she incorporated the leaves and vine.  Sue Nickel's New York State of Mind has three different borders. There's another I've been considering that combines zig zag and applique borders. I thought it was Freddy Moran's quilt but can't find it online or in my books.

I measured then measured again but no more fabric appeared. With the narrow chartreuse inner border the quilt now measures 63" by 75". Because there are two different birds, the toile cut into two 6.5" borders: the first is 84" {two strips} while the other is 124" {three strips.} They will fill one short and one long side.

The blue gingham could be cut into three 10" strips but only 129" or four 7" strips that are 172". The final choice was four strips because it's the only way to fit the final two sides.

Here's what it looks like laid on the kitchen floor. Quieter than I realized.

Spiderweb quilt with blue borders

Next is to decide which border extends to the edges - the applique or the toile.

As usual lately, this is not the most improvisational quilt. However, I had visions for the border but didn't have enough fabric to carry it through. On to Plan B which is turning out better than the original idea. That's my bit of improv.

With the bird toile attached, I'm considering appliqued birds on the blue gingham. Another adjustment since my first idea was vine with leaves. Second was adding flowers. I'm working much more slowly than normal because of the holidays, diffidence about my applique abilities, or actually thinking about the results. Not sure what proportion each is playing.

Kaja and I have plans to start quarterly improvisational challenges next year. We hope quarterly will allow more time for all of us to complete other, personal work but frequent enough to see progress on improvisational topics. Check us out next month for all the details!

Enjoy the day, Ann

InLinkz removed because it was hacked.

Saturday, October 1, 2016

Spiderweb Quilt Finished and Kaleidoscope of Butterflies Oct 2016 Linkup

It's time for another Kaleidoscope of Butterflies linkup. What have you done or seen?


I finished Suhavi's Stars, a Welcome to the World gift for a precious baby. {It would have been a baby shower present if I hadn't been out of town all summer.} While it's not a kaleidoscope, I used that ruler to draft the triangles for the strips.

Suhavi's Stars - a spiderweb quilt

With only one yard of orange solid {which is not as bright as these photos} I needed some scraps to widen the back. These make me very happy. The blue especially sets off the orange.

Back of Suhavi's Stars

Because there wasn't enough of either, there are two different fabrics for the binding. They looked different as pieces but are much less noticeable on the binding.

Suhavi's Stars spiderweb quilt,
details of binding and quilting

The quilt has been gifted. The parents like it, too. Hooray!

Quilt Details
Size: 40" x 40"
Pattern: Spiderweb
Batting: Mountain Mist Cream Rose 100% cotton
Thread: Gutermann peach cotton
Quilting: Walking foot

There haven't been many butterflies lately but the hummingbirds have been crowding the feeder. I guess they are preparing for their trip south. This one was enjoying the flowers. And aren't they similar to the quilt's colors?

Hummingbird feeding on nectar

Other kaleidoscope quilts on the web:
  1. Melissa's 
  2. Linda Miller's
Enjoy the day, Ann

InLinkz removed because it was hacked.

Tuesday, September 20, 2016

Quilting the Spiderweb and Catalina Island

I tried some different quilting on these spiderwebs. I used the walking foot to travel from point to point around each seam creating petal shapes.

When I got back to the starting point, I marked a point 1.25 inches from the center for the next round. I used pins to locate those points since markers didn't show on all the different fabrics. {The distance was a random length that looked good to me on these spiderwebs.

Marking endpoints for
point to point quilting on a Spiderweb quilt.

For the third round, I used the same distance and marked it from the outer rim of the spiderweb.

Marking the endpoints of the third round
of quilting on the Spiderweb quilt

Using the same distance meant I didn't have to change the ruler and risk messing up the second and third rows.

Spiderwebs with three rows of quilting

I simply imagined gentle curves between consecutive points. Each round has a slightly different curve; in fact, each curve is slightly different because they aren't marked.

By planning where to start I was able to sew all these rounds from web to web without breaks. Hooray! Only two pairs of threads to bury.

We recently spent a weekend on Catalina Island. I've always wanted to see the flying fish so DH arranged an evening boat ride. That was the highlight. But Catalina has so much more, especially if you like beach life. The water is beautifully clear and there are two marked areas to swim and snorkel. Loads of sea life on view.
Views of Avalon bay on Catalina Island and Zane Grey's house

Zane Grey, a Western writer, had a home here which is now being converted to a hotel. The Casino {which they carefully explain means 'gathering place' not 'gambling'} is visible in the lower left photo above. The entrance has wonderful aquatic murals.

Murals at the entrance to the Casino, Catalina Island

The Nature Conservancy encompasses most of the island and includes the Airport in the Sky, a landing field for prop planes.
Airport in the Sky, Catalina Island

The Channel Islands have a five-pound native fox. Two of them posed for photos: one at the airport {no, I didn't feed him} and the other resting along the roadside {at the narrowest point, of course.}

Two native foxes and a buffalo
seen during a tour of Catalina Island

Additionally, the Conservancy supports a small herd of bison brought to the island for a film in the 1920's.

The critical issue on all the Channel Islands is the lack of water. The drought that encompasses most of California is particularly acute here. All restaurants are required to sell bottled water {imported from the mainland} rather than serve water in a glass. As of September, they must use disposable dishes. The toilets everywhere use salt water to flush. Very smart. But the faucets and shower heads in our hotel seemed to have no restrictors.

Only a few cars are allowed on the island; it takes about 14 years to get a permit. Most people get around via bus, bicycle, walking or one of the 1100 golf carts. The air was so clear that walking was a pleasure.

The ferry sailed past Point Fermin lighthouse on our way to the island but DH arranged a helicopter ride back as a special treat. What a great birthday.

Ferry to Catalina Island passes Point Fermin lighthouse.
Newport Beach from the helicopter.

 If you're in the Bay Area this weekend find time to visit Sherri Lynn Wood's newest exhibit, Afterlife. She's created a series of quilts using recycled materials.

Enjoy the day, Ann

Saturday, September 17, 2016

Spiderwebs and Stars

I cut kite shapes a couple of years ago for a spiderweb quilt. "More is more" {my usual method}  didn't work in this case so the warm colors were pulled and stashed away for a while.

Digging them out recently there are sixteen stars; perfect for the toddler quilt I need. Actually I needed it this summer but only have time to start it now.

Orange and Red Stars form the background
of this Spiderweb toddler quilt

Several layout tests until I decided to arrange the stars diagonally.

The outmost string on the spiderweb wedges must contrast with the star colors. Some were red, orange or yellow. I moved them to a star with a different value. And lucky me, there were some blue wedges from the previous quilt that didn't look good against blue stars. {I still need to border and quilt that one.}

Laying out the Spiderweb quilt

It's always amazing how much smaller the quilt becomes as the units are sewed.

Sewing Spiderweb quilt blocks
Coming along well.

Enjoy the day, Ann

Saturday, December 12, 2015

Spiderwebs Need a Border

My computer is still out for repairs and I'm out with a cold. It takes an entirely different skill set to try to post from my tablet. And I can't click any links. But I did get the spiderwebs sewn. Now they need a border.

Jewel Spiderwebs sewn 

Here are some closeups of a few.

Jeweled spiderwebs, detail.

It's still unpressed to keep the sides from stretching. And it needs a border. I've always wanted to make a vine and leaf border. This seems like a good place to put one. But... which fabric for the background? None has enough yardage to go all the way around. Some thinking is in order.

Enjoy the day, Ann

Tuesday, November 17, 2015

The Spiderwebs are Haunting Me

It's still clean up/clear out mode around here. I bought shallower boxes for my fabrics so they all fold upright. Much easier to move them and to see everything at one glance. Previously my fabrics and projects were stacked like pieces of paper. It was easy to get lost in the stacks.

Guess what? Those pesky Spiderwebs popped up during the move. I hadn't forgotten them but had been ignoring mine. Everyone else's are gorgeous. See Cathy's here, or Edeltraud's here or Sujata's here or Krista William's here... but mine have not played well together.

First attempt at Spiderwebs, 2014

While clearing out the scrap bag last week, I made more wedges. And I decided to limit the stars to light blue/green. On the left are four different blue stars. Unfortunately that's all of three blue fabrics. Most spiderwebs are grouped by their outer band color. Opinion of my arrangement? Yuck.

On the right the stars are one fabric and each web is grouped into alternating sets of outer band color. (I thought it might look like propellers.) Yuck again.

Spiderweb versions 2 and 3.

"If plan A fails, remember there are twenty-five more letters." Claire Cook

Adding dark strips didn't improve things nor did adding lights. Finally I decided the webs needed more concentrated colors. By now the scrap bag is skimpy; so I cut some new fabric. I sewed new wedges of mostly single colors - red, blue, green, yellow, purple, orange, or pink - placing them to boost the color of each web. Much better; almost jewel-like.

Spiderweb Jewels

Spiderweb blocks are sewn around the star, not the web. I drafted this 12" block myself using a kaleidoscope ruler. Silly me. The wedges needed to be cut 6.625". I should have used an easy measurement for the wedges and let the block be whatever size resulted.

Construction notes: Mine are not paper pieced. I sewed strips together, pressed, then cut wedges for some. Others I eyeballed lengths of strips to form the wedge, pressed, then trimmed with with the ruler. Once I started assembling the blocks, I stopped pressing to keep from distorting the bias edges.

Spiderweb Jewel, detail showing construction

Remember Ad Hoc Improv Quilters linkup #3 is only a week away - Tuesday, 24 November. What do you have to share?

Enjoy the day,
Ann