Showing posts with label quilting. Show all posts

Tuesday, July 4, 2023

A Big Pleat on the Back

There is nothing noble in being superior to your fellow man; 
true nobility is being superior to your former self.
~Ernest Hemingway

Quilting


Two weeks of guests with heat advisories daily. No rain; temps well over 101 F (38 C) but no fires. It meant everything we did was inside. Fortunately, the A/C only went out once. It finally rained Sunday and we are grateful the temperatures have dropped 10 degrees. Funny how the heat wave made mid-90s seem cool. 

Guests left yesterday so I returned to quilting. I’m still having major difficulties posting photos but that pales in comparison to the mess on the back. After quilting about ten diagonals, I noticed all this bunching on the back. Huge pleats. It's only happened once before and I'm not sure exactly what my mistake was this time. Obviously it was pleated as it was pinned; I’m just unsure exactly how that happened.


I'll be taking all these seams out. Perhaps I can save half of them. We'll see. This will take a while.

Reading

I read the novella Foster by Claire Keegan about a young Irish girl who goes to live with relatives for a year and found it thought-provoking.

Happy Fourth of July, America!

Enjoy the day and the fireworks, Ann

Tuesday, February 13, 2018

CCVI (Yellow and White) Quilted

Chinese Coins VI (the yellow and white one) worked out better than I thought. Three different column widths are symmetrically placed. The Coins and columns are rotary cut although I didn't try to keep the coins parallel.

Such a low volume quilt needed some solid white fabric to emphasize the lightness of the "white" columns. I.e., ensure everyone realizes they are not beige. I'm finding that adding some solid white to areas I want to read as white is better than using all prints.

Chinese Coins VI quilt

As I've mentioned before I like to ditch stitch major seam lines and on Coins I like to add rows of stitching about 3/8" to 1/2" on each side of the ditch. Here I mimicked that design down the centers of the yellows and the wider (outside) white columns. Then I sewed my usual: quilt by splitting the distance in half until it looked right to me. Because the center yellow column is wider, those quilting lines are spaced further apart than the other yellow columns. I considered quilting as many divisions on the two narrow white columns but decided that was too tight.

Parallel quilting can seem stiff until the quilt is washed. Then is softens up beautifully.

Chinese Coins VI quilting detail

There was a lovely yellow and white stripe in my stash waiting to become binding. Even better, it had these unique bulleyes. Now I see I should have fussy cut the binding so theys lined up around the binding. A note to remember for next time.

Chinese Coins VI binding detail

The buffalo plaid/gingham on the back makes me quite happy. It has a slightly roughened texture - almost like kitchen toweling or hopsack - although it doesn't snag. Usually I like soft finishes but this texture certainly offers comfort on a cold day. We've been having lots of cold days in Texas lately. I'll have to remember this backing choice in the future.

Quilt Details
Size: 45" x 52"
Design: Chinese Coins
Batting: Mountain Mist Blue Ribbon 100% cotton
Thread: yellow Aurifil cotton 50/2 thread, YLI nylon monofilament
Quilting: walking foot parallel lines

Enjoy the day, Ann

Tuesday, July 4, 2017

Quilting Scrappy Trip

Nothing will show on this bright quilt so I chose a diagonal grid. Simple. I thought it would be fast but for some reason has taken longer than planned.

People have asked what fabrics I use and this is a good representation. Lots of prints {some quite large scale}, a few tone on tone, some batik, some uglies, plaids when I find them.

Crosshatch quilting detail on Scrappy Trip

We visited Coors Field in Denver for a baseball series. It was hot, 90+, although that was typical nationwide. Hat, shorts, sunscreen required.

Coors Field, Denver

The Denver Art Museum had an exhibit of Pacific Islands bark cloth from the mid 1800s to 1900s.

Pacific Islands Barkcloth,
Denver Art Museum collection

It was used as clothing, ceremonial masks, room dividers, bed coverings, and mosquito protection. Chiefs gave yards of this cloth as gifts to important visitors.

Pacific Islands Barkcloth,
Denver Art Museum collection

This one reminded me of some of our two-block quilt examples. It resembles striped blocks with applique.

Pacific Islands Barkcloth,
Denver Art Museum collection

Several of these remind me of Hawaiian applique, too. Such beautiful designs.

Pacific Islands Barkcloth,
Denver Art Museum collection

Not only did they design pinwheels, their painted repeating styles remind me of Seminole patchwork. 

Pacific Islands Barkcloth,
Denver Art Museum collection

Happy Fourth of July to my American friends.

Enjoy the day,  Ann

Saturday, February 25, 2017

Outlining the Stars

 I bordered the stars with straight stitching. Each star has its own stitching. Lots of threads to tie off.

Stars bordered with walking foot stitching
Here's the view from the back.

View of stitching from the back

Next step will be to fill in the spiderwebs and stars. I may use the same method for the spiderwebs as Suhavi's Stars but I'm thinking about different FMQ designs for the stars themselves.

I'm plugging away on the Sampler quilt. Someone suggested I fold and baste the edges to keep them from fraying and the batting from becoming dirty. 

Edges folded and basted to keep them tidy and clean

Given that this quilt is twenty-nine years old and still unfinished, that's the best advice I've ever been given!

Tuesday is our next AHIQ linkup. I have #AHIQChineseCoins to share. Do you?


See you then.

Enjoy the day, Ann

Saturday, February 18, 2017

String Quilt for a New Grandmother

Ok. I got sidetracked. Instead of working on Coins or Spiderweb, I finished a top for a dear friend who recently became a grandmother. No complaints though. A finished quilt is always a win plus it only took a day to baste, quilt and bind this little toddler quilt which will be perfect to use when the baby visits.

String quilt quilted with a grid pattern using a walking foot.
Red and yellow string quilt, quilted and bound

The quilting design is a variation of the one I used on the blue string quilt. This time I stitched in the ditch of all the blocks then stitched a half-inch away on each side. Finally I divided the remaining space into half and half again (four equal-ish sections.) It was easy to quilt from point to point with the walking foot after eyeballing the spacing and marking it with straight pins. The ditch stitches only show on the back; that makes the front a bit plainer than intended.

Quilting point to point using
straight pins to mark the points.

The fabric for the back has been in my stash for years. {In fact, I just culled it. Sitting on top of the "future sleeve" pile made it more noticeable.} What a treat to have sufficient yardage for the entire back.

Red and Yellow String quilt detail:
quilting, binding, and backing

The same fabric creates the binding, too. It is cut separately, not pulled from the back. The fabric is naturally blurry and a third of a yard still remains.

The best thread color turned out to be brown. Blending with both red and yellow, it's not too harsh on either color.

Quilting detail, red and yellow string quilt

Quilt Details
Size: 40" x 48"
Design: String quilt on paper foundation
Batting: Mountain Mist Cream Rose 100% cotton
Thread: Brown Metler cotton
Quilting: Walking foot on a domestic machine

Enjoy the day, Ann

Tuesday, February 14, 2017

Into the Ditch

As many of you know, I quilt on an older domestic Bernina with a fairly small throat plate. With a large quilt, it helps to stitch in the ditch along major seam lines.

I started by stitching the block boundaries vertically and horizontally. Each block contains a "star," not a spiderweb. This stitching starts and stops which also means loads of thread tails to bury. Next I stitched the border seams. Now I'm stitching around each spiderweb by rotating as the needle moves from point to point. With care, you can turn the quilt when reaching the borders. That translates to only two threads to bury. Yay!

These photos may help visualize what I did: Sew across the X where two spiderwebs meet.

Sew across the X where two spiderwebs meet
Turn at the inside of the star.

Turn at the inside of the star.

Fortunately I have two machines so while I quilt on my Bernina, I can still sew Coins on my Featherweight. Not both at once, you understand. But no time wasted changing needles and thread.

Here are some more possible Coin pairs. The yellow floral with brown/yellow/white plaid is not working for me. I don't think I'll use it.

Possible Chinese Coin pairs.

Although I haven't written about this in a while, I'm still working on my old Sampler quilt - usually while listening to the news at night. This is the final block to be hand quilted but it's still a long way from done. Twenty-nine years and counting.

Sampler quilt {still}in the hoop

Of course, if I'd worked on it regularly it would have been finished years ago.

Enjoy the day, Ann

Tuesday, October 25, 2016

AHIQ Linkup October 2016 and Quilting Spirals

Between this small quilt and the t-shirt quilt I haven't started any improv this month. But the quilting design has free-hand aspects. After some ditch quilting with a walking foot, I decided to quilt spirals on the inner border.

Why? Because the thread is a bit heavier and tends to knot up if you change directions in a point. Spirals have no sharp points for knots to form.

Free motion spirals without echo quilting

I used a glass to mark circles. This keep the spirals reasonable spaced. But it still takes practice to maintain spacing during the inward and outward spin.

A glass makes a good
template for spiral placement

Adding a line of echo stitching on each side of the spiral will fill out this border.

Enjoy the day, Ann

InLinkz removed because it was hacked.

Tuesday, September 20, 2016

Quilting the Spiderweb and Catalina Island

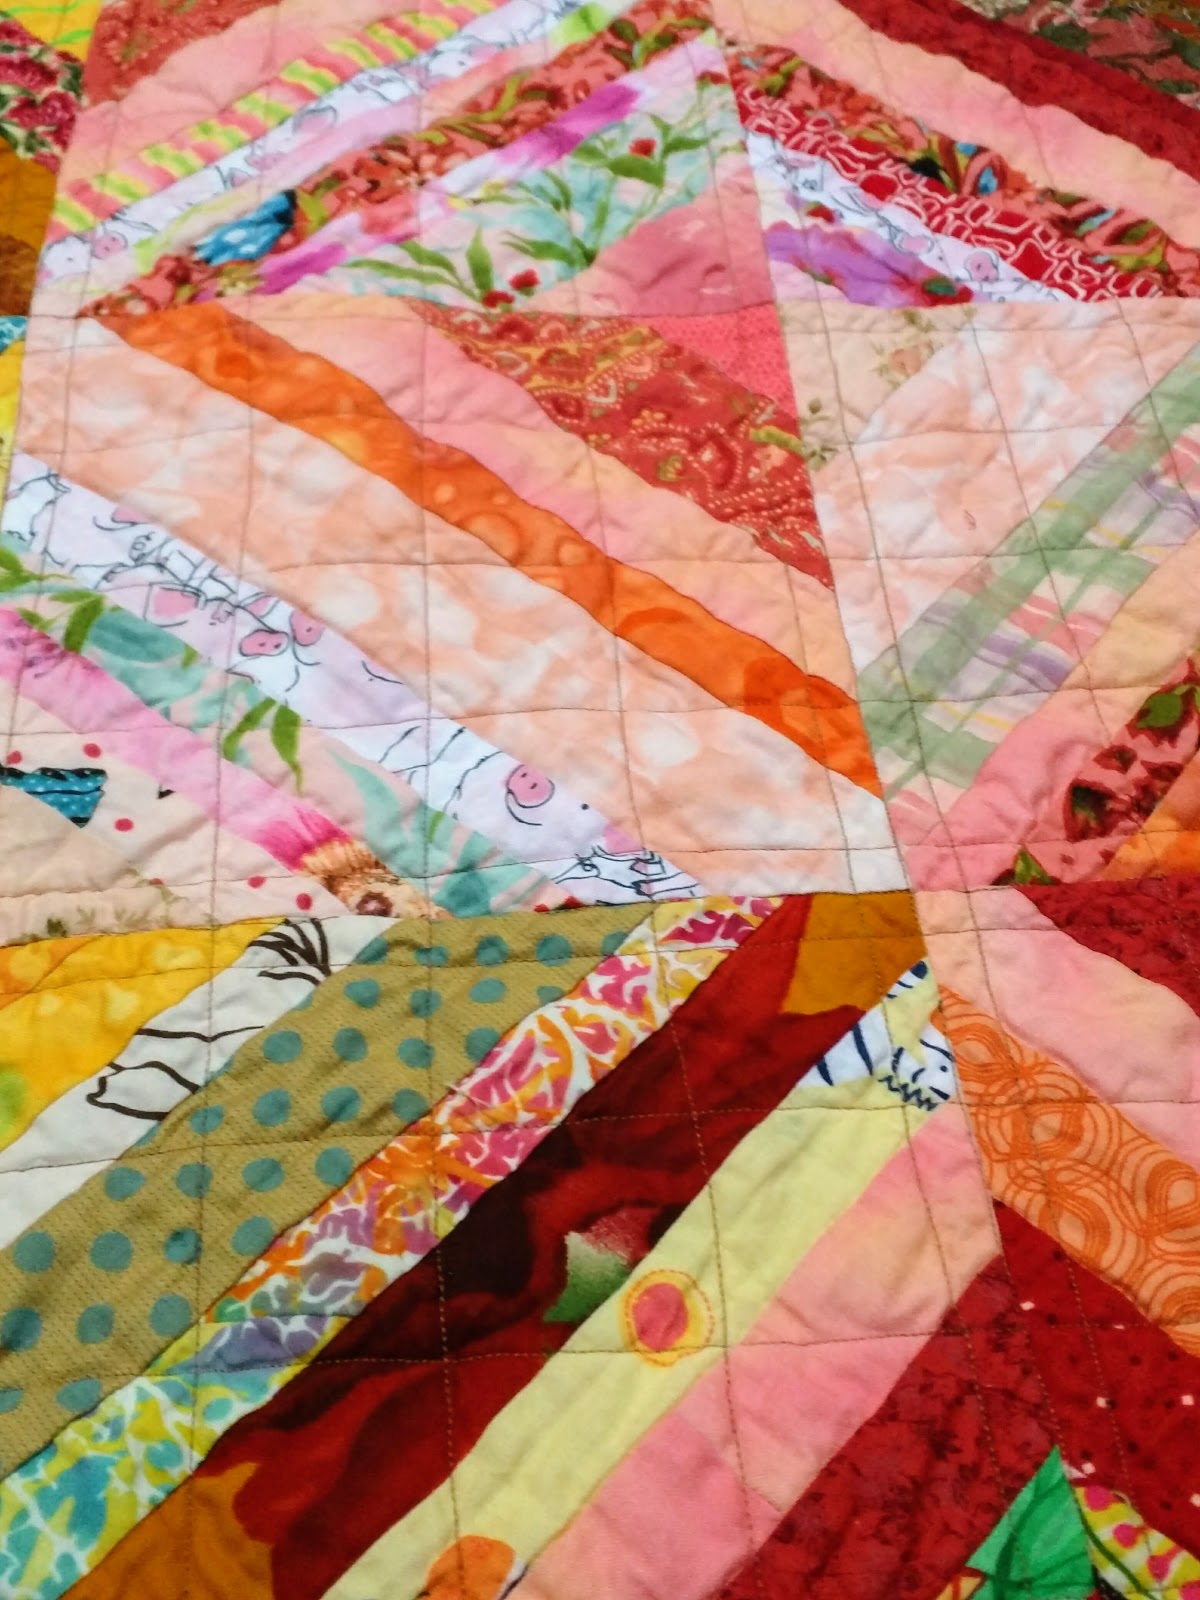
I tried some different quilting on these spiderwebs. I used the walking foot to travel from point to point around each seam creating petal shapes.

When I got back to the starting point, I marked a point 1.25 inches from the center for the next round. I used pins to locate those points since markers didn't show on all the different fabrics. {The distance was a random length that looked good to me on these spiderwebs.

Marking endpoints for
point to point quilting on a Spiderweb quilt.

For the third round, I used the same distance and marked it from the outer rim of the spiderweb.

Marking the endpoints of the third round
of quilting on the Spiderweb quilt

Using the same distance meant I didn't have to change the ruler and risk messing up the second and third rows.

Spiderwebs with three rows of quilting

I simply imagined gentle curves between consecutive points. Each round has a slightly different curve; in fact, each curve is slightly different because they aren't marked.

By planning where to start I was able to sew all these rounds from web to web without breaks. Hooray! Only two pairs of threads to bury.

We recently spent a weekend on Catalina Island. I've always wanted to see the flying fish so DH arranged an evening boat ride. That was the highlight. But Catalina has so much more, especially if you like beach life. The water is beautifully clear and there are two marked areas to swim and snorkel. Loads of sea life on view.
Views of Avalon bay on Catalina Island and Zane Grey's house

Zane Grey, a Western writer, had a home here which is now being converted to a hotel. The Casino {which they carefully explain means 'gathering place' not 'gambling'} is visible in the lower left photo above. The entrance has wonderful aquatic murals.

Murals at the entrance to the Casino, Catalina Island

The Nature Conservancy encompasses most of the island and includes the Airport in the Sky, a landing field for prop planes.
Airport in the Sky, Catalina Island

The Channel Islands have a five-pound native fox. Two of them posed for photos: one at the airport {no, I didn't feed him} and the other resting along the roadside {at the narrowest point, of course.}

Two native foxes and a buffalo
seen during a tour of Catalina Island

Additionally, the Conservancy supports a small herd of bison brought to the island for a film in the 1920's.

The critical issue on all the Channel Islands is the lack of water. The drought that encompasses most of California is particularly acute here. All restaurants are required to sell bottled water {imported from the mainland} rather than serve water in a glass. As of September, they must use disposable dishes. The toilets everywhere use salt water to flush. Very smart. But the faucets and shower heads in our hotel seemed to have no restrictors.

Only a few cars are allowed on the island; it takes about 14 years to get a permit. Most people get around via bus, bicycle, walking or one of the 1100 golf carts. The air was so clear that walking was a pleasure.

The ferry sailed past Point Fermin lighthouse on our way to the island but DH arranged a helicopter ride back as a special treat. What a great birthday.

Ferry to Catalina Island passes Point Fermin lighthouse.
Newport Beach from the helicopter.

 If you're in the Bay Area this weekend find time to visit Sherri Lynn Wood's newest exhibit, Afterlife. She's created a series of quilts using recycled materials.

Enjoy the day, Ann

Saturday, March 26, 2016

Unintentional Slow Quilting

I'm finally slow quilting. Not because I want to but the machine is messing up.


This should have been a three-hour job but with all the skipped stitches and repeated rip outs it's taking an unlimited amount of time. The machine is desperately in need of a tuneup. Fortunately I have a Featherweight for piecing if not quilting.

The March AHIQ link up continues a few more days. We'd love you to add some improvisational and/or utility quilts you're working on. Be sure to click the thumbnails to read more about each quilter's work. There are so many aspects to study and enjoy.

Enjoy the day, Ann

Saturday, March 19, 2016

Fifth Log Cabin Baby Quilt Finished

And this is the last of the five log cabin leader/ender projects from last year. Hooray! While it seemed helpful to have the tops ready to go, it's even better to have a finished quilt tucked away for a quick gift. All these blocks are regular log cabins but two columns were made of lights only. Similar blocks appear in this log cabin, too.

The light/dark shading highlights design changes so there are almost endless ways to set log cabins. In fact, they are the same ways you can set HSTs.


One yard of a Jane Sassaman print is extended with men's shirting leftovers purchased in NYC several years ago. The finish on the shirting material makes it shimmer like polished cotton. It also makes it wrinkle resistant and cool - the opposite of flannel, very welcome in hot Texas.


I'm not as happy with the free-motion quilting loops I made on the lights. The darks were ditch-stitched with a walking foot.


Quilt Details
Size: 44" x 44"
Pattern: Log Cabin variation
Batting: Mountain Mist Cream Rose 100% cotton
Thread: Gutermann cotton sewing thread in navy and white
Quilting: Straight line with walking foot and free motion loops

Here are some log cabins I've completed if you want to look at other layouts. Many of these were from the leader/ender project.


Do you have any improvisational and utility quilts for the AHIQ linkup this Tuesday, March 22?

Enjoy the day, Ann

Tuesday, March 15, 2016

Fourth Log Cabin Quilt Finished

The fourth small log cabin is quilted and bound. The top is from last year's leader/ender project. (There were five in all.)


I'm using the new-to-me plan for the back. Four WOF reds create the sides: two quarter-yards, one third-yard, and one half-yard. That made the length 47", enough to overhang the top. The width is only 40" so I sliced it about a third of the way across and inserted a cream quarter-yard remnant. Look closely; the top of that strip is a different fabric so it reaches 47", too. This one is so pretty.


Straight lines with the walking foot on the lights combine with free motion loops on the dark. Tami's recommended marking the middle of the dark to keep the loops aligned. Great idea.


Quilt Details
Size: 44" x 44"
Pattern: Log Cabin, zigzag variation
Batting: Mountain Mist Cream Rose 100% cotton
Thread: Gutermann cotton sewing thread in navy and white
Quilting: Straight line with walking foot and free motion loops

Stephie at Dawn Chorus Studio continues discussing how long it takes to make a quilt with Kaja Zeisler of Sew Slowly. Kaja is a master improvisor and hand quilter. Stephie has written a thoughtful article; take a look.

Remember the AHIQ linkup for improvisational and utility quilts is next Tuesday, March 22. Kaja and I hope you'll join us; there's always lots of good reading.

Enjoy the day, Ann

Saturday, August 1, 2015

Midnight Snacks Finished

Midnight Snacks is quilted and bound. The straight lines are 3/8" from the seam lines. Very simple.

Midnight Snack quilt 

As usual, the quilting is much more visible on the back. The section of scraps adds some interest and extends the width of blue fabric ten more inches.

Midnight Snacks quilt back

More leftovers make the binding. They include the last scrap of the print fabric on the front,  gold fabric used in this pillow, and some cotton plaid seersucker.  It's such fun to create these simple bindings.


Midnight Snack quilt binding detail

Here's a shot of the quilt folded to show the binding better.

View of the binding of Midnight Snacks quilt

Quilt Details
Size: 48"(H) x 51"(W)
Pattern: One block - equilateral triangle
Batting: Mountain Mist Cream Rose 100% cotton
Thread: Gutermann cotton sewing thread in light blue
Quilting: Straight line with walking foot in a triangular grid

We drove through a shower last week and found a double rainbow on the other side.

Double rainbow

Enjoy the day, Ann

Saturday, July 11, 2015

First Zig Zag Log Cabin Quilted

The first zigzag log cabin is quilted.

Dark blue, red, green purple, brown and black alternate with pastel and white fabrics to create the log cabin block.
Zig Zag Log Cabin
I used a bit of this fabric in the New York Beauties. (Do you see it near the top?) It's been in my stash for a while.

Back of Zigzag Log Cabin

Here's a detail view. The quilting mimics the zigzags and the spacing of the stitching adds interest. The light areas are quilted with yellow Gutermann cotton thread while the dark areas have navy thread.

Back of Zigzag Log Cabin, Detail

The front and back don't match each other but it was fun to use this cheerful print for a San Francisco Giants fan or just as a change of color. Hopefully the young recipient will like it.

Zigzag Log Cabin, folded

Quilt Details
Size: 44" x 44"
Pattern: Log Cabin, zigzag variation
Batting: Mountain Mist Cream Rose 100% cotton
Thread: Gutermann cotton sewing thread in navy and gold
Quilting: Straight line with walking foot

I'm not much of a knitter but I bought the Hitchhiker shawlette pattern by Martina Behm. I wanted something to work on while travelling. The sawtooth border is such fun. Much more practice is required.

Hitchhiker pattern by Martina Behm 

Enjoy the day, Ann