Tuesday, April 27, 2021

Improv Hourglass Quilted

Things get bad for all of us, almost continually, 
and what we do under the constant stress reveals who/what we are.
~Charles Bukowski

Quilting


Inner borders benefit from SID (stitch-in-the-ditch) to keep them straight and that's what I did first here. But what to do next? The improvisationally cut hourglasses don't lend themselves to diagonal stitching although straight lines could run vertically. That's one of my default quilting designs. 


Then I recalled the quilting design on kawandis. It's a simple squared-off spiral from the outside in. And usually hand quilted. Starting at the outside meant the back needed to be carefully basted because there's no way to smooth bumps out as quilting progresses. And yes, there was extra at times. Fortunately, those fit between the rounds. Since no stitching crossed any other, there were no pleats.

The inner border was filled with free motion loops in dark brown and the outer border returned to the squared-off spirals. Feathers and Baptist fans didn't seem like they would show against the strong fan pattern of the print.   


The back started with a yard of an alphabet print purchased {a couple of years ago} for use on a baby quilt. It's enlarged with a tone-on-tone beige and a tiny green remnant. That green was wider but part was trimmed once the quilt was finished.


The binding is a wonderful multi-color stripe that looks hand painted. It has every color in the quilt: red, yellow, white, brown, and green.

Quilt Specifics
Size: 52" x 52"
Design: Improv Hourglass
Batting: Mountain Mist Cream Rose cotton
Thread: Superior brown and Gutermann multi-yellow cotton thread
Quilting: Walking foot spiraling squares and FMQ loops
Approximate yardage: 5.75 yds

Previous post: Improvising the scraps

Monthly FUR (Fabric Use Rate) 

Two quilts finished this month. Most excited that the Wheel quilt is finally a finish and it looks beautiful. Plus this small one has gone to a new baby. March = 24.75 yds. YTD =  42.625 yards.


Reading

Somehow I quit reading Clare O'Donohue's Someday Quilts mysteries but I'm making up for lost time. This week I finished The Devil's Puzzle where a skeleton is uncovered in Eleanor's backyard. It's been buried for thirty to forty years so there's not much chance of discovering who it is or who murdered him. There are only two more books in this series and I hope to finish it by year end.  

EDIT: Clare was a producer for Alex Anderson on Simply Quilts.

Enjoy the day, Ann

Tuesday, April 20, 2021

Improvising My Scraps

Community does not necessarily mean living face-to-face with others; 
rather, it means never losing awareness that we are connected to each other.
~Parker Palmer

Quilting


Cleaning out every corner of my house has been a salutary lesson. For some reason there are stacks of squares neatly packaged in different shoe boxes. Six-inch, 5.5", 2.5", and 2". Who knows why now. And why in the world are these blocks half an inch different in size? I tried to simply toss the larger ones into the scrap bag but instead pulled out chunks from the bag and cut them into six-inch blocks to make Hatchet blocks. 

There were so many that I sorted them by color later... after they were cut. Sigh. When I tired of Hatchets I switched to this improv hourglass blocks from Cultural Fusion Quilts. Generally these fabrics run analogously from red to orange to yellow although many of these yellows look more like cheddar.  

Here they are laid on the rug. A bit too small and there is not enough red or yellow yardage for a border. Then this cheddar-orange from my stash and the dark brownish-black from the scrap bag magically called. {I think I like putting these larger pieces in the bag. Finding them inspires different designs than strings do.} 

Improv hourglass blocks 

Four red blocks could create simple border corners but there were still some squares of yellow left, too.  Here's the top sewn.  And yes, I know one block is sideways. It will stay that way.

Improv hourglass quilt top


That strong border shows off the blocks beautifully. It's not fall here but the colors certainly reflect autumn. Next week I'll quilt it... as soon as I figure out the back.

After the freeze, most of our plants died back. I trimmed the ferns and hostas to the ground and am watching them sprout new growth. Most of the jasmine leafed out but some hedges may need to be replaced. I planted all my pots with flowers or ferns and am on a mission to get the ground cover going between the flagstones so hopefully weeding won't be a daily activity in a few years.  We still need the landscapers to grind a tree stump and replant. Privacy and shade are goals, too.


Reading

The Baby Ganesh Detective Agency series by Vaseem Khan delightfully draws us into Mumbai and its varied districts. In this first book, The Unexpected Inheritance of Inspector Chopra, the poor mother of a drowned boy challenges the police to discover what happened but Chopra's superiors don't want the death investigated and it's his last day of work. Then  his uncle sends him a gift of a baby elephant who is "not what he seems." Well written, engaging, and fun to read about another part of our world. It reminds me of The Number 1 Ladies' Detective Agency. 

Enjoy the day, Ann

Tuesday, April 13, 2021

Wheel Quilt Bound and Labelled

Make a list of things that make you happy. Make a list of things you do every day.
Compare the lists. Adjust accordingly.
~Unknown

Quilting


This quilt began over four years ago as an experiment with a wedge ruler. Instead of starting within the limits of the ruler, I immediately extended the perimeter with less than stellar results... then set it aside. Two years later it resurfaced in a clean-and-sort of the boxes and the soft colors called to me. {It was hard to find a place to photograph and I finally took an angled view and adjusted it on my phone. The wheels are circular, not oval as they appear here.}

Wheel quilt

What fun it's been to work on this quiet and limited palette, to rework the fans into blocks that lie flat, to take time with each step. I find iterative processes meditative and this quilt in particular is the repository of diverse family memories - the joyful and sad markers of time.

Wheel quilt detail with netted crab fabric

My stash only held a few quiet creams suitable for setting the fans and {of course} none had sufficient yardage to make all of them. The fisher-girl fabric delights me. It's a personal nod to our dear sister and always brings a smile. 

Detail of fisher-girl on Wheel quilt

The red and white striped fabric has been set aside for sashing since the first day but with the fan blocks  complete, it took a while to determine how much to use - both width of the sashing and frequency. Eventually, alternating it with a quieter taupe created a better rhythm.

Wheel quilt detail including cracking crabs fabric

The red and white fabrics of the wheels alternate between tastefully lyric florals and three crab novelty prints. I pulled everything in that colorway and was amused to find them. {And there weren't enough florals anyway. Of course.}

Wheel quilt detail with knitting crabs fabric

Many quilts use snowballs as central blocks and alternate blocks. I've done it myself but I hadn't made a border of them. They seemed like the perfect reprise of wheels - smaller and less distinct - but still repeating a circular theme. Of course, it took me many iterations to quieten down my fabric choices. The soft center can easily be overpowered.

Wheel quilt border detail and wheel with abstract circle fabric

What an excellent decision to send the top to Peg Collins for long arm quilting! I knew every stitch and design would show on all the light backgrounds and wanted something more exciting than my normal quilting. Her work is amazing.

Wheel quilt detail

The final steps were to trim the edges, bind, and label. A search through my dwindling stash brought two diagonal stripes. {The sashing stripe is gone. Of course.} The red-and white is narrower than the sashing. From a distance it looks pink.

Testing a red and white stripe binding

The green, blue, and red stripe unexpectedly excited me {next to the border} until Gayle gently nudged me to something that doesn't compete with the sashing or the wheels. 

Testing a multicolor binding

A quiet green enhances the quilt. In fact, it is the cutoffs from the backing fabric. Perfect.

Wheel quilt with detail of back and binding

My quilts are rarely labelled. My mother used to write them if I needed one for a show. Some of them are fading from washing even though I use special soap and archival pens. Penwork on the ones I've gifted disappear quickly. {I see that when visiting.} Now I simply sign the bottom right corner like a painter.  I usually use thread that matches the top. You have to look hard to see it. But it shows more on the back so archivists will find it. That's my story.

Wheel quilt signature

Quilt Specifics
Size: 86"x108"
Design: Fans and Snowballs
Batting: cotton
Thread: white polyester
Quilting: FMQ by Peg Collins
Approximate yardage: 19 yd {with leftovers for the scrap bag}

Previous posts:
1. The first block - way back in 2018

Reading


The Doctors Blackwell by Janice Nimura is a biography of Elizabeth, the first female M.D. in America, and Emily, her younger sister and the better physician. Together they founded the New York Hospital for Indigent Women and Children. Although they were contemporaries of many suffragists (and Lucy Stone Married one of their brothers} they didn't support universal suffrage, believing education was more important. Elizabeth was also the first, and for many years the only, woman physician listed in England. 

Enjoy the day, Ann

Tuesday, April 6, 2021

String Tulip QAL Month 3

A party without cake is really just a meeting.
~Julia Child

Quilting


So many household repairs needed attention that it was hard to push forward on the tulips. How did you all do? It's no problem if you're behind; we're all working at our own pace. And several quilters have branched in their own directions. For example, Kaja pieced tulips and Julie created an applique so lively I can see the blooms blowing in a breeze. Not only are her colors gorgeously bold, but her tulips are strung horizontally across the petals rather than vertically. Be sure to take a look.

Although I'm sharing directions, this is improvisation. Do what you want whether they are tulips, strings or something completely different. My directions are there simply to help people who are more hesitant and the many people who asked how I made the ESS blocks. 

This month we'll appliqué the center and put the top together. As usual, these are just suggestions, hopefully enough to get beginners started. There are many ways to accomplish these steps; this is just the one I used. Look at YouTube for other methods.

String Tulips quilt

Sew the Borders

We left off with the center cut two-inches larger than the finished dimensions of the ESS blocks. Remove the paper from the ESS blocks and lay them out as a border. Sew the four sides together so the lengths can be verified. Press the borders carefully {NO ironing and NO steam} because all the sides are bias. 

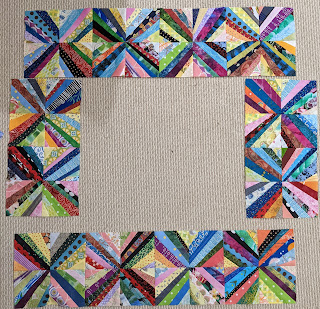
For ESS string block borders sewn

Find the Center

Once the length is established, fold the center {that  was cut an inch or two wider} into quarters and press. 

Center of String Tulips is quartered and pressed

Marking a perimeter keeps the tulips from creeping into the seam allowance. The center may shrink up a bit once the appliqué is done which is why a washable marker was chosen and why we added an inch or two extra to the center. If your string blocks are a different length than mine, change the measurements.

Center the ten-inch marks of the ruler on the center crease then draw the perimeter with the marker. {Or half your personal border width.} Repeat for each quarter of the center. 

Marking the center perimeter with ruler and washable marker

Prepare Tulips

Previously I needle turned the tulips but this time I hand basted the seam allowance. Or use raw edge appliqué or any other method.

Basted seam allowance of tulip

When they are all ready, pin them to the center background. Eyeball the location or measure with a ruler as long as they are inside the marked line. Try to position the center petal along the main diagonals with the point toward the corner.

String Tulips pin basted to the center

Prepare Stems

Measure the diagonal distance between two tulips to calculate how long the stems will be. Add an inch or two to slide under the flower bases. It can be trimmed back later but it would be a shame to run short.

For sturdy stems use binding remnants. Stems can easily be changed to any width you like. Mine were cut 2.25-inches and finish about 1.125".

Stems don't have to be green. Try unexpected colors to see what happens. 

Four possible stem choices for String Tulips

Open the binding and press both edges to the center. 

Pressing the tulip stems


Position the Stems

Fold the stems in half to locate the centers. Place the centers of both stems on the center of the background and extend each stem diagonally so they make ninety degree angles. Pin or glue the bottom one down. Pin or glue part of the top one down but leave one side loose to fold it back while sewing the bottom one.

Pinning the stems in place

Once you know there is sufficient seam allowance for the stems, tuck the ends under the tulips. 

Check that everything is well placed. If you are adding leaves, etc, lay those templates temporarily in place to ensure there's enough room. Adjust as needed {which could mean scooting something over or increasing its seam allowance. Note: A narrower tulip like Julie's {link at the top} leaves more room for additional appliqué pieces. Think about it.

Appliqué

Use your machine's edge stitching foot or blanket stitch to appliqué the bottom stem, starting and ending  under the tulips.

Applique the stem under the tulip

Then repeat with the top stem. 

Applique the tulip stems

Finally stitch around each tulip. Choose thread to match your fabric or not. I found it easier to start at the top right point. Slow down at the base where there's a wad of seams. Repositioning the presser foot by lifting it momentarily will help ease the sewing.

Applique the tulips

Add Additional Appliqué

I added eight circles but you could add anything you want... or nothing at all. Since I own a set of Karen Buckley's Perfect Circles, that's what I used to choose circle sizes. Look around your house for any circles... bobbins, spice bottles, etc. Place your templates on the background to check the size.

Possible circle templates

These fabrics from my stash repeat colors on the white print. I cut a few of each to test which would work best. 

Possible circle fabrics

Cut them out, then pin or glue them in place. Check the position then appliqué them in the same way as the tulips and stems.

Adding a circle above the tulip

Sew the Borders to the Center

Once all the appliqué is finished, it's time to re-measure the center. This time, mark the cutting line. In my case, that's a perimeter 10.25-inches from the center for each quadrant. I lined the ruler up with the 10.25 line on those pressed lines on the background. 

Mark the new sewing line for the center section

The appliqué pulled my center in about an eighth-inch. As a check, the cutting line you are marking now will be a quarter-inch or more than the previously drawn line.

Then cut the center along that line, pin the borders to opposite sides and ease them onto the center.

Add Outer Border

The ESS blocks are all bias so I added a narrow outer border to stabilize the quilt. {The other choice is to stay stitch an eighth-inch from the edge.} Cut strips 1.75-inches by WOF and seam together as needed. My first two sides are 40.5", the length of eight ESS blocks plus two seam allowances. The second two sides are 43". Measure your blocks to determine your personal lengths.

String Tulip 3 quilt top

Pin or mark the length and the center then pin each to a side and sew.

Ta da! Top done!

On a personal note, I'm fully Pfizered. Hopefully everyone will be vaccinated soon, the only way we can kill off this virus.

Enjoy the day, Ann