Showing posts with label selvedge race quilt. Show all posts

Saturday, October 10, 2015

Selvedge Quilt Continues

I made twenty Brock House units before putting them together. My only requirements for sewing two units together were equal lengths and that they not have the same center solid. Sometimes they matched almost perfectly in length and curvature.

Two selvedge blocks ready to sew together.
Same length and curvature.

Others just needed a trim.
Two selvedge blocks.
On the left: same length, need trimming.
On the right: trimmed.

It got a bit harder after that. The well-behaved pairs matched each other again although the length might be off. In the set below, I added another string to the top right side to get them to match.
Left photo: the top right section bows in.  
Right photo: yellow string added to equalize the lengths.

Other times, they curved away from each other. Fixing that was a choice between adding some strings or trimming the curves. When trimming, I overlaid the two units and cut between them so they would lay flat after sewing. There's a more detailed explanation in this post.

I sewed two sets of four and two sets of six then sewed those together. Again I added a selvedge or trimmed as seemed best.

Things went very well until the last seam. Here's a mistake. I added long selvedge strips to both sides rather than trimming one side.  The selvedges point in opposite directions so even with a variety of selvedge strings this seam is more visible.

On the design wall it was obvious a long selvedge joined every large section together. If I had trimmed both sides, the vertical and horizontal rectangles would have butted against each other in a more natural fashion and better disguised this seam. I may take these out and redo them...

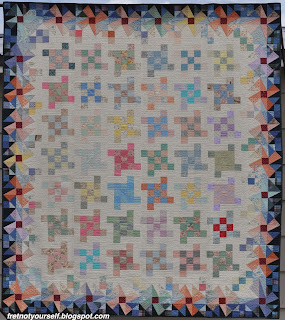
Brock House Selvedge quilt center

Here's a detail of the final seam.

Final seam detail.
All the selvedges point in opposite directions.

Did you notice that the solid selvedges are included in these strings? I was afraid the quilt would be too bland. The solids had really long fringe on the edges, so I sewed them about an eighth-inch inside the woven area. Perhaps you can see it in the photo below. I used white thread for all this sewing since many of the selvedges have a white edge.

As luck would have it, two solids formed a T which you can see in the photo on the left. Like an itch you can't scratch, it bothered me until I inserted a second string to separate them.
Selvedge quilt detail:  before and after
inserting a second string between two solid strings.

One of the best effects of blogging is that it forces me to slow down. Stopping to look at the photos helps me see problems that aren't as apparent while I'm sewing. Perhaps they aren't a mistake to anyone else but it's better to decide now if it will continue to bother me. And what am I going to do when I finish this quilt? Start another. Might as well get this one to my satisfaction.

Previous posts Improvising a Traditional Block and Selvedge Race quilt.

Enjoy the day, Ann

Saturday, October 3, 2015

Improvising a Traditional Block

I'm still thinking about the selvedge string sheet (Selvedge Race); however, there are more selvedges on the loose. So I started the Race again. After two repeats it was almost wide enough; I added one more selvedge to make a narrow sheet only five strips wide. The width ranges from four to six inches since the selvedges were not cut a consistent width.

Brock House is a traditional block documented in The Quilter's Album of Patchwork Patterns by Jinny Beyer.

Brock House and variations for selvedge strings.

In some ways it reminds me of Sherri's Floating Squares: two small squares sewn together then joined to a larger square. When I simplified further (bottom left in the photo above) that iteration reminded me of Flying Squares, a quilt I made years ago using the bottom right block.

Flying Squares quilt

Brief directions for Flying Squares can be found here. These block designs all use partial seams. It's a very useful technique; not hard at all. Jinny Beyer wrote directions for partial seaming here and Laura Nownes (co-author of Quilts, Quilts, Quilts) created a YouTube video here.

I decided to try this with the skinny Selvedge Race. The selvedges are so busy that they seem to need solids. Here is what's on hand.

The solids in my stash.

Finding a 4.5" orange remnant in my scrap bag from the back of this quilt, I freehand cut all the solids into squares about that size although a larger center square might look better. (Using what I have.)

Selvedge string Brock House variation

In the photo above, I sewed a partial seam on the top left rectangle. Then sewed the bottom left rectangle all the way across, pinned the bottom right rectangle (ready to sew.) The top right rectangle is pinned on the solid only to ensure it's aligned with enough seam allowances everywhere.

I make a couple of stitches in place then tie the threads of the partial seams on the back of the block. Most people probably wouldn't bother but I hate the idea of threads coming loose.

Tying threads from partial seams on the back.

Is this improv? Depends who you ask. I think of these as units. They are similarly sized but not identical. Joining strips will probably be needed to fit them all together. In some ways they may look like Kaja's Wall units - after all, they are smaller, square-ish shapes. In other ways they may look like Flying Squares... or something else entirely.

I am reminded of Anna Williams, an exceptionally talented Louisianan who found more time for quilting later in life. In her eponymous book, Nancy Crow wrote, " (Anna) built her quilt tops from parts and pieces, sewing smaller shapes together, then adding more shapes to make larger units. Her crowded bedroom housed stacks of small units, stacks of medium units, stacks of large units..."(p. 17) So there is a legacy of sewing units first, then using/reusing them as single pieces to build a quilt. [And, no. This quilt will be nowhere near as artistic as Anna's. But the IDEA of simply making units resonates.]

 Two down. Now I'm cutting the rest of the narrow string sheet into rectangles.

The AHIQ Link-up is still open for a couple of days if you want to join in by linking up or just perusing the posts.

Enjoy the day, Ann

Tuesday, September 29, 2015

Selvedge String Race Quilt and First AHIQ Link Up

This is why I keep my fabric in clear containers. When I decided to save selvedges, the only empty spot was a small drawer. Stuff kept going in; nothing came out; it was easy to forget. But now that it's come to light, I simply have to "make it or move it." My improv book study chose to work on strings again this past month. I have several ideas but these selvedges are screaming for attention. So I'm combining the two projects.

Selvedges stashed in a drawer are finally brought
 to light when the drawer no longer closes.

Problems:
  1. Huge variety of lengths. Some selvedges are one-eighth yard while others are three yards.
  2. I saved both sides of the fabric. One has printed information while the other may not have any white at all.
  3. Some selvedges are bound-edge while others are fringe-edge.
  4. I don't want to use a foundation. (The Hotter'n Hell Hundred helps explain my disinterest in thick quilts. No. I have not raced, but I have lived through these summers.) 
Racing reminded me. My sister made a Jelly Roll Race quilt at her guild retreat last year. I've never made one and don't buy jelly rolls but the fabric shape seemed similar enough. Sew long strips end to end making a very loooong strip. The ends are brought to the top so two sides can be sewn together to the fold. Cut and repeat until your quilt reaches the length/width combination you want.

Starting on the woven edge, I backstitched to keep it from unravelling when I cut the thread close then sewed off the cut side.

A new problem arose. Because the selvedges can only be sewn one way, that loooong strip has to be cut in half before sewing two strips on the side. That's manageable although the strip is as long as Rapunzel's hair.

I tried to pair both selvedges from each fabric but otherwise just used them as they came. Random selection. They range in width from a scant half-inch to three inches. Greater consistency would be better if I cut selvedges again - perhaps one-inch past the printed section or 1.5 inches total.

Here's what it looks like with the first two strips sewn.

Selvedges sewed end to end.
Then overlapped and sewed together.

The improv book study met the next day and I had only completed one more repetition. Mine is on the left in an accordion fold (Ten folds actually.) Look at the delicious results from everyone. Clockwise from mine, Tami alternated glorious golds with skinny navy strips. MN organized her strips into color groups and crosscut each with an X. She's almost finished binding this delightful small quilt. ML created wonderful mockups of different ideas using digital color photos. (She keeps them in a binder. I need to adopt this idea.) Now she's creating a table runner with large triangles of strips.

A second month of String tops 
from the Improv Book Study

I kept working that evening. Here it is after four rounds of cutting and sewing. Wow, a string sheet. The Race is on!

Use selvedge strings to create fabric.
Selvedge Race string sheet.

The sheet curves to the right rather than straight. I need to think some more.

It's time for our first Ad-Hoc Improv Quilt Link-up. Improv has so many different meanings. Although Kaja and I have written several posts recently, we are on tenterhooks to read your ideas and see how you've been working.

Enjoy the day, Ann

InLinkz removed because site was hacked.