Wednesday, October 15, 2014

Sausalito and the Bay Model

I finally took the thirty-minute ferry ride to Sausalito. Mine left from the Ferry Building in SF but others depart near Pier 39. The ferry has two decks with indoor and outdoor seating as well as room for bicycles if you call for a reservation.

Bay Bridge and Treasure Island from the Sausalito ferry

Many tourists rent bicycles to ride through the Presidio, over the Golden Gate, down the hill to Sausalito and then take the ferry back to San Francisco rather than make the trip uphill. It was too overcast for me this day.

View of Building 64, Warden's house, Lighthouse and Main Cellhouse on Alcatraz
Alcatraz from Sausalito ferry

The ferry had good views of the Bay Bridge, Treasure and Angel Islands, Alcatraz and the Golden Gate Bridge.
View of Golden Gate Bridge under overcast skies
Golden Gate Bridge from Sausalito ferry

These two fountains were our first sight on disembarkation. Constructed by local residents in 1985 to provide water for pets and their owners, they honor Sally Stanford, a popular Sausalito mayor and former SF madam.

Water Fountain for pets and their owners
Water fountain inscribed, "Have a drink on Sally," honors former Sausalito mayor and well-connected San Francisco madam Sally Stanford.
"Have a drink on Leland" pet water fountain
Pet fountain inscribed, "Have a drink on Leland."
A few steps away, Vina del Mar Park is barely large enough to hold its three treasures. The fountain and two elephant statues (named PeeWee and Jumbo) were created from paper mache for the 1915 Panama Pacific Exposition in San Francisco and transferred here afterwards by architect William Faville. In the 1930's they were recast in concrete from molds of the originals.

Concrete fountain and elephant statue stand between palms
Fountain and elephant statues from the 1915 Panama Pacific Exposition now reside in Vina del Mar Park, Sausalito.
There were originally twelve of these elephants at the Exposition holding flagpoles rather than lights.
Concrete statue topped with a crown of street lights
One of the elephant statues in Vina del Mar Park, Sausalito. PeeWee or Jumbo?

A mile down Bridgeway is the US Corps of Engineers Bay Model Visitor Center which occupies 1.5 acres of a WWII shipyard. Built in 1957 to test a pair of proposed dams, the model was used to study environmental changes on the San Francisco Bay and Sacramento - San Joaquin Delta system from human interventions such as infilling or channel deepening or straightening. It was retired in 2000 when advances in computing power made it obsolete but remains the world's largest three-dimensional hydraulic model. Bay Area residents worked to turn it into an educational center and tourist attraction.

Curving roofline recalls the quonset hut building style of the WWII shipyard
Bay Model Visitor Center, Sausalito CA

I took the fabulous audio tour for $3 but there are Ranger guided tours, evening lectures and daytime student programs. Check the calendar here.
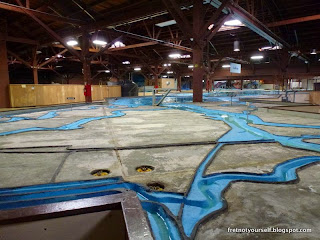
The shallow marshes and winding channels of South Bay are recreated in the Bay Model.
View of the South Bay, Bay Model.
Palo Alto is marked with a sign.

The model's horizontal scale is 1:1000 but the vertical scale is 1:100 so small copper tabs were added in the water to correct the water currents. Water is pumped from the Pacific Ocean portion of the model to raise sea level and it is allowed to drain by gravity for low tide. The tidal cycle is 14.9 minutes rather than one day so studies could be completed more efficiently. Measurements include water level, velocity, salinity and temperature.

The open waters of San Francisco Bay are recreated in the Bay Model.
View of San Francisco bay, Bay Model.
Notice the copper tabs to correct the water currents in the model.

I spent three hours here and could have spent the entire day... but hey, I'm a retired geologist. Here's a four-minute YouTube video about the Bay Model if you'd like more background.

Enjoy the day, Ann

Wednesday, September 10, 2014

Round Robin Improvisational Quilt

The Santa Clara Valley Quilt Association hosted Sherri Lynn Wood for a lecture and workshop last month and I was fortunate enough to take her class. She taught at previous QuiltCons and will again in 2015. What a wonderful teacher! We all learned so much from her unique perspective of quiltmaking. Her idea that improvisation is a score to be riffed rather than a pattern to be followed is particularly enlightening. Improv Handbook for Modern Quilters, her first book, will be available from STC Crafts early next year.

Here's my top at the end of the Improv Round Robin workshop. It started with the dark blue, dark red and grey at the bottom right. I pieced that section to open a conversation before passing it randomly to eight different quilters. Each of them combined a bit of their fabric with mine to expand the discussion. Time was very limited; Sherri repeatedly reminded us to re-center ourselves. We needed it. I've rarely been so wound up in a class. (Engrossed or involved, yes; but not wound tighter and tighter. Perhaps it was lack of sleep.)

Dark blue, dark red, grey and green fabrics were used to make this improvisational quilt.
Improv Round Robin quilt top at the end of the day

We each brought a box of "well-curated" fabrics. I just grabbed leftovers from Steam Punk along with a few pieces from the scrap bag.  Here's where I planned to start. It's probably eight yards - way too much for this project. I may be wrong but I improvise from scarcity rather than abundance.

Fabrics originally pulled to make the Improv Round Robin quilt

During our opening discussion, Sherri suggested winnowing our fabrics further and gave a range of two to one hundred fabrics. Then she said, "But no one's ever used just two." That was all the prodding necessary. I selected the dark blue and grey because each was more than 1.5 yards. The dark red was my signature fabric which I kept and added to each quilt I worked on. Sherri may have been a bit concerned about this extreme position when she suggested I add a few more fabrics with similar values. So I put the three on the right into my box also. I expected limited choices would be easier for everyone but found out it was harder. By the way, the photo above was taken before the workshop but the one below was taken after. That's all the fabric I had left.

Final fabric selection for Improv Round Robin quilt 

This quilt actually contains a fabric from eight other quilters. Oddly enough, one had a dark red while another had a dark blue that were both similar to the ones I'd used. The fabric with the large dots was a lovely addition which expanded the conversation into green and pink as well as repeating circular patterns. I really admire the way someone brought bits of blue and red into a very quiet grey section at the top. At the end of the day it looked a bit like an A-line skirt. How delightful!

When I got home I wanted to square it up but maintain the skirt view. I thought about framing it with one piece of fabric but that didn't seem true to the improvisational spirit. Instead I made a rule to use only scraps still in the box or from my scrap bag. No hunting around for more. 

Scraps of medium blue, red, white, grey and green added to the sides of an improvisational quilt.
Improv Round Robin quilt top after squaring up

Except for one, the inner border pieces on both sides were found like that and chosen because they filled the space very well. That "one" was a paper pieced section of red, green and black that didn't work in my watermelon quilt and had foundered in the scrap bag about ten years. When I put it behind the final hole it found a home. I marked it with chalk and cut it at that odd angle. I pieced the two strips that were cut from each side into the bottom. Do you see them? Don't they look wonderful?

I pinned the blue on the right side first and planned to use it on all sides. But then the red floral caught my eye. It had been used to make Steam Punk centers so it was full of holes. The dark section made it long enough. It opens and brightens the quilt as well as bringing the scale up. Now that yellow circle on the blue has friends.

The leftover circles are the final touch. I think they reinforce all the beautiful dots. And they won't languish in the scrap bag. 

Enjoy the day, Ann

Saturday, August 30, 2014

Steam Punk Back

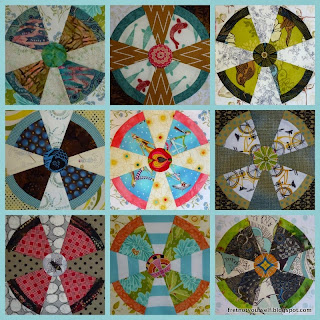
My husband thinks Steam Punk blocks look like those old television station test patterns. I see propellers. With that in mind I drafted thirty-inch airplanes to fly across the back. Of course they are made with leftovers from this project and bits from the scrap bag.

Planes of leftovers for the quilt back

It's amazing how hard accuracy is with such large blocks. They are bigger than my cutting mat and ruler. All these years I thought small blocks were more difficult.

Here are my sketches on graph paper. The airplane is fifteen grid lines across so I simply scaled each as two inches to create a thirty-inch block. You could multiply by a different scalar for another size.

Two sketches for back blocks:
Airplane or Old TV

Don't the blades of that Steam Punk block (in the first photo) remind you of the Polyphemus moth? It didn't fit in the top and doesn't seem like a good addition to the back either. Perhaps it will make a baby quilt. (I need another project like a hole in the head.)

Enjoy the day, Ann

Saturday, August 23, 2014

Where Do You Get Your Ideas?

Steam Punk is rolling along. Here's a quick snap on the design wall.

Quilt in shades of blue, chartreuse, green,  brown, red, grey, orange, pink
Steam Punk quilt top with sawtooth sashing

So many people wrote very supportive comments as previous photos were posted. Thank you all very much. A few said they would never have thought of this arrangement. That's the same way I feel when I look at your quilts. Isn't that why we're posting and blogging? To share ideas and build an artistic community.

This spring I read Steal Like an Artist by Austin Kleon. He posted his rules here. I see these guidelines as a tongue-in-cheek 21st-century rewording of John Donne:

    "No man is an island,
     Entire of itself.
     Each man is a piece of the continent,
     A part of the main."

So we go to shows and galleries, read books and blogs, attend guild meetings, interact with others. Mull over what strikes our fancy and let it morph into a new creation. This is not wholesale copying but rather a synthesis of ideas and techniques in the manner of the Impressionists. While each was unique, all were inspired by the interaction of color and light. They lived, worked and exhibited together. They shared models, locations and design layouts. You probably know this story about Mary Cassatt and Andre Degas but it's always fun to read. Their courage to break new ground came from their common bonds.

I've known about traditional New York Beauty quilts for years. Some of the best examples are in Bill Volckening's collection. He generously shared many at the San Jose Quilt Museum exhibit in 2013. Multicolored teeth, cogs instead of teeth, reverse colorways, elaborate or plain quilting. My favorite was set at an odd angle with crude patches in places before the border was added. What caused that design decision? Did a dog chew it or did the original maker die? My sashing is my first attempt to incorporate what I learned from this show.

The four 18-inch Steam Punk blocks

Large-scale prints that needed a showcase led me to draft some larger blocks. Kona Bay fish, Alexander Henry cherry blossoms, Kaffe Fassett floral and a batik. Some centers are this exceptionally bold print; the maker is not on the selvage.

Fabric used for some propeller centers

But Ruth McDowell's Pattern on Pattern (printed in 1991) must have also played a part. She updated traditional quilts with scale change, overlays and transparency.

My copy of Pattern on Pattern by Ruth McDowell

When I got stuck during construction, these ideas emerged. It's my work but it wasn't invented in a vacuum. Your quilts are just as unique a synthesis. That's why we love to read about the processes. What do you think?

Enjoy the day, Ann

Saturday, August 16, 2014

Putting Steam Punk Together

This quilt continues to be a delight! My two remaining decisions were whether nor not to sash the blocks and whether to set them straight or on point. Matching up all the propeller points didn't sound like fun. The block construction makes a thick lump of seams when they are sewed without sashing. Without sashing, the quilt looked better straight set. Everyone who commented preferred on point. But the density of the sets I previously posted still attracted me. So I did both: some blocks set together, some sashed.

Steam Punk in two sizes with single Sawtooth sashing

The propeller quartets keep the feel of my original sets, a few extra-large propellers add a change of scale and the sashing pumps it up. Happy dance!

I reduced the seam lumps a little by carefully unsewing all intersections that extended into the seam allowance. This top will not lend itself to straight line quilting but the sashing can be ditch quilted.

Originally I sketched the double sawtooth sashing of historic New York Beauties with its wide inner sash (in a color or muslin) and many little sawteeth on both sides. It's as labor intensive as the block - master quilter's work. This seemed too busy for Steam Punk so I switched to large triangles.
The base and height of the triangles are 2.25" which is the diameter of the propeller centers. I thought I might put circles in the posts but they were again too much.

Paper pieced sawtooth border

The triangles were drawn on graph paper, scanned and copied. I steamed each triangle after it was added, then turned the paper over and steamed again. By the time the sashing was done the paper tore off easily. I trimmed the sashing before removing the paper. It's easy to trim from the back with a rotary cutter since you already know your points are perfect.

This will be another huge quilt. It will take a while to sew together and even longer to figure out how and where to photograph it. I'll keep you posted.

Thanks for all the support and opinions, everyone!

Enjoy the day, Ann
Tuesday, August 12, 2014

Around the World Blog Hop and My Oldest UFO


One of blogging's delights is meeting people with common interests as well as intriguely different ones. It's fascinating to see what others are doing. Stephie shares her work and personal outlook at Dawn Chorus Studio. She and I were both working on soft blue Ocean Wave blocks when we met. She also knits, draws and paints. It's a special treat when she posts something she's finished. Stephie runs... miles and miles it seems. I don't, although I used to hike and trek a lot. Her photos of the Cornish countryside are always enjoyable. (Hooray for geology!) I was so pleased she asked me to join this blog hop celebrating creativity and friendship around the world.

I grew up in a family of very talented women. My mother needlepoints, my grandmother knitted and sewed. She knit suits with notched collars and pleated skirts that fit her to perfection. It was my paternal grandmother Martha and great-grandmother Marinda who quilted. Marinda had the first sewing machine in her county. She loved sewing so much she'd sew for anyone who brought her fabric. Both these quilters died when I was a baby so although we had a houseful of fabulous quilts no one taught me. 

Never fear. I read all the Little House on the Prairie novels. I was sure I knew everything. At twelve I made my first quilt, a double bed log cabin, by cutting up dresses my sisters had outgrown. (Because that's where you get scraps, right?) I machine pieced it with quilting thread. (Hey, it was a quilt.) I machine quilted it every twelve inches whether it needed it or not. This quilt went to college with me then to my first house. My children fondly remember picnics on it. It finally fell apart after thirty years. I'm surprised it lasted that long.

This is my oldest UFO - 25 years old. It's hand pieced and quilted. Why isn't it finished? Frankly, I forgot how much quilting I'd completed already. Now it's by my chair to work on in the evenings. Perhaps I'll have it done in another year or two.

Original design of traditional quilt blocks in green, black, pink, blue, tan and white
Sampler Medallion 

Blue center star surrounded by compass points in dark brown, green and black
Sampler Medallion detail

I've always liked really 'ugly' fabrics; friends have even given me yardage as a dare. Even so, I wasn't always happy with my quilts. Color combinations I'd thought would be fabulous frequently looked flat. After a lecture by Pat Bishop of Quakertown Quilts, three friends and I started a scrap block exchange bee in our guild. By making a personal challenge to use every block I received I learned to use colors and prints I 'hated.' Not only could these blocks be worked in, they frequently brought the quilt to life. My problems were underdeveloped taste and overdeveloped color snobbery.

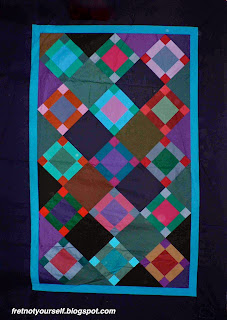
I already posted several quilts that used scrap bee blocks including Bow Tie, Princess Feather, Flying Squares and Baskets of Friends but here's one more... still unquilted.

A nine-patch variation made with solid colored scraps.
Amish Gems - a scrap bee exchange quilt

My stash is fairly small - two clear storage boxes for everything quilt-related. Petting fabric is a major hobby; I take it out and rearrange it frequently. While I try to fill in color and value gaps, I buy fabric because I like it. These are usually quarter- or half-yards although I buy more of stripes and solids. Running out is always fortuitous. My quilts are improved by forced creativity.

I sketch pieced designs on graph paper but use an unlined pad for pictorial quilts like A Daisy a Day. I may start with a fabric or color in mind but I don't consciously use color theories at the beginning. I just sort through my stash setting random fabrics next to each other. I keep anything that creates a reaction either by fitting in well or standing out glowingly. After that I'll have an idea of missing fabrics or colors. Then I go shopping. Yea!

Why do I quilt? Because I simply must. I love fabric - touching it, feasting on the colors and prints - but I especially love making quilts. Planning a design, layout, cutting, sewing, layering and quilting both calms and invigorates me. There are always quilts dancing in my mind.

Thanks again, Stephie! See you online.

Enjoy the day, Ann

Monday, August 4, 2014

Trips Around the Block Finished

Although Trips Around the Block has been finished for a while, it's been almost impossible to photograph. It's too large for the design wall or the floor. I finally got this photo of the entire quilt at the guild meeting although it has serious issues. Even holding the quilt overhead, it drapes down the stairs and onto the lower floor for a slightly cockeyed view. Additionally, the top is overexposed by light from the windows while the bottom is in shadow. But this was my first view of the entire quilt full-on and it looks very different than the partial and low angle views I'd had before!

Bright colors liven this two-block quilt. One block is a Mini Trip and the alternate is an X-block.
Trips Around the Blocks

It fits our current bed with room to tuck the pillows under the quilt. Hopefully this will keep dust and pollen off the pillows. I started this quilt in August 2013 and finished in June 2014 - much too long. But what did I do when I finished? Yes. I started another. So time is not relevant.

Trips Around the Block

The center is a two-block variation of Trip Around the World: one block is a Mini Trip and the alternate is an X-block.

I invented five rules for this quilt.
  1. Use darkish blues and greens for the main Xs. 
  2. Use more lights. 
  3. Include 60 degree angles on the border.
  4. Make the border lighter in value.
  5. The Xs are the darkest values in the quilt.
What happened? I was 'Seduced by the Dark Side.' I used four black patches in one block. That was all. Then I thought they looked lonesome. The plan flew out the window. I still like the occasional black near the center of the Trips but don't like it competing with the blues near the Xs. I wish I'd consistently used lights on each side of the X because it has a more delicate feel.

Trips Around the Block - Detail

I downloaded isometric graph paper here that I used to design the border. Such fun! Try it yourself sometime.

Trips Around the Block - detail of corner

Leftover ribbon fabric makes a wide stripe on the back. I quilted on my home Bernina with 50/2 Aurifil in grey, black, white and pink. The center is a simple grid using a walking foot but the border has several different free motion quilting designs. The orange peel in the white background needed registration markings that took quite a while. I think it was worth the effort although there were many heavy sighs during the process.

Trips Around the Block - back view

Here's a list of my multitudinous postings for more information.

Trips Around the Block
More Trips
Progressing
The X-Blocks
Border Ideas
Tutorial
Working on the Border
Finished Border

Let me know if you have another question.

Enjoy the day, Ann

Tuesday, July 29, 2014

Steam Punk Blocks: Final Set

Hooray! This is my last set. Some of the fabrics are from 'My Precious' pile. For example, the blade fabric in the second from left bottom row is from Sue Benner. Her work is glorious and I have treasured the scrap she gave me. I finally had the courage to cut it. Isn't it an improvement to be seen and enjoyed in this quilt rather than hidden in my stash?

Three blocks are made of leftover pieces from previous blocks... just to use them up. It makes this set livelier than the previous ones. Hopefully these odd blocks will be good blenders.

Steam Punk quilt blocks #81-96

The next task is deciding the final layout. I'm still debating straight set versus on-point as well as sashing (or not.) My original plan was straight set without sashing but I've had a few more thoughts. The original pattern was set on point with grey sashing. Jeannette at Gone Aussie Quilting started a SteamPunk QAL that now has 194 members. These fabulous quilters have posted an exciting variety of blocks, sets and quilts. Many of them are straight set... at least while they are being posted. Take a look. What setting would you use?

Enjoy the day, Ann

Thursday, July 17, 2014

Steam Punk Quilt Blocks - Fifth Set with Construction Notes

The Steam Punk blocks are almost done. Just a few more and then on to the sashing!

Propeller blocks in pinks, greens, blues and reds.
Steam Punk Quilt blocks 65-80

I've been taking photos of each block as they are finished and cropping the edges. That makes it very easy to create these collages in Picasa. Each collage inspires a slightly different set of blocks: lighter, darker, brighter, quieter. Previously I simply took photos of layouts on my design wall. Cropping and collaging with Picasa is a big improvement because it approximates the sewing edge. You can even add a sashing effect with any solid color by increasing the grid spacing.

Nine Propeller blocks in green, blue, brown and pink/red.
Steam Punk blocks with sashing

While we hope our blocks finish square that is not always the case. Especially curved seam blocks. After making a few I decided to alter my cutting method for the quarter circle corner pieces by cutting the outer sides of those pieces slightly larger than the template. I didn't change any other templates and still sewed quarter-inch seams.

Plastic template is positioned on fabric to show how larger outer seam allowance was cut.
Quarter Circle piece cut with larger outer seams

The extra seam allowance in the outer corners leaves enough room to square the blocks even when my sewing pulls one corner in.

Marimekko fabric in greens and blues is used with browns and yellows to create a Steam Punk block.
Top right corner of this block is not square. But larger seam allowance allows trimming.

Then I use my square ruler to trim the block to 9.5 inches with a quarter-inch seam allowance past the blade edges.

Steam Punk block ready to trim to size

I considered extending the seam allowance on the triangles also but using the correct size helped ensure the blades didn't get too big.

Here are my previous posts on this quilt:
First Set with Tutorial
Second Set
Third Set
Fourth Set

Enjoy the day, Ann

Monday, July 7, 2014

Steam Punk Quilt Blocks - Fourth Set

These Steam Punk blocks are rolling along now that I'm in the groove. Loving the novelty prints - bicycles, bees, koi and phones!

Steam Punk blocks with geometrics and novelty prints
Steam Punk blocks 49-64

Enjoy the day, Ann

Saturday, June 28, 2014

Pillow Covers and Colorado

We just returned from Colorado - a trip full of friends, family, storytelling and work made easier with helping hands. In the evenings I finished these simple envelope pillow covers using some of the Moda fabric line Hearty Good Wishes. My granddog is quite pleased. ;-)

Navy figures of sailboats, whales or fish on cream background cover these three pillows
Pillows using Moda fabric Hearty Good Wishes

Although parts of the state had devastating tornados we just saw welcome rains sweeping across the valley.

Incoming storm

Here's my new favorite monument... to the invention of the cheeseburger. What a significant moment in time. Nowhere but the US.

Grey stone plinth inscribed with details of the invention of the cheeseburger, 1935 Denver Colorado
Monument to the creation of the cheeseburger
Fret not; enjoy the day.
Ann

Wednesday, June 25, 2014

Steam Punk Quilt Blocks - Third Set

My third set of Steam Punk quilt blocks. I still love the pattern.

Steam Punk quilt blocks in blues, greens and browns
Steam Punk blocks 33-48

Fret not; enjoy the day.
Ann

Friday, June 6, 2014

Baskets of Friends

I'm still quilting the border of Trips Around the Block... and wondering what evil genius inspired me to try persnickety quilting designs rather than simple all-over free motion. What brought on my grousing? The quilt currently on our bed. It uses similar colors; the only reason I want to change it out is that it's too small for our new (enormous) bed.

Pastel baskets and Mexican Stars on muslin with floral stripe and checkerboard borders
Baskets of Friends

My Houston scrap bee exchanged these baskets in the 1990s although I didn't make the top for another decade. (Letting those blocks age properly.)

I designed one-fourth of the center using the original DOS-based EQ. Then I printed four copies, cut and pasted them together in this centered arrangement.

Pastel Mexican Star blocks in yellow and blue on muslin
Baskets of Friends, detail of Mexican Star blocks

The alternate block is Mexican Star but that's not how I put them together. There was a pretty woven plaid in dusty green, blue and pink I liked so much I bought it three different times. Have you done that, too? There was so much that it's also part of the backing. Once I decided to use it for the crosses, I knew I didn't have the patience to fussy cut the plaid into the corners of the basket blocks. So I sewed quarters of the Mexican Star onto each side of the basket block. then cut corners off the basket block and treated the crosses like sashing. It's easier to see in the detail photos.

Pastel green and purple basket block on muslin
Baskets of Friends, detail

The pretty floral stripe was a sale fabric from High Fashion Fabrics in Houston. Why was it on sale? Well, this stripe alternated with four-inches of mouse-grey enclosing a narrow "lace" like hem-binding tape. You can see more of the fabric next to the blue Star centers. It looks pretty cut up but wasn't as attractive on the bolt. Despite six or seven stripes across the width of fabric, I ran out and had to create inset triangles on the outer border rather than extending it all the way around. Because the outer border was reduced, I also ran out of greens for the checkerboard. Rooting around in my stash, I found some light blues. How fortunate! It looks much better this way. (Running out of fabric forces creativity, doesn't it.)

Oddly enough, when I moved back to Houston (again) High Fashion had another bolt of this same fabric. Was it reprinted or just hiding in their warehouse all these years?

Pink, green, black and white floral stripe with green, blue and cream checkerboard
Baskets of Friends,
detail of mitered border stripe and back of quilt

I free-motion quilted the center in a baptist fan pattern, used parallel lines on the floral stripe and meandered the checkerboard border. Baskets of Friends was in Paducah for the 2003 AQS show.

There were still baskets left. A friend with a young daughter made them into this garden path set. Isn't it interesting how we can start with the same blocks but end up with completely different quilts! It's always such a joy to see the variations people design.

Garden Path basket quilt

Fret not; enjoy the day.
Ann