Showing posts with label making a quilt back. Show all posts

Tuesday, June 20, 2023

Choosing a Back for Ocean Waves

The trouble with blaming the powerless is that although it's not nearly as scary as blaming the powerful, it does miss the point. Poor people do not shut down factories... Poor people didn't decide to use 'contract employees' because they cost less and don't get any benefits.
~Molly Ivins

Quilting


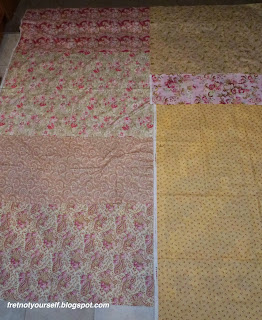
As I've repeated ad nauseam, the point is to use up more of my ancient stash... especially larger yardages. There's about four yards of this darling owl print which I purchased because it's my college mascot. Fortunately, it's also DH's mascot so it's going on the back of the Ocean Waves quilt. The white Xs on black fill out the rest, 


The layers are ready but I still can't get many photos to load here. Sorry. Pinning is the next step but since it’s summer, I’ve been visiting and hosting family. Time enough for that step when it quiets down. It’s more fun to enjoy in-person visits again. Hooray. 

Reading

There's a new book called Marple of short stories using Agatha Christie's characters. They are all good but some are better than others (of course.) They were good afternoon reads, perfect for down-time when visiting.

Enjoy the day, Ann

Tuesday, May 28, 2019

Queueing up the Quilting

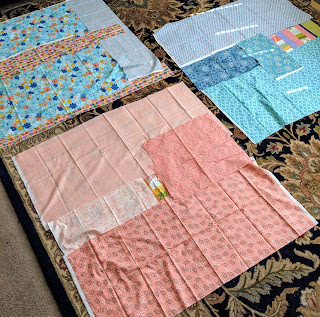
Three new tops are ready to sandwich once the backs are sewed. I've found it easiest to lay the top on the floor and cover it with fabrics until the back is large enough. Sometime I'll make a back like Julie's. What a great way to dress up the back side of a quilt. But not this time. After I sew them up, I'll spend the day pinning all of these plus the Chinese Coins with Roses top. All four will take one queen-size batt and I won't have to worry about storing a partial batt.

Three small tops are laid out so backing fabric can be properly sized. The fabrics are grouped by color to create monochromatic backs in blue or peach.
Designing three quilt backs

I'm keeping the Roses because I've been asked to show my guild how to make them but the baby quilts are all promised. I'd still like to have some finished ones on hand. I'll have to look through the bin again. Surely there are more partial blocks hanging around.

In the meantime, it's been flooding in Houston and Dallas. Fortunately my traveling has been on the dry days because you definitely want to stay inside in these downpours. Then we went to Oregon for a graduation. Precipitation accompanied that trip.

My brilliant idea was to go to Crater Lake on the way up. We've always wanted to see it; the Lodge just opened for the season. We drove past Klamath Lake, the largest fresh-water body in Oregon. It's the geologic remnant of pluvial Lake Modoc which was ten times larger and formed about 10,000 years ago during the last Ice Age. {Pluvial lakes form when temperature rises near glacial regions.}

A view from the highway running along the east side of the lake shows the train tracks, the grey water, and the lowering clouds.
Klamath Lake on a cloudy day

Bits of snow hid in the shade as we entered the park but it was waist high by the time we got to the Lodge which sits at the rim of Crater Lake.


The lobby of the lodge has rustic rocking chairs and easy chairs as well a wooden staircase to the second floor.
Crater Lake Lodge

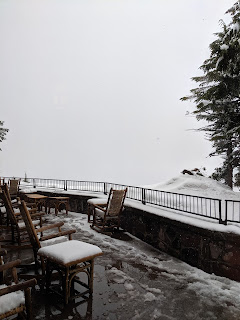
And then it started to snow.

The view from the deck is completely shrouded by falling snow. It's piling up on the deck chairs and tables, too.
The deck at Crater Lake Lodge

We were told this is a wonderful view of the Lake... if hadn't been snowing. We are {allegedly} right on the edge of the lake. Not that we could see anything. Neither the near nor far side.

Still, we enjoyed touring the Lodge and reading about it's reconstruction. And we hope to return on a more auspicious day.

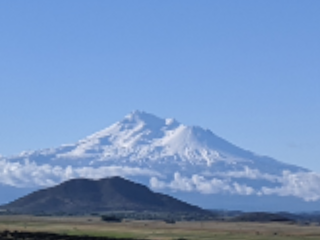
The sun broke out as we crossed the border so DH took a photo of Mt. Shasta. Another future trip.

View of Mount Shasta against a bright blue sky.
Mt Shasta

Enjoy the day, Ann

Saturday, September 16, 2017

Bunches of Backs and Some Improv

Doubling Down on Backs

All summer long {Beach Boys version here} I've been giddily making quilt tops with no thought to the rest of the work involved. Now reality sets in. Seven quilts in the queue and five were sewn this summer.  Fortunately I picked up several quilt batts on sale.

The next step is to make some backs. The easiest way is to lay the top on the floor and cover it with fabric. Here's a glimpse of the newest five.

Quilt backs ready to pin baste

I have very low standards for backs. As long as the fabric is good quality and the combination doesn't make me sick, it's a go. Older fabrics preferred since this is a great way to use 'em up and move 'em out. {Rawhide!}

Not the most exciting part, but an important step in the process. Now to pin, quilt and bind them.

Improv Pillow-to-be

I've been admiring Chris English on Instagram. Like Kaja he works with vintage shirts but makes pillows instead of quilts. My small group is sold on experimenting with improvisation and, although we probably don't have his exact process, we sure are having fun.

These are three shirts DH "retired", cut into strips: a faded denim-colored corduroy, a plaid, and a solid white. They are all 100% cotton but the white is also no-iron. They mean it. It hardly holds pressing at all. Hopefully, quilting will take care of that.


Clockwise from the lower left: cut shirts into strips, sewed strips into sets, cut and sewed strips together. Stopping now until our next work day.

Enjoy the day, Ann

Saturday, May 27, 2017

Piecing a Back

Quilt backs are great places to use leftover fabrics. Quite a bit has been lurking in my stash. Today's the day to move it out. The trouble is, "I might need this someday." What I need right now, though, is room. So let's be ruthless.

Because I liked the medallion style back of my Polka Dot quilt, I started by pulling a couple of large rectangles for a center. Blue and brown.

There's less blue so it goes in the center. If the brown is cut lengthwise, it will almost frame two sides.

Laying out excess yardage for a back

Because it was getting pretty dark, I pulled some lighter blues. The two black and white strips are leftover from the Polka Dot quilt while the brown floral at the bottom is the last of the Thirty Year Sampler fabric.

Late in the day I snapped two quick photos to decide whether to leave the skinny light blue strip in or not. Colors are off but here's the comparison.

With or without?

In looks better to me because it balances the light blue at the bottom. So the next day I sewed the final two seams.

Back for Scrappy Mini Trip quilt

This step is done. Basting comes next. After a trip to Massachusetts to visit my grandson... and his parents. Hooray.

Enjoy the day, Ann

Tuesday, February 7, 2017

Chinese Coins Fabric Pull and Spiderweb Back

Sometime in the late 90s I bought a Balson Hercules fabric called Fujiwara by Susan B. Faeder. {Reading the selvedge.} It has always been a favorite, one I intended to use but never have. It was my first choice for the back of the spiderweb because there's over four yards, it was still in the stash, and it makes a statement. At least I will be able to visit it easily by turning this quilt over.

I combined it with some soft blues then added one funky green/black/beige plaid to pump it up. {Who remembers "Pump you up" from Saturday Night Live?} The longer I look at this, the better I like it.

Spiderweb quilt back with
Balson Hercules "Fujiwara" fabric

The quilt was almost completely pin basted when I realized I'd rotated the front ninety degrees. Darn. Another evening spent taking those pins out. Then pinned it correctly. So feather-headed.

It's far enough along that I could start pulling fabric for Chinese Coins. While pondering what tack to take, I read this:

"The next step is to do a pull of all the fabrics I have been aching to use and to see how they look together." Kathy Doughty

What an exciting way to approach a scrap quilt. But, I also need/want to make a quilt for my niece who is decorating her new home in turquoise, yellow, grey, and white. And I happen to have lots of light blue leftovers right now. {Insert maniacal laugh here.}

I pulled these from my stash and {for now} intend to supplement them with leftovers in the scrap bag.

Fabric for Chinese Coins

"Landscapes/naturescapes"

Did you know there's a way to move/regroup photos on your Pinterest boards?  I've been doing a lot of that lately. Creating order by commonalities allows me to think. {That's a geologist for you.}

It never occurred to me to combine a traditional block with a painting until I saw Deb Hyde's work. Someone posted this time lapse YouTube video showing the development of Lucy ITSWD several years ago but few people seem to know about it. I'm awed that anyone could keep two balls in the air -  a specific quilt style and a scene. Definitely one to enjoy over your morning coffee or tea.

Which came first, the chicken or the egg? The form or the scene? The answer: it depends.

Diane Wright's Thimble Islands shows sea, sky, and islands in blues and browns while Ululu (Ayers Rock) rises in the distance across a wide valley in Ann Bauer's Summer Comes to the Mountain. (It's about the middle of the page.) The regularity and precision of column widths in both makes me think they envisioned this arrangement from the start. In fact, Ann's website shows several works created in a similar style. The phrase "working in a series" comes to life as she develops her ideas.

Diane's free-hand cut coins emphasize waves hitting rocky shores. Ann's straighter cuts create a flat, grassy plain with a hazy distant mountain. By curving the pink fabrics she perfectly conveys a setting sun reflecting on wispy clouds.

On the other hand, I think I'm overlaying the Coin form on the finished quilts of other artists. I could easily be reading more into it than they intended but  I'm struck by how well the Chinese Coin design evokes an impressionistic scene.

From Sue Kelly's previous posts, I know she did not use stacked coins as a starting point. She randomly cut and sewed fabrics until she ended up with her design for Abbott's Lagoon... which just happened to resemble Chinese Coins. Now that she's quilted and embellished this piece, it's even easier to distinguish the tidal flats, mud flats, grassy hummocks, and deeper waters of this lagoon. So much detail.

In a previous post I referred to Kaja's Build Me a Wall but it's still the only scene I've found that's a closeup of a manmade structure (rather than a panorama.) I'm unsure if she started with a Coin format but she wrote about some of her other works recently. They demonstrate how one's starting idea can unfold into more expressive form.

In fact, this Rail Fence began with leftovers from Chinese Coins. I added some darker blues, raided the scrap bag for odd strips of triangles, and worked them into a different form by rotating sections.

Improv Rail Fence built from Chinese Coins

Whether an artist arrives at a Chinese Coin layout purposefully or in retrospect, I'm delighted to find it possible to use a structured form to create a natural scene. Even if you start with some Coins, remember you're the creator of your own quilt. Feel free to change it any way that works for you. Let's celebrate all of us!

Enjoy the day, Ann

Tuesday, February 23, 2016

February AHIQ Linkup and Designing a Quilt Back

The kaleidoscope quilt needs a back and I want to use fabric on hand. Making large blocks like the planes on the back of Propellers and Planes is fun but nothing seemed to work with this top.

Finally I pulled orange/peach fabrics. There were two one-yard pieces and a quarter-yard remnant. That fills up half of the 77-inch back. Then I sewed all the leftovers into long strips. Finally I cut the first set lengthwise about one-third of the way across. These sections go on either side of the strip set. (Hopefully I can get a full photo later. Sorry.)

Width of fabric yardage creates half; then leftover strip are sewn randomly to fill in.
Large WOF fabric cut lengthwise
and filled with leftover strips 
to form a quilt back.

It occurs to me that this is a simple recipe for a back.
  1. Create a large WOF unit from one-three large pieces.
  2. Cut this unit lengthwise and/or width wise.
  3. Fill along the cuts with leftover strips and/or blocks.
  4. The original unit forms the outer sides or outer corners depending on how many times you cut it.
Enjoy the day, Ann

InLinkz was removed because site was hacked.

Saturday, August 30, 2014

Steam Punk Back

My husband thinks Steam Punk blocks look like those old television station test patterns. I see propellers. With that in mind I drafted thirty-inch airplanes to fly across the back. Of course they are made with leftovers from this project and bits from the scrap bag.

Planes of leftovers for the quilt back

It's amazing how hard accuracy is with such large blocks. They are bigger than my cutting mat and ruler. All these years I thought small blocks were more difficult.

Here are my sketches on graph paper. The airplane is fifteen grid lines across so I simply scaled each as two inches to create a thirty-inch block. You could multiply by a different scalar for another size.

Two sketches for back blocks:
Airplane or Old TV

Don't the blades of that Steam Punk block (in the first photo) remind you of the Polyphemus moth? It didn't fit in the top and doesn't seem like a good addition to the back either. Perhaps it will make a baby quilt. (I need another project like a hole in the head.)

Enjoy the day, Ann

Saturday, January 11, 2014

Scrap Back for a Quilt

Every quilt needs a back which takes lots of fabric and gets expensive. Using tiny scraps is more frugal but can add so many seams that quilting becomes difficult. I usually pull some older fabrics from my stash. I prefer to incorporate some extra pieces from the top or from previous quilts. I've always made backs this way, even when everyone else put muslin on the back. I think of it as "creating jobs for future quilt historians." They'll have twice the fabric to document and date. ;-)

The back of this quilt includes extra diamonds and strips from the front. The pieces are small but in a limited area. The back of Road to My Sister's House is an enlarged block from the front. None of the green fabrics was large enough and this solution let me use them all. The size of the green squares maximized the scraps remaining. Then the sashing width was calculated to fit the back properly. (It was easier because the quilt is square.)

Occasionally I have long, skinny pieces trimmed from the sides of another quilt back than can be seamed into a strippy back. (I'll look for a photo.)

This time I pulled fabrics that have been languishing for quite a while. The front has lots of reds, whites and beiges so I first chose soft pinks and beiges for the back. Most are half or quarter yard width-of-fabric (WOF) cuts. These are laid on the quilt top to ensure there's enough fabric to cover it. But the darkest beige in the first set of fabrics is about five inches too narrow.

Quilt back layout #1

I found a quarter yard of pink floral to replace it.

Quilt back layout #2 - with pink floral

There was also a pink plaid in the stash.

Quilt layout #3 - pink plaid

Then I remembered a tiny bit of cowboy faces on red. How would that look? I had to piece the fabric with some red strips to make enough for this section.

Quilt back layout #4 - cowboy fabric

Now the left side of the back is too quiet. I pulled the remaining face fabric - cowgirls this time.

Quilt back layout #5 - cowgirl & cowboy fabric

Once the layout is finalized I piece it. This one is very easy. Cut the selvedges off. Sew the fabrics into left and right panels and then sew them together.

Keep in mind it's easier to baste the quilt sandwich when the back is at least four inches larger than the top. This quilt is about 70 inches wide while the back is 82 inches wide. The extra width will make a skinny strip I can use on a future back.

Enjoy the day. Ann