Revised 8/11/13
The original instructions seemed unclear to new quilters so here's a revision. I started with a square quilt made of nine blocks set three-by-three. The length and width are the same.
A bit of math background:
- A diamond is a rhombus. (A square is also a rhombus.)
- Their sides are all the same length and their opposite angles are congruent – the same measure.
- All the angles of squares are 90° but diamonds are usually other measures, like 60° and 120°, 45° and 135°, or 30° and 150°.
- Directions saying ‘cut a two-inch diamond’ refer to the length of one side of the diamond not the length along either diagonal.
- Looking at traditional blocks, the diamond is usually set against a square or right triangle; that’s why this measurement works.
Constructing the border:
- Lay out three strips white/green/white angling the beginning as shown to utilize the most fabric. (A below.)
- Sew strips with quarter inch seams.
- Measure a 45° angle by aligning the ruler’s 45°line with the seam line of the strips. Cut the angle. (B below.)
- Measure two inches from the angled edge and cut one set of diamonds. Repeat until you have enough sets. Make straightening cuts when needed to keep a true 45° angle. (C below.)
- Sew the diamond sets together as shown (quarter inch seams) until they are slightly wider than the finished width of the current top. (My top was 36" after subtracting the outer seam allowances.)
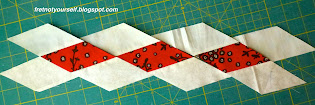
- Add an extra white diamond to each end of the border.
 |
| Diamonds set out tip to tip with one extra white diamond added to each end of the strip. |
- Press the sewn strip gently to open the seams. Don't rub or use steam; just press up and down.
- The edges are uneven so measure a quarter-inch from the wider-angled diamond points and trim.
- Also trim the short ends of the strips a quarter-inch from the diamond tip.
 |
| Line up ruler edge one-quarter-inch past the diamond points and trim the borders. |
| Border strip with one side trimmed. |
- Measure the length of your strip from the endpoint of the left-most colored diamond to the endpoint of the right-most colored diamond.
- Trim excess. The border on my quilt was 37.5"; the red diamond sample here measures 12.125“ long.
 |
| All sides trimmed with quarter-inch seams past the diamond points. Measure the length and width of the border from point to point. |
- Subtract the finished width of the current top and divide by two. This is the finished width of the inner border. In my case: (37.5 – 36) / 2 = 0.75”.
- Add seam allowances and cut strips for the inner border to that width. No matter the length of the diamond border, it will always fit because the width of the inner border is chosen last. In my case: 0.75 + (2 * 0.25) = 1.25" wide.
- Sew and press the inner borders to the quilt.
- Carefully pin two opposite sides of the diamond border easing in fullness as needed.
- To make the corner blocks (squares-on-point):
- Measure the finished width of the diamond border from one wide-angle point to the other. It is always an odd measurement. Mine is about 1-11/16” finished.
- Draw this size square on a piece of graph paper.
- Find the midpoints of each side and draw a square on point.
- Check that the size is correct.
- Paper piece.
- Sew corner blocks to the final two diamond border strips.
- Attach the final two diamond borders to the quilt, matching the intersection of the borders and easing fullness as needed.
- To keep the quilt square, measure the length of current top across the middle and make the first two sides of outer borders these lengths.
- The last two sides of the outer border are this length plus twice the width of the outer border.
Ann

