Showing posts with label quilt border. Show all posts

Tuesday, September 3, 2024

Crossroad Blocks into a Baby Quilt

The hardest job kids face today is learning good manners without seeing any.
~Fred Astaire

Quilting


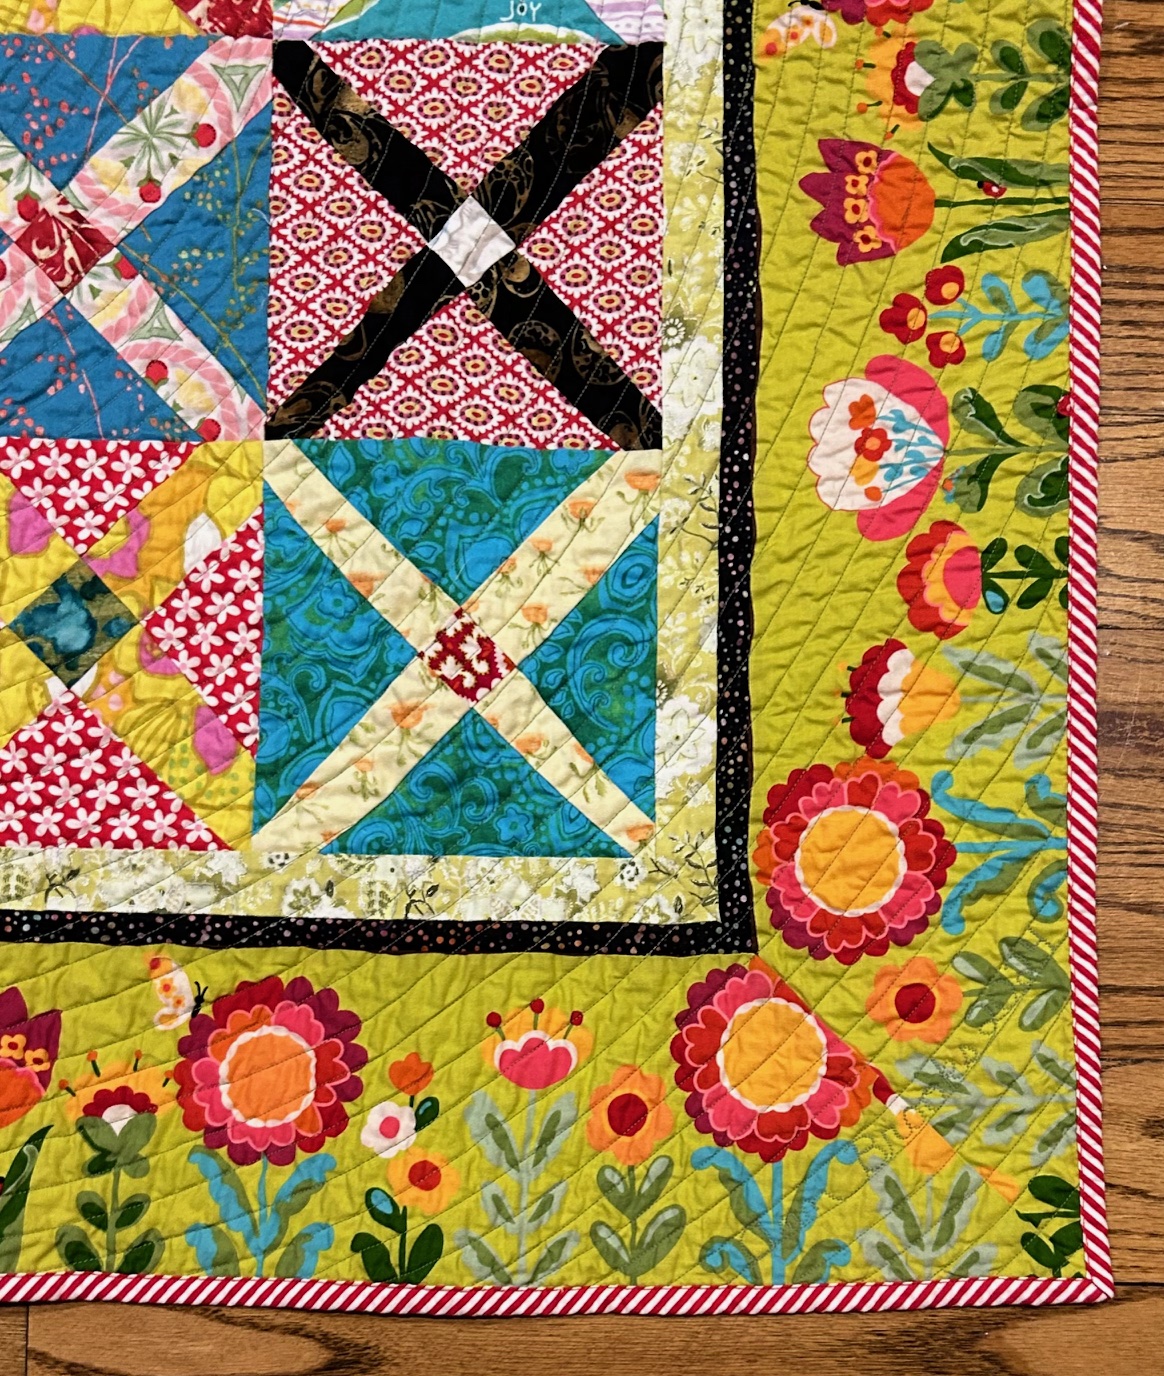
Yet another set of crossroads blocks. They've made several borders for me... like my Bramble Blooms 1 and The Square Deal {which I kept for myself}. The collection of 25 became the center of a baby quilt.

Crossroad quilt blocks

The green fabric has seven lengthwise repeats separated by a wavy brown line. It's visible on some of the borders below. They gave me the idea of adding a dark inner border. It was too severe but adding a third border in light green helped. However, the four blue cornerstone blocks do not. Out they went. 

Testing various border fabrics on the Crossroads baby quilt

Next the spiral quilting commenced. Now that I have the technique mastered, it's my go-to for baby quilts. I happily cross any and all patterns. Echo quilting shows well on prints while the prints themselves still hide quilting imperfections. There are few starts and stops - only when the bobbin thread runs out. I always bury threads so prefer to have a minimum of them to contend with.

Without interruptions the quilting is finished in two days. If something comes up, it can take much longer though. 

Spiral quilting

This simple quilt has three outer borders: a very pale green, a black with multicolored dots, and a wide flower garden on chartreuse. The dark border looks irregular but that's the remnant of the wavy line in the border print. I hadn't mitered corners in a while. There's no attempt to "match" the design but I find mitering and inset seams easy to do although the sewing is a bit different. Here it's a better solution than sewing the border like courthouse steps. 

Crossroads baby quilt with flower garden border

The binding is a diagonally printed red and white stripe also used on Bramble Blooms #1


The back used up most of three leftover fabrics. {Do I ever really use all of any fabric? Even when I think so, there are frequently small bits and strings in my scrap bag. They are a joyful find since they recall previous quilts and the lovely people they were given to.} 

Back of Crossroads baby quilt

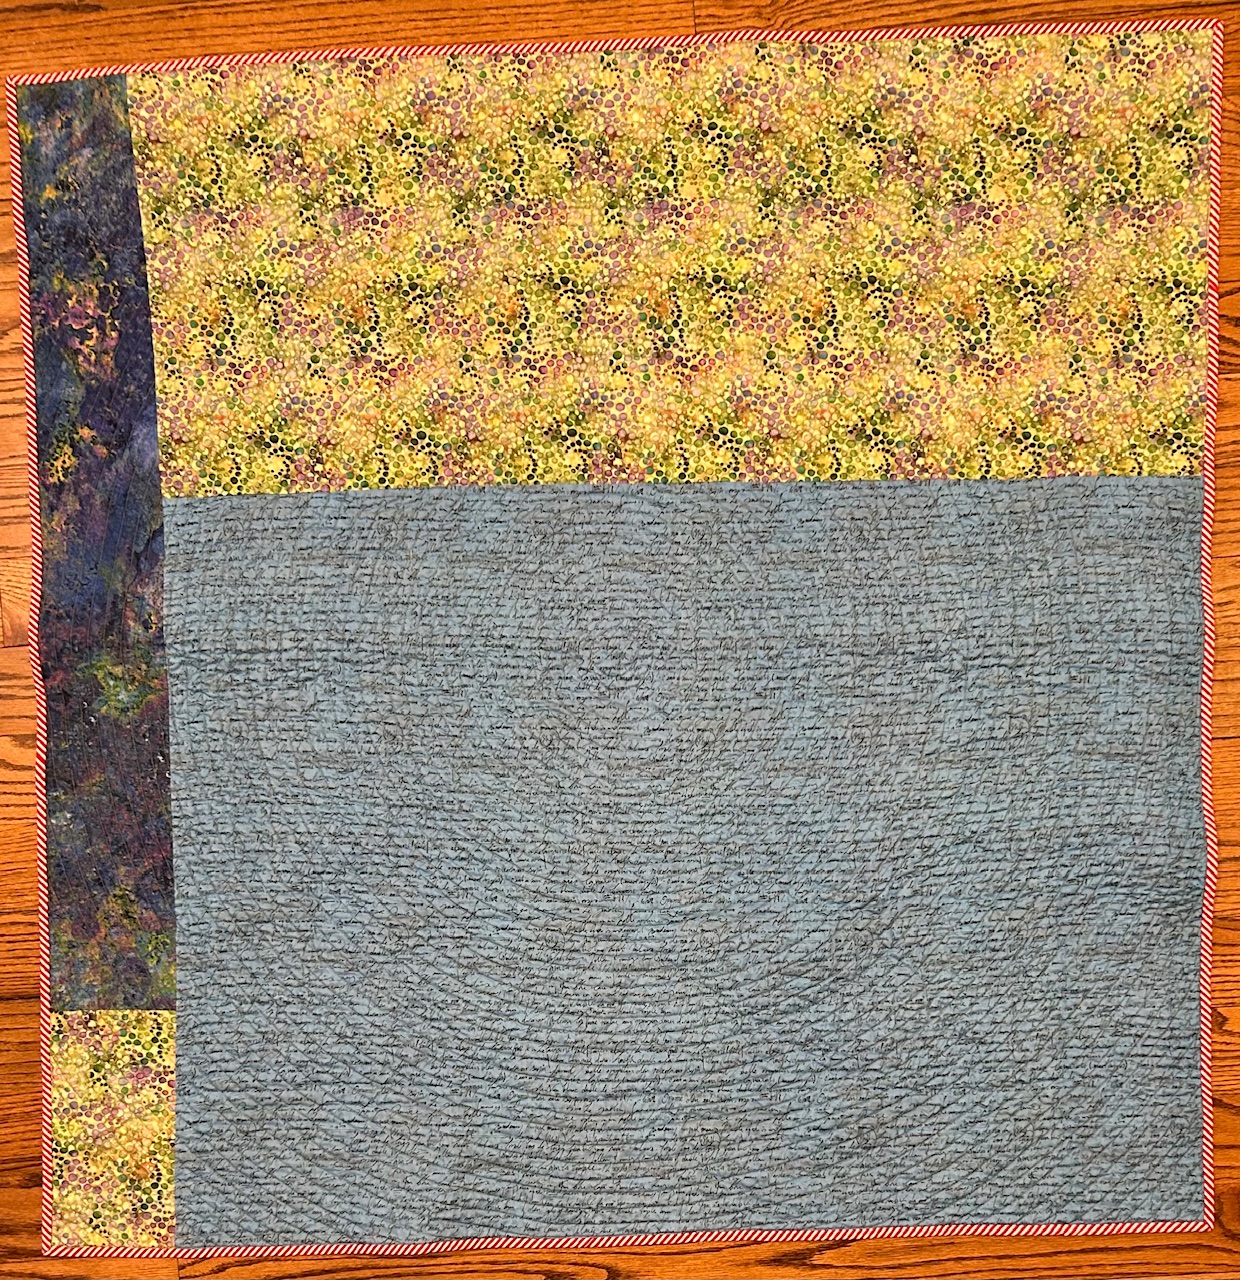
Notice how the spiral quilting shows well on the lighter blue but disappears on the other prints.  

Quilt Specifics
Size: 44" x 44"
Design: Crossroads blocks with border print
Batting: Mountain Mist Blue Ribbon Cotton
Thread: Superior green cotton
Quilting: walking foot spiral
Approximate yardage: 3-4 yards

Reading


Tiya Miles' book, Night Flyer: Harriet Tubman and the Faith Dreams of a Free People is an engaging read. Most of us know the basics of Harriet's story but Tiya uses her skills as a historian to show her faith, her deep understanding of the natural world she lived in, and her relationship with other enslaved women whose memoirs and speeches encompass some of Harriet's. Tiya's work shows us how to excavate the lives of people who left few written and legal records - the circumstance of many people throughout history. 

Enjoy the day, Ann

Tuesday, March 5, 2024

Ocean Waves V and BB1 Centers

'Thank you' is the best prayer that anyone could say. I say that one a lot. Thank you expresses extreme gratitude, humility, and understanding.
~Alice Walker

Quilting


The quilt became too large to lay out on the floor of my sewing area which made it a bit harder to put together. There may be a few triangles leftover but I'll put them on my guild's Free Fabric table. What a diversity of triangles from dusty reproductions to fairly current clear tones and everything in between. I thought this mixture might look terrible but it may be my favorite of all these quilts.

A quarter of Ocean Waves V

Although my BB1doesn't look different, all the appliqué is stitched - by machine. I deliberately didn't put a blue-green center in the lower right leaf and think I like it. We'll see how it weathers. 

Bramble Blooms #1 QAL center

Now to plan borders for both. Appliqué or some piecing? Time will tell. Audrey and I use a similar method here - we both pull fabric and set it around the centers. I'll try to take more photos.

Enjoy the day, Ann

Tuesday, February 27, 2018

Scale Change and an Ohio Star Quilt: AHIQ 30

Reading Kaja's prompt reminded me of a scrap quilt I made years ago. The small shoofly and star squares were from a block exchange. Because we traded two blocks at once, most of the resulting quilts were very similar - an alternate set like the center of mine.

I didn't have many blocks, didn't want to make more but also wanted a queen-size quilt. As everyone knows I've always loved interesting borders. Setting the small blocks in a really large star was my solution. The navy points were too severely dark so I exchanged part of one point for a striking Japanese-style print. {I put the extra dark navy on the back of this quilt so historians would know this was a design choice rather than a lack of fabric. Just amusing myself.} I also wanted to extend the star to its points but, fortunately for me, it became too large. Chopping them off makes a much stronger design.

Shoofly Star quilt set in a large star

It still didn't look right. I recall folding and overlaying various fabrics thinking I'd change more points out when ribbons came to mind. Now this is where I ran out of fabric. There are several different reds. Then gold because a second ribbon of red didn't look right. And somehow I decided to play with transparency where the ribbons passed over darker and lighter sections and crossed each other.

Border of Shoofly Star quilt plays with transparency

This has always been one of my favorite quilts. I gave it to QS for Christmas that year {198? mumble} and sleep under it when visiting. It's a special treat to have quilts scattered across the country. I feel like a grandmother: I get special time with them but don't have to care for them. Audrey made good points about sharing quilts with others in a recent post. Funnily enough, QS didn't quilt back then but this gift inspired her to start. See; I still make my sisters do things. Ha. Tag! You're it, Sis!

Quilt Details
Size: about 90" square (?), fits a queen-size bed
Design: Shoofly and Ohio Star blocks, original border of enlarged Star
Batting: Mountain Mist Blue Ribbon 100% cotton
Thread: cotton, gold metallic, and YLI nylon monofilament
Quilting: Walking foot, free-motion

Enjoy the day, Ann

InLinkz removed because it was hacked.

Saturday, December 17, 2016

Bordering Issues

Time to work on my Spiderweb quilt again. It's been sitting for a year already. My plan was to create an applique vine... using only yardage on hand. Although I rarely applique, it always attracts me. Some of my earliest quilts were appliqued. But that was years ago.

Lack of practice increased my hesitation; however, Audrey at Quilty Folk creates such attractive work I made a vow to try again. She suggested six to ten inches for appliqué borders. Any more narrow and it's hard to have curves in the vines. In my case, nine inches sounds best. After all, it can always be cut down but very difficult to weave more fabric together.

I pulled several fabrics in light blues. This micro gingham is my favorite. With less than two yards it won't extend to all sides. In fact, it will only finish two sides with six-inch borders.


 This mottled sky fabric looked great in the stash but slightly off color when next to other fabric. That's exactly why it has been in storage. Perhaps it would improve if combined with some others.


Free Spirit made this newer toile with leaves and birds. There are two different rows of birds which might cover three sides but... no appliqué.

Testing bird print toile as a border.

I decided to cut the toile and pin it against the spiderwebs. Even if it's not used here, this would be the cutting width for anything else. Maybe.
An inner border improves things. This pink string from my scrap bag is too wide. {Good thing. That's all there is.}


Eventually I tried some lighter fabrics. These are two yardages from the stash {as opposed to scrap strings.} Using lighter colors for the inner border might emphasize an applique vine. {Even though the toile stands in for the outer border, I'm still trying to figure out how to applique a vine.


Making haste slowly.

Enjoy the day,
Ann

Saturday, November 12, 2016

T-Shirt Quilt Finished

This quilt is finally done and in the mail. Wow. It's taken longer than any other t-shirt quilt I've made. {Guess I'm out of practice.}

She wanted many t-shirts incorporated. They each represent an important memory. After choosing the twelve main blocks she then selected 20 pocket logos for posts. Did you notice the lower left block is actually two t-shirts sewn together?

University of Arkansas and Alpha Omega Pi t-shirts framed in light prints, sashed with red.
Megan t-shirt quilt

Text bites and images from  the remaining shirts and leftovers from shirts already used were scattered across the surface and machine appliqued with matching thread or invisible nylon. These are usually placed in bare areas of the larger blocks and extend into the sashing. Two of them are actual pockets cut so the pocket still works. With so many layers, both sewing and quilting must be slow and careful.

And look at the binding. It's an older 30's reproduction plaid on point that I loved but never used. I think it goes very well with both front and back. Who'd have thought? {I love mixing styles unexpectedly.}

Megan's t-shirt quilt, detail of binding,
backing and free-motion quilting

 Quilting the border seemed daunting originally. How would I highlight the huge circles. I worried too much. It's a combination of spirals with echos to get to a new area. I used purple thread. The pink and blue threads were too severe on alternate colors. Purple blends pink and blue; perhaps that's why it worked here.

Border folded to half circle

We considered cutting the binding at half and three-quarters of the circles by the simple expedient of folding the border back.

Border folded to 3/4 of the circles

The half circles may be my favorite but overall, the border seems too narrow for the quilt. The partial circle is neither here nor there.

Quilt Details
Size: 77" x 96"
Batting: Mountain Mist Cream Rose 100% cotton
Thread: Various cotton, Metler neon polyester, YLI invisible nylon
Quilting: Walking foot and free motion on a domestic machine

Enjoy the day,
Ann

Saturday, April 18, 2015

Philadelphia Borders

This quilt seems to need an inner and an outer border. I considered using dark red or double pink fabric similar to the one in the Ohio Star in this post... but then found a reproduction stripe at the bottom of my stash. There's enough to cut 4" wide strips for the outer border. The blue hand-dye is left over from Propellers and Planes. I cut it 1.25" (finished .75").

Reproduction fabrics in many colors alternate with muslin in this quilt.
Philadelphia quilt with borders, partial view.

Mitering the border went fairly well although some of the stripe intersections need adjusting. The quilt squares up nicely; my photos are just a bit off.

Mitered inner and outer borders
of Philadelphia quilt

The back is mainly a cream/brown/blue plaid enlarged with random brown fabrics. Bears are printed on the narrow strip. (I tried to find alligators.)

Back of Philadelphia quilt

The main seams are ditch stitched. I'm thinking about diagonals with the walking foot for the rest of the quilting.

Enjoy the day, Ann

Wednesday, February 26, 2014

Scrappy Trip 2

There were a few leftover squares in the scrap box; leftover colors, too. But I wanted to use them up, so I sorted by the number of identical squares... 8, 7, 6... Rows were chosen by which set had the correct number of squares. I wasn't sure how good it would look. But here it is.

A small quilt of nine Scrappy Trip blocks is bordered in pink and white.
Scrappy Trip baby quilt with mock eyelet border

Years ago I made a border like this and thought it might work here as well. I measured an old piece of eyelet to recreate a pink ribbon threading through it.

Eyelet Border design

Ideally the inner and outer strips should be the same width but I may scallop the edge. A wider outer edge leaves that option open while I decide. What do you think? Also I may make a bow of the remaining pink for the corners.

Here's the top without a border. Isn't it interesting how a simple border changes a quilt?

Scrappy Trip without a border

Enjoy the day!
Ann

Wednesday, February 12, 2014

Woo. Pig. Sooie! Another Finished Quilt

When my son attended the University of Arkansas I made a quilt in his college colors. In fact I made enough blocks for two quilts thinking the second set would work for a Razorback friend. Of course, he graduated several years ago but... (insert various excuses here.)

I finally pulled the blocks out again. Exactly 63. Most log cabin layouts have centered designs which use an even number of blocks. Where was the 64th? However, sixty-three makes a seven-by-nine quilt: off-center but appealing. It just needed a border.

Another year passed until I was ready to piece it. Gwen Marston's liberated variable stars looked like just the ticket to perk up this quilt. They were fun and relaxing to make since you don't worry about the star points. I like this one better than the first one. (Don't tell my son!)

Red and cream log cabin set in an off-centered barn-raising style with a border of red variable stars.
Razorback 2 quilt finished

The open spaces in the border gave me room to write the recipients' names, college, graduation year. My favorite is the college yell!

The Razorback yell, "Woo, pig. Sooie!" is embroidered on the border of the quilt.
Razorback yell

Here are the fabrics I considered for the binding: dark brown, white, tan with dots, dark red, black with white lines, and white on white.

Binding choices for Razorback 2

In the mail today. Off to the East Coast. Woo, Pig. Sooie!

Related posts:
Liberated Variable Stars
Block Piecing Tutorial
Ready to Quilt
Razorback 2 Quilt

Enjoy the day. Ann

Tuesday, January 28, 2014

Flying Squares Quilt

Although the center of a traditional Flying Squares block is background fabric, I made my quilt from some six-inch nine-patch blocks traded with friends. The traditional center would have more sense of movement. To change the nine-patch to a flying square I simply added a 8-by-2" rectangle and a 2" square to each side with partial seaming. Many people have already posted directions for partial seams; just Google it.

Flying Squares blocks made of light and medium prints on muslin with a border shading from light to dark Crazy Ann blocks
Flying Squares quilt

The border is a block named Crazy Ann (which seemed very appropriate!) The windmill effect of the stars adds to the sense of flying.

There's an inner border of muslin and two-inch squares to maintain the floating effect of the blocks. But that meant the corner blocks had to be slightly elongated. I drafted those on graph paper. Sorry, the sketch is now lost.

Detail of quilt  with Flying Squares blocks made of light and medium prints on muslin with a border shading from light to dark made of Crazy Ann blocks
Detail of Flying Squares

This is still one of my favorite quilts. I love the vintage feel of pastel-to-medium prints on muslin and the parallel line quilting.

Enjoy the day. Ann

Wednesday, January 22, 2014

Finished Border for Trip Around the Block

Alternating with the variable stars, I've been piecing the border for my Trip Around the Block quilt. I think it's worked out very well, too. Lots of starts and stops with hexagonal blocks but it was a good challenge. Since the quilt is so large this is just a portion showing the mitered corner.

Multi-colored quilt in a Trip Around the World variation; narrow green and black inner border; larger outer border of stars with braided black and white fabrics.

Sandwiching will have to wait until the previous one is quilted.  Perhaps next week.

Enjoy the day. Ann

Wednesday, January 15, 2014

Variable Star Border Attached and Ready to Quilt

I just finished these liberated variable stars with a variety of reds and whites/tans to make the stars sparkle. They make a delightful border for an older top. What a perfect pick-me-up!

Log cabin blocks composed of red and cream rectangles for the center. Variable Star blocks of many different red fabrics on cream and white backgrounds for the border.
Liberated Variable Star border

Sandwiched during the commercials of the football games this weekend.

Enjoy the day. Ann

Saturday, December 14, 2013

Still Working on the Border

Meanwhile, back at the ranch... I'm still working on the star border for my Trip Around the Block. The original post about the borders was in August. (Wow, so long ago.) Here's another "rough draft" layout. My borders are usually darker but this time I'm determined to make a light border... and use hexagons. Just to be different.

This was my last layout before cutting. OK, the stars are cut. But sometimes I've cut material then changed my mind and not had enough fabric for the revised version. So now I try harder to get a sense of the fabric relationships before cutting very much. What do I like here? A narrow striped inner border. The pink in the middle and black and white around it. Some white space between the inner and outer border.

Ombre, white solid, black & white stripe,
pink dot, black & white stripe, white solid.

I downloaded isometric graph paper from my favorite site, printablepaper.net, and started sketching. So many grids (polar, isometric, hexagon, pentagon, and a raft of diagonally printed grids in addition to music, knitting and beading.)

Sketch of border

Eight-pointed stars would be much easier to piece but this is a nice change of pace.

One border sewn

One quarter of the border is now finished. My stars and garters! It's painstaking, time-consuming sewing. I'm finishing loads of scrap blocks as leaders and enders, though. Perhaps by the time the entire border is done there will be enough for another baby quilt.

The inner border is not attached to the quilt yet. In fact, it's not cut. I prefer to finish fussy borders first and then cut the simple, inner border as needed. It lessens the stress; who cares if the inner border is 1/2 or 3/8 or 7/16 inches wide? It just needs to fit.

Fret not; enjoy the day. Ann

Monday, November 18, 2013

Take Your Pick

Do you prefer Texas Mink or no Mink on the border?

Black, red, orange, pink & white  t-shirts are combined with bright blue sashing, hot pink posts and multi-colored Texas Mink fringed border..
The quilt with Texas Mink.

Black, red, orange, pink & white  t-shirts are combined with bright blue sashing, hot pink posts and yellow striped borders.
The same quilt before Texas Mink.

Fret not; enjoy the day.

Ann

Wednesday, August 28, 2013

Trip Around the Block Border Ideas

The blocks are together. To make the quilt large enough I need to make another set of blocks around all sides or add a border. Here are some borders I've been considering.

A scrap of this border made a star center in the middle of one of the O-blocks and reminded me to look for this fabric in my stash. It influenced the direction of my fabric choices but the border is a bit narrow for such a large quilt. And there is not enough to complete the border. So I either need to find some fabrics to enlarge (and lengthen) it or save it for a lap quilt.

Auditioning brightly printed fabric for quilt border
Sawtooth border fabric

I bought this Henry Glass fabric recently because it looked like a perfect binding or narrow border. The colors actually blend with the sawtooth border fabric.

Auditioning striped fabric for a quilt border
Repeat stripe border fabric

This is a border I drafted using six-pointed stars. It's not pieced yet so the stars are still too large. If I use it the stars will be multicolored. The innermost fabric is an old Nancy Crow ombre stripe followed by a sweet pink random dot print. I love the black & white stripe but are there too many dots?

Auditioning six-pointed stars for a quilt border
Pieced star border

On graph paper the space between the stars is the same length as the star width. But what if the stars lined up with the X-block centers?

Arranging blue six-pointed stars for a quilt border
Pieced star border aligned with X-blocks

Fret not; enjoy the day. Ann

Saturday, June 29, 2013

Scrappy Trip with Borders and a Mini-Tutorial

Here's the finished top. The narrow diamond border incorporates similar colors with a different shape for added interest. And these were not that hard.

Scrappy Trip quilt made of mainly greens and pinks.


Revised 8/11/13
The original instructions seemed unclear to new quilters so here's a revision. I started with a square quilt made of nine blocks set three-by-three. The length and width are the same.
A bit of math background:
  • A diamond is a rhombus. (A square is also a rhombus.) 
  • Their sides are all the same length and their opposite angles are congruent – the same measure. 
  • All the angles of squares are 90° but diamonds are usually other measures, like 60° and 120°, 45° and 135°, or 30° and 150°.
  • Directions saying ‘cut a two-inch diamond’ refer to the length of one side of the diamond not the length along either diagonal. 
  • Looking at traditional blocks, the diamond is usually set against a square or right triangle; that’s why this measurement works.
My strips are already 2” wide so my diamonds will finish 1.5”.

Constructing the border:

    • Lay out three strips white/green/white angling the beginning as shown to utilize the most fabric. (A below.)
    • Sew strips with quarter inch seams.
    • Measure a 45° angle by aligning the ruler’s 45°line with the seam line of the strips. Cut the angle. (B below.)
    • Measure two inches from the angled edge and cut one set of diamonds. Repeat until you have enough sets. Make straightening cuts when needed to keep a true 45° angle. (C below.)


    1. Sew the diamond sets together as shown (quarter inch seams) until they are slightly wider than the finished width of the current top. (My top was 36" after subtracting the outer seam allowances.)
    2. Add an extra white diamond to each end of the border.
    Diamonds set out tip to tip with one extra white diamond added to each end of the strip.
    1. Press the sewn strip gently to open the seams. Don't rub or use steam; just press up and down.
    2. The edges are uneven so measure a quarter-inch from the wider-angled diamond points and trim.
    3. Also trim the short ends of the strips a quarter-inch from the diamond tip.
    Line up ruler edge one-quarter-inch past the diamond points and trim the borders.

    Border strip with one side trimmed.
    1. Measure the length of your strip from the endpoint of the left-most colored diamond to the endpoint of the right-most colored diamond. 
    2. Trim excess. The border on my quilt was 37.5"; the red diamond sample here measures 12.125“ long. 
    All sides trimmed with quarter-inch seams past the diamond points. Measure the length and width of the border from point to point.
    1. Subtract the finished width of the current top and divide by two. This is the finished width of the inner border. In my case: (37.5 – 36) / 2 = 0.75”.
    2. Add seam allowances and cut strips for the inner border to that width. No matter the length of the diamond border, it will always fit because the width of the inner border is chosen last. In my case: 0.75 + (2 * 0.25) = 1.25" wide.
    3. Sew and press the inner borders to the quilt.
    4. Carefully pin two opposite sides of the diamond border easing in fullness as needed.
    5. To make the corner blocks (squares-on-point):
    • Measure the finished width of the diamond border from one wide-angle point to the other. It is always an odd measurement. Mine is about 1-11/16” finished. 
    • Draw this size square on a piece of graph paper.
    • Find the midpoints of each side and draw a square on point.
    • Check that the size is correct.
    • Paper piece.
    1. Sew corner blocks to the final two diamond border strips.
    2. Attach the final two diamond borders to the quilt, matching the intersection of the borders and easing fullness as needed.
    3. To keep the quilt square, measure the length of current top across the middle and make the first two sides of outer borders these lengths. 
    4. The last two sides of the outer border are this length plus twice the width of the outer border.
    I hope this helps. Fret not; enjoy the day.

    Ann


    Wednesday, May 29, 2013

    The Woman Who Knew Too Much


    Here's an another example of how misguided I can be. Years ago someone wanted to trade these blocks in a fabric combination I knew would look terrible. But she was a good friend so I made a few, planning to piece the top and quietly give it to charity. Well, it looked much better than I thought. Changing my mind, I kept the top and donated something else. Oh, darn; there were only enough blocks for the center... because I knew so much.

    Scrap quilt using black background florals and solid pastels.

    It took a while to collect a variety of solids and even longer to find black background florals but I persevered. Colors kept getting brighter so the border fabrics are stronger than those in the center. Then there was a problem with the inner border. Nothing seemed to work until... We moved across country; my new friends wanted to dye fabric. Everyone else's looked fabulous; mine looked like five dirty dishrags. I knew it! I saved them even when we moved back to Texas where I finally hauled this top out determined to finally finish it.

    When I can't figure a quilt out, I get all my fabric and successively pin it near the problem. I knew commercial solids and hand dyes didn't work well together. Good thing I followed my habit because the dishrags looked great. But none had sufficient yardage to make a border. So I pieced them. Where one fabric got mushy and dirty-colored I picked another hand dye and made little four patches to transition them better.

    Using four-patches to soften change from one fabric to the next.
    Dishrag lavender to dishrag peach

    Adding the inner border meant the outer border needed to be a bit larger. Squares of the black florals in the corner solved that issue. Serendipitously the corner of each square blends with the other points! Lucky me; the top was finally completed.

    The blocks are from Princess Feather and Mountain Reel Quilts by Nancy Daniel. It was one of the first designs for rotary cutters and it's an easy pattern. (This is not the quick cut Delectable Mountain. The light side is larger than the print side of this block.)

    Fret not; enjoy the day.

    Ann