Showing posts with label piecing. Show all posts

Wednesday, January 1, 2014

Block Piecing Tutorial: A Method to Maintain Order

I enjoy making scrap quilts. The seemingly random arrangement of fabrics interests me and I love the depth achieved by using fabrics that don't quite match. We are so much smaller than a quilt (no matter how large we think we are.) Mismatching colors in clothing looks weird most of the time but adds so much dimension to a quilt. When I work on blocks like the variable stars I take time to arrange the lights or darks in ways that add sparkle.

Sometimes, however, I lay out a scrap block in a particular order only to sew the wrong sections together. It's so annoying. Here's a way to avoid this problem.

1. Lay out the block as you'd like it.

Nine 2.5-inch square patches of red and cream are laid out to form a star
The nine patches of this variable star block are laid out as I intend to sew them.

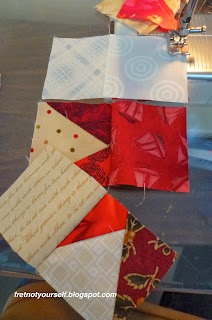
2: Chain piece pairs of squares from the columns starting at the top left. Place the top left and middle left pieces right sides together and sew. Repeat with top middle and middle pieces, chain piecing them to the previous pair. Repeat again with the top right and middle right. Do NOT cut between these three chained pieces but cut after the third (right-most) one is sewn. (This is where I'd sew an ender to keep the thread from tangling.)

Three pairs of red and cream squares are sewn together on a Bernina sewing machine with thread linking the pairs into a chain.
Chain piecing the two squares from each row.

3. Finger press seams to opposite sides and open.

Layout of red and cream nine-patch block showing three pairs of squares sewn with chain piecing intact between them.
The first two squares in the first two rows are sewed
and the thread is still chained between them.

4. Now chain piece the next square in each column to the previous sewing. Place bottom right piece to the right section, right sides together and sew. Repeat with bottom middle piece and middle section, chain piecing them to the previous set. Repeat again with lower left piece and left section. Again, do NOT cut between the chained pieces but do cut after the third one is sewn. (Sew another ender.)

Red and cream squares of a nine-patch are chain pieced into three columns to maintain the order of the pieces.
Chain piecing the bottom squares
to each column.
Ender #1 is in the background.
 
5. Finger press seams to opposite sides and lay open. The block is linked by the sewing thread you didn't cut. Everything should be in order.

Three column of a block are chain pieced together to maintain the order of the squares.
Two sets of chain piecing completed.
(Sorry, the columns look like rows
so you can see the chaining.)

6. Place left and middle columns right sides together butting seams and sew. Sew an ender. Cut.

Two columns of three red and cream squares each are sewn together to in the penultimate step of making a Variable Star quilt block.
Sewing two columns together.
Notice how chains hold the
third column in place on the left.

7. Repeat with last column. Sew a fourth ender. Press and admire.

The final column, chain pieced to the main section, is ready to be sewn to the nine-patch block.
Two columns sewed.
Ready to sew the last column.

The block is now sewn in order. Yea!

A variety of red fabrics create a star on the cream and white background of a Variable Star block.

This method works for any block that breaks down into squares such as four-, five-, seven-, nine-patches. And did you notice I sewed four enders making this one block? That's how I get so, so many scrap blocks finished {which is both a blessing and a curse.} Do you have questions? Let me know.

Wishing everyone peace and joy throughout the New Year.

Enjoy the day. Ann

Monday, March 25, 2013

Daisy Quilted and Bound

A Daisy a Day is finished in time for the quilt show next month. I used a Mountain Mist Cream Rose cotton batt and YLI Soft Touch, Metler Fine Embroidery and Aurifil Mako threads for quilting. It's linked to the Free Motion Quilting Project because I used Flowing Leaves to fill the background.

Red ladybug on daisy petal against blue background in this original art quilt.
A Daisy a Day

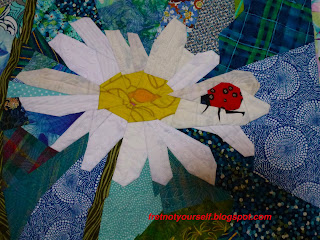
Here's a closeup of the ladybug on its daisy.

Detail of ladybug on daisy quilt

How did I create the legs? I cut them from this Alexander Henry fabric. It's also the reason the quilt was reversed. There weren't three legs in the other direction!


Fret not; enjoy the day.

Ann

Monday, March 18, 2013

I'll Give You a Daisy a Day

Bright red ladybug rests on the white petal of a daisy in this original art quilt.
A Daisy a Day quilt top

What a beautiful day for a bicycle ride through the blossoming trees! When I ride my bike I can hear the birds warble, watch the water dance down the creek and smell all the goodness of the earth. I've found a spot where the mallard and his mate love to dunk their heads searching for goodies on the shallow bottom.

I had to sew some of the joy of spring into my current quilt. Using Leah Day's Flowing Leaves, I've finished most of the background of my daisy quilt. I don't think I'll quilt so heavily on the daisies; I'm still working that part out in my mind.

Intricate, small leaves stitched in royal blue thread on the back of this quilt.
Free-motion quilting
Fret not; enjoy the day.

Ann