Showing posts with label pictorial quilt. Show all posts

Thursday, October 22, 2015

Lobster Boat Quilt for a Special Person

Guess who's going to be a grandmother?

Lobster Boat quilt

How happy am I? VERY!

No names announced yet so we are calling him Little Tex.

Surely such avid sailors would want a sailboat quilt. Wrong-o. She Who Wore White wants a lobster boat. Fortunately she sent several photos. I got busy sketching different ideas. When finalized, templates are drafted by overlaying tissue paper. Sometimes I draft in reverse; other times I turn the tracing paper over after drawing because the freezer paper templates are always the opposite direction.

Lobster boat sketches and pattern.

Do you see those small cities of houses in the sketches? Thank goodness I came to my senses before piecing. The bottom two photos show the templates. I kept the gentle curve along the top of the hull because it will be easy to piece. But I did add a very small triangle on the front of the boat to make a pseudo-curve. It could have been been drawn as a curve, too.

Next I pulled fabrics that might work. Way more than I finally used but it all came from my stash.

Fabric possibilities for the lobster boat quilt

Fairly confident in my choices for the ocean and the boat's hull, I pieced those sections first. The bold red and white striped fabric adds emphasis (several boats had a band of color on the hull) but I especially liked the way the yellow and text fabric creates boards.

The lighter blue and white print and the dotted blue mimic reflections of the boat on water. Originally I planned to piece the lobster buoy from several small pieces. Then I found a Balinese wax print that worked excellently - a yellow teardrop on dark blue.

Piecing the lobster boat quilt

The blue fabrics get lighter with distance. Careful template placement on the blue and white stripe makes perfect shorelines and sandbars. How lucky is that? That's (my version of) the Brewster Island lighthouse in the distance.

Piecing the center of the lobster boat quilt

Throughout construction I was dreaming up more ways to personalize this quilt. So the trio of houses in the foreground are the school colors of parents and uncles. (In fact, that same yellow is in the Tiger Stripes Rail Fence.) To ensure no one else could claim them, each is labeled with the respective name in Metler Poly Sheen neon yellow or orange. More about writing in this post. None of these colors showed up well on the yellow house so I used dark purple cotton thread on it. Then I christened the boat with the grand-dog's name and added a Texas flag because he would always fly it.

Details of the lobster boat quilt

There were sailboats, fish, and lobster prints begging to be used but they never worked in the body of this quilt. I worked them into the border.

I intended to improvisationally piece the back from the scraps (honest) but these fabrics dropped next to each other. Now he will always be wrapped in the loving arms of Texas... and me.

Texas flag on the back of the Lobster Boat quilt.

Those directions for five-pointed stars came in handy again.

Lots of free motion quilting: still water, waves, stone houses, windshield, boards, and more. Even with all that quilting, it's still soft and cuddly once it was washed.

Quilting details from the back of the Lobster Boat quilt.

Quilt Details
Size: 50"(H) x 51"(W)
Pattern: Original design
Batting: Mountain Mist Cream Rose 100% cotton
Thread: Metler and Auriful 50/2 cotton sewing threads, Metler Poly Sheen
Quilting: Free motion quilting


The next Ad Hoc Improv Quilters Linkup begins the Tuesday, October 27.

Enjoy the day, Ann

Saturday, May 11, 2013

The Road to My Sister's House


So you weren't scared off by the wild braid in my last post? Here's what I made from those ugly fabrics. It's a personal story about my youngest sister.

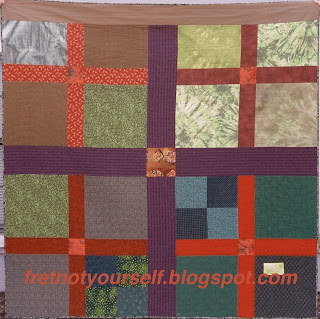
Simple cross blocks combine with printed braid sashing and pieced border.
The Road to my Sister's House quilt

The class designed with the smallest squares in the morning. After lunch we cut rectangular crosses, sashing and posts to build on our stories and layer texture into our quilts. How amazingly everyone's quilt improved, especially mine! Cutting the braid the length of the fabric kept consistency along each sashing. Limiting the width highlighted its inherent motion. To me it represents the tire tracks of all those long drives. Those incredibly loud oranges became the flower centers surrounded by orange and yellow petals. (Printed circles are very useful that way.)


I added borders the following week. The inner border used all my African fabric. (It spoke to me at first sight it but had never found a home.) Again, I just played around putting fabric near the quilt to see what looked right. The outer border x's and o's represent the letters we send and the love we share. Complete o's were too static; partial o's look better. However, I quilted the phantom parts in.

The back enlarged the pattern on the front to keep it interesting.

Quilt back of enlarged blocks repeats the design from front of quilt

Fret not; enjoy the day.

Ann


Friday, March 29, 2013

Aspen Leaves

Walk through aspen groves and listen to the wind rustling the leaves. To top it off aspen turn the most vivid colors in the fall. Entire hillsides of brilliant orange and yellow! These are some of my strongest memories of living in the Rocky Mountains. And I had a good assortment of just those colors in my stash.

For the straight line piecing assignment in our book study I chose to interpret these leaves. I had my recollections and some very old photos. But using out-of-focus or slightly faded photos allows more room for interpretation. (And my sister kindly emailed some current photos. Hooray!)

Original quilt - two aspen leaves in orange and yellow against a bright blue background
Aspen Leaves quilt

First I sketched and sketched and sketched. When the layout pleased me I enlarged it to 18 by 24 inches, the size of my sketchpad. This seemed like a reasonable size to sew.

Original Drawing for Aspen Leaves

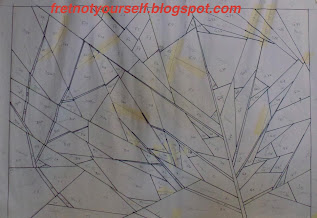
Next I drafted a sewable pattern by overlaying a second sheet of paper and drawing with a straight-edge.

Sewable Pattern for Aspen Leaves

Now for the fun part: choosing the fabrics! In reality aspen turn from green to orange and finally yellow. But no matter how I tried, the solid yellow leaf did not look right. So I fooled with Mother Nature. Can you find the orange slice fabric?

Here's a detail of the free motion quilting. All but two pieces came from my stash. Of course, now I'm out of orange... and need more yellow, too.

Detail of Aspen Leaves

Fret not; enjoy the day.

Ann


Monday, March 25, 2013

Daisy Quilted and Bound

A Daisy a Day is finished in time for the quilt show next month. I used a Mountain Mist Cream Rose cotton batt and YLI Soft Touch, Metler Fine Embroidery and Aurifil Mako threads for quilting. It's linked to the Free Motion Quilting Project because I used Flowing Leaves to fill the background.

Red ladybug on daisy petal against blue background in this original art quilt.
A Daisy a Day

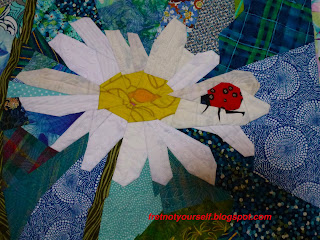
Here's a closeup of the ladybug on its daisy.

Detail of ladybug on daisy quilt

How did I create the legs? I cut them from this Alexander Henry fabric. It's also the reason the quilt was reversed. There weren't three legs in the other direction!


Fret not; enjoy the day.

Ann

Friday, March 22, 2013

Creating A Daisy a Day

It's so interesting and helpful to me when people share some of their creative process that I want to do the same. The daisy quilt began with the book study assignment simple leaf and extended into radial structure. I scanned an old family photo, traced two daisies and enlarged the sketch to a workable size.


Drafting the pattern on tracing paper took several days. I discovered predilections for partial seams (Ruth McDowell's puzzle pieces) and drawing too many lines! Partial daisies filled in some blanks. Reversing the pattern put the taller daisy top left. Several iterations were needed to simplify sufficiently.


After labeling both sides of the draft, I heavily retraced all my lines on the back side. Now freezer paper will lay on top of a reversed pattern. All template markings are on the front (paper side) of the freezer paper so no ink bleeds from template to fabric. Later the draft can be turned to the front again to avoid confusion when piecing.
The ladybug was a potential pest. Unsure of the result, I made templates of her wedge and pieced it first. It's easy to rid a quilted garden of ill-behaved insects!


Here's my first ladybug. The second and back legs look fine but the front leg/head combination is really Ms. Pac-Man. Darn; that visualization will stay with me forever!


After three more attempts and one day searching the fabric stores (it's tough, but someone has to buy fabric) I pieced a ladybug I can live with. Time for fabric audition.


Daily photos tracked frequent fabrics changes and allowed more thoughtful reflection. For example, although the last layout is misaligned, it still reads as flowers and is more vibrant. Something to consider next time.


Here are several possibilities for the border. Which would you choose?


The pieced top is here. I'm still quilting it.

Fret not; enjoy the day.

Ann

Thursday, March 21, 2013

The Live Oak

My first post was a out of chronological order but I was so excited how well it was going! So let's start at the very beginning.

Ruth McDowell's work is spectacular. Additionally, she is one of the most generous teachers, sharing information in her books and classes. The Live Oak is the result of a two-day workshop.

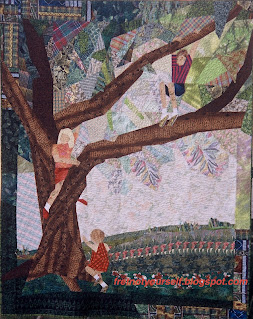
I wanted a quilt of my children climbing the tree in our front yard and had many photos to choose.  As I recall they could always be found in the tree or in the creek; but no photo had all of them in the tree at the same time. (Isn't that always the case?) The tree was sketched and photos enlarged by differing amounts to get the children to the same scale. Next the photos were positioned on the tree and overlaid with tracing paper to draw a line design. Then it had to be drafted into something sewable. At this point the class was over.

Working steadily at home the quilt was completed in two months and juried into the 2003 AQS Show in Paducah. It's still my favorite.

An original art quilt of three children climbing the live oak in their yard.
The Live Oak

Time passed. Although ideas kept running through my mind, the mantra was, "I'll do this when I retire." Now is the time.

Last spring I proposed a one year Book Study in my guild to jointly discuss Ruth's book, Piecing: Expanding the Basics. She re-wrote it as two books, Piecing Workshop and Design Workshop. We agreed to meet monthly with sketches, work finished or in-progress and two fabrics we found hard to use. The point was to study her techniques and determine how we could apply them to our own work. Five other quilters joined and we've had a blast. The group found solutions to drafting problems and explored uses of some of the ugliest fabrics ever! We progressed from the samples in Piecing Workshop to original designs of our own.

Here's the monthly outline I wrote from Ruth's books. They are such a rich source of topics, it was very difficult to narrow them to twelve.


1. Sew her sampler with straight seams, inset corners, linear elements, curved seams & inset pieces
2. Sew a small maple leaf quilt
3. Sew a small lily quilt
4. Sew a pieced & slipped landscape
5. Design a simple leaf
6. Design a tessellated block
7. Design a block with radial (wedge) structure
8. Sketch or sew some setting variations
9. Create a design with a different structure (such as log cabin, braid or clam shell)
10. Create a design with people, animals or man-made structures
11. Draft an original landscape 
12. Begin a series by abstracting or simplifying a previous sketch

Next time I'll show some of the steps in my recent work.

Fret not; enjoy the day.
Ann 

Monday, March 18, 2013

I'll Give You a Daisy a Day

Bright red ladybug rests on the white petal of a daisy in this original art quilt.
A Daisy a Day quilt top

What a beautiful day for a bicycle ride through the blossoming trees! When I ride my bike I can hear the birds warble, watch the water dance down the creek and smell all the goodness of the earth. I've found a spot where the mallard and his mate love to dunk their heads searching for goodies on the shallow bottom.

I had to sew some of the joy of spring into my current quilt. Using Leah Day's Flowing Leaves, I've finished most of the background of my daisy quilt. I don't think I'll quilt so heavily on the daisies; I'm still working that part out in my mind.

Intricate, small leaves stitched in royal blue thread on the back of this quilt.
Free-motion quilting
Fret not; enjoy the day.

Ann