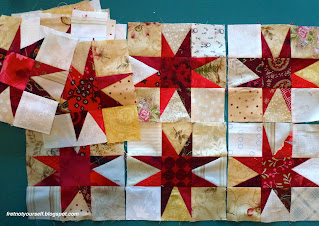
I read Gwen Marston's Liberated Quiltmaking II last month. Published in 2010, it's a wonderful book filled with photos and instructions of lively, colorful blocks. So when I pulled {yet another} set of vintage blocks out of the closet I decided to incorporate some of her stars.
Here's what I completed yesterday. The background and center squares are cut 2.5" while the star points were made from crumbs and scraps. What a relaxing way to spend the day.
Scrap quilts, improvisational quilts, and art quilts with occasional forays into travel and books.
Monday, December 30, 2013
Tuesday, December 24, 2013
More Log Cabin Baby Quilts
Just before Christmas a friend's wife gave birth to a darling baby girl. Their son is so excited! And I am, too. Here's the quilts I made for them. This one finished about 42" with those half-inch logs.
This next one is about 64" square and has two-inch logs.
 |
| Half Log Cabin |
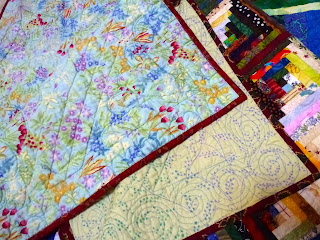
Here's a quick view of the backs. The one on top is one of my favorite Alexander Henry prints; so many lovely colors. The quilting is a combination of straight lines and feathers but I had to put some spirals in the border.
 |
| Quilt backs |
I pick a quilt block to use up scraps. Then I piece the blocks slowly as leaders and enders when I'm working on other projects. As they are finished, I press them and add them to the scrap block box. When I need a quilt, it's halfway complete. When I get tired to making one style block I choose another. Works for me. These blocks use light & dark fabrics. I'm about ready to start a new block using medium shades; they are overflowing my scrap bag.
Enjoy the day. Ann
Enjoy the day. Ann
Friday, December 20, 2013
Monarch Butterflies at Natural Bridges
With Christmas presents wrapped and under the tree, I went to Natural Bridges SP near Santa Cruz last week. There used to be more bridges but they have collapsed. Still gorgeous.
 |
| Natural Bridges |
No one was in the water except this guy, busy searching for dinner.
 |
| Snowy Egret |
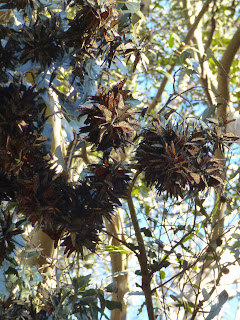
The best reason to visit this time of year is the butterflies that winter in the ravines. Looking up, they appear to be branches of dead leaves. But look again.
They group like this for warmth. There were thousands of them this year but I'm told there were millions in the '70's. Monarchs live on every continent except Antarctica. They lay eggs on milkweed, the only plant their caterpillars eat. Human development is destroying milkweed habitat. I bought some seeds to plant in a pot this spring. One bush per monarch. I'm on their migratory path so perhaps they will visit me soon.
Enjoy the day. Ann
Enjoy the day. Ann
Saturday, December 14, 2013
Still Working on the Border
Meanwhile, back at the ranch... I'm still working on the star border for my Trip Around the Block. The original post about the borders was in August. (Wow, so long ago.) Here's another "rough draft" layout. My borders are usually darker but this time I'm determined to make a light border... and use hexagons. Just to be different.
This was my last layout before cutting. OK, the stars are cut. But sometimes I've cut material then changed my mind and not had enough fabric for the revised version. So now I try harder to get a sense of the fabric relationships before cutting very much. What do I like here? A narrow striped inner border. The pink in the middle and black and white around it. Some white space between the inner and outer border.
This was my last layout before cutting. OK, the stars are cut. But sometimes I've cut material then changed my mind and not had enough fabric for the revised version. So now I try harder to get a sense of the fabric relationships before cutting very much. What do I like here? A narrow striped inner border. The pink in the middle and black and white around it. Some white space between the inner and outer border.
I downloaded isometric graph paper from my favorite site, printablepaper.net, and started sketching. So many grids (polar, isometric, hexagon, pentagon, and a raft of diagonally printed grids in addition to music, knitting and beading.)
Eight-pointed stars would be much easier to piece but this is a nice change of pace.
One quarter of the border is now finished. My stars and garters! It's painstaking, time-consuming sewing. I'm finishing loads of scrap blocks as leaders and enders, though. Perhaps by the time the entire border is done there will be enough for another baby quilt.
The inner border is not attached to the quilt yet. In fact, it's not cut. I prefer to finish fussy borders first and then cut the simple, inner border as needed. It lessens the stress; who cares if the inner border is 1/2 or 3/8 or 7/16 inches wide? It just needs to fit.
Fret not; enjoy the day. Ann
Wednesday, December 11, 2013
Placemats and Napkins
I made a set of placemats and napkins as a Christmas present. After much discussion we chose mattress ticking for the fabric. And they are so cute! The ticking is canvas-weight, perfect for placemats.
I like them so much I just finished a second set of mats for my husband. (Just what he always wanted!) But I used Moda Kasuri Medallions in indigo quilting cotton for the napkins. The heavy ticking required a half-inch seam but the napkins needed just a quarter-inch seam.
My grandmother taught me to miter corners but Britex Fabrics of San Francisco recently posted an inspirational guest blog by Nicole with very clear instructions that are very similar. Try it out.
By the way. Notice how much prettier the place setting looks. Those placemats were washed, then ironed while damp. Mine were dried and then ironed. Even with steam I couldn't get all the wrinkles out. Next time, I'll iron straight from the washer.
Enjoy the day, Ann
Enjoy the day, Ann
Friday, December 6, 2013
Quilts for Generations to Come
Finally figured out how to post some photographs of the quilt enveloping friends' future generations. Isn't this why most of us quilt? Don't you love seeing them still used and enjoyed years later? Family quilts hold a lifetime of memories and more.
Subscribe to:
Posts (Atom)


