Saturday, April 27, 2013

Ocean Waves Away

It's done! Putting it in a show was the incentive needed to finish Ocean Waves. This is one of the few quilts  I've made without a border. It looked odd at the show but looks great on the bed.

Queen-size Ocean Wave quilt with green,blue and tan scraps.

There are no photos from the beginning of this project but I started with lots of light blues, pinks and greens. Eventually I found this fabric in my stash which seemed to have many of the colors 'She Who Wore White' wanted.

Fabric (by Fabric Traditions) used for binding & color selection.

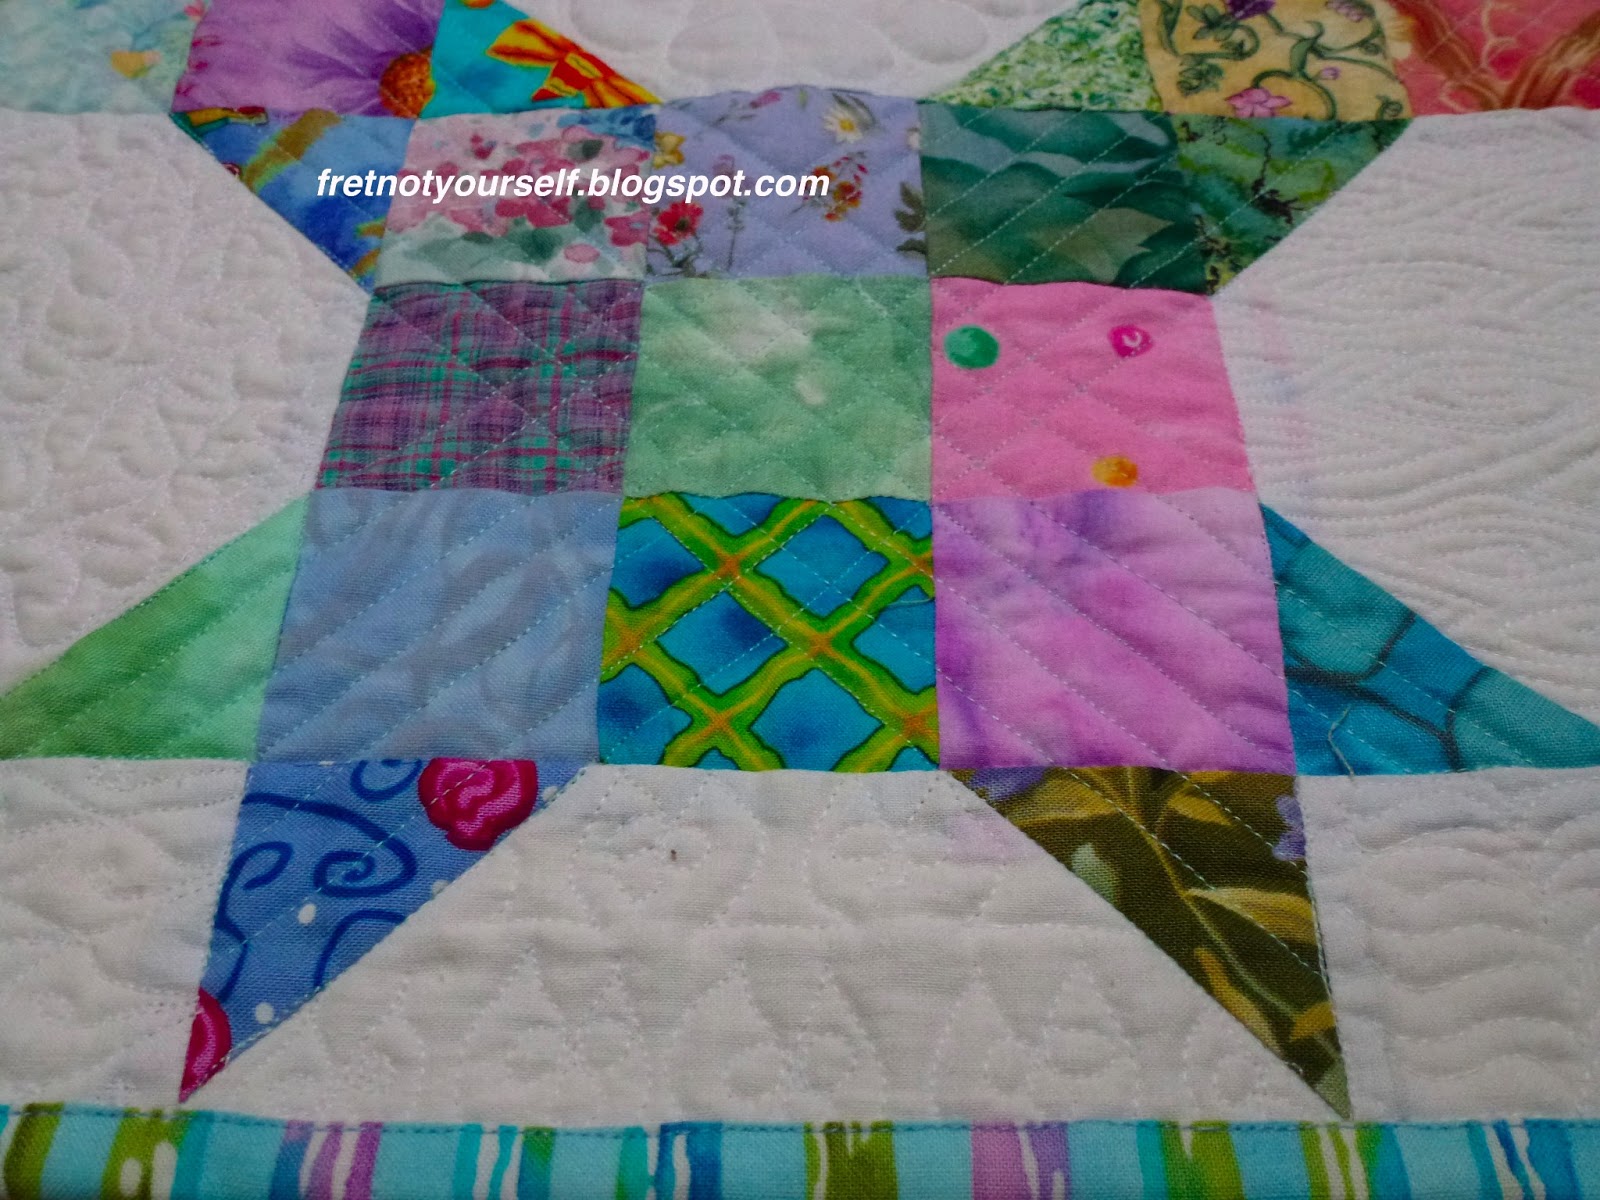
All the cut fabrics were placed next to it. Any (but not all) that didn't look good in this new color scheme were discarded. Then I added medium and dark blues, teal, greens from yellow-green to blue-green, darker browns and a few mustard, rusty orange, purple and black. Fabrics didn't have to match but they had to blend with the others. The lights run from white to tan. I like how the bright whites "pop" - something unexpected. Almost every print style is included: Civil War, 30's reproductions, baby fabrics, batiks, modern, stripes, plaids, geometrics, florals, etc. No solids, although some may appear to be.

Pebble quilting on muslin
Pebbled quilt edge

Feather quilting on muslin
A section with lighter triangles

With so much muslin on the front, the back had to be muslin to prevent shadowing. This is my first time using a wide fabric (108") for a back. I doubt I'll ever do it again. Although it is nice to have no seaming, it didn't have the same the quality. Ocean Waves drew up more than other quilts I've made. The top was 102" but after quilting it's 98". I'm uncertain if the cause was the thread, the backing, the construction or the heavy quilting. On previous quilts I've tried everything except the wide backing so perhaps the looser weave on the backing caused some of the shrinkage.

I free motion quilted with white YLI 100 weight silk on top and beige Soft Touch 60 weight cotton in the bobbin. These fine threads require shorter stitch length. (Thicker thread need larger designs and slightly longer stitches.) Make samples before starting.

Fret not; enjoy the day.

Ann

Wednesday, April 24, 2013

Writing with Thread

When you want to write on a quilt, try thread writing instead. No need for a label; no need to worry that the ink will fade; this will last as long as the quilt.  I usually thread write after the quilt is sandwiched so I don't use stabilizer. Here are four ways.

A. Use the programmed alphabet on your machine. Punch in your name and the date to sign the corner. Try it on a scrap piece before stitching on the quilt to make sure the letters and spaces are entered in the correct order. Make sure your quilt has room to move with the stitching; feed dogs are up with this method.

B. Sew in cursive using a narrow free motion zig-zag stitch. This is my favorite way to write on a quilt. I do not try to satin stitch; I just want a thicker line than a single row of stitching. Unlike the programmed stitches, this can be as large as you like or as small as you're able to write.

Zig-zag with white Aurifil 50/2 cotton thread.

Want the words to stand out? Use contrasting thread. My favorite is Metler Poly Sheen in neon green (5940), neon yellow (501) or neon orange (1306). (These are the numbers on my current spools; check with the manufacturer.) The colors may sound awful and look harsh on the spool BUT... they aren't neon on your quilt and the zig-zag writing is readable.

Metler Poly Sheen threads.

Zig-zag with neon green thread.

Zig-zag with Metler neon yellow thread.

C. Recently I found the Graffiti stitch on Leah Day's Free Motion Quilting blog. The echo stitching is what makes this writing show up at all. It's another good way to sign your quilts. For an understated look, match the thread to the fabric.

Straight Graffiti stitch.

D. If machine writing isn't your style, try hand embroidery. Check out this very informative tutorial  How to Make an Embroidered Signature at Pretty by Hand. Kristyne's color combinations are a treat for the eyes and the workmanship is inspirational.


What could you write on a t-shirt quilt, or any quilt for that matter?
  1. Nicknames
  2. Names of family, friends, pets
  3. Classes, activities, frat/sorority, clubs
  4. Band, sports & instruments/positions played
  5. Names of moves: wrestling holds, cheerleading jumps, chess moves
  6. School name
  7. Religious organizations
  8. Offices held
  9. Honors earned
  10. Class year
  11. Major
  12. Mascot
  13. Lyrics
  14. Code phrases, cheers, chemical compounds
  15. Poems, haikus, quotes
Fret not; enjoy the day.

Ann

P.S. Paul Burega commented about thread writing on his quilts. He posted a photo on his blog A Dad who dyes fabrics and quilts. Click to see his photo. It looks great with the softly waving lines surrounding it.

Saturday, April 20, 2013

Nine Patch Snowball

Last year I began cutting a few project remnants into 2.25 inch squares. But by the time there were enough I was in a machine quilting funk. My sketchbook was boring; I couldn't quilt designs I'd previously mastered. I wallowed in this misery for a week. Boring, tiring and non-productive.

Google searches led to Leah Day's Free Motion Quilting Project. Making small samples didn't appeal. Finally I realized I could make a nine-patch snowball quilt which would:
  1. Use up scraps
  2. Have small areas similar to Leah's samples 
  3. Give me a warmup piece to practice on before moving to larger quilts AND
  4. Finish a quilt for the ready-to-go stack.
Cheerful pastel and medium prints on white. Border creates stars for nine-patch snowball quilt.
Nine-Patch Snowball Scrap Quilt

How to make this quilt:
  1. Cut 353 squares 2.25". Use the Value Finder to sort the squares by value, keeping only lights and mediums (Gray Scale 9-4.) Darks go back into storage. 
  2. Randomly sew 225 squares into 25 nine-patch blocks. Don't make x's or o's. 
  3. Press seams to the center (because the snowball seams press out.)
  4. Cut muslin into 24 squares of 5.75 inches each.
  5. Take 96 colored squares, turn them over and draw a diagonal line on the back.
  6. Pin to each corner of a muslin square and sew along the drawn line. 
  7. Flip and press towards the corner; make sure the colored square (now a triangle) reaches the original muslin corner. Then carefully cut the excess muslin & colored part underneath leaving a quarter inch seam allowance.
  8. Lay out blocks alternating nine-patch and snowball. Match seams and sew. (The seams won't butt each other because they have different angles. Pin the intersections well.)
  9. The border is simply a row to finish the "stars." Cut 28 muslin rectangles 5.75 by 2.5 inches and 4 muslin squares 2.5 inches. 
  10. Take 32 colored squares and repeat step 4.
  11. Pin and sew two colored squares to each of 16 muslin rectangles as shown on the quilt. Since the muslin is slightly wider, the squares won't reach all  the way to both sides.
  12. Press & trim the excess from the rectangles as done in step 6.
  13. Lay out border alternating rectangles with colored triangles & plain rectangles. Put muslin squares in the corner. Sew.
  14. By cutting the border muslin slightly wider, the star points finish 1/4"before the edge of the quilt. Now you don't have to bind exactly to those points. Let it float a bit! Easier.
Step 5
Pressed snowball block


Step 6 (second part)
Additional information: I made this completely from scraps but if you need to buy something, here's the yardage I calculated.

  1. 1 yard muslin for the top
  2. 1.125 yards for the back (it's 41' by 41")
  3. 0.33 yard (12 inches) for binding (quarter inch double fold)
  4. 1.375 yards assorted scraps for the squares and triangles

Wouldn't six inch blocks be easier? Perhaps. However, this quilt finishes just under 41 inches, so the back can be made from one width of fabric. With six inch blocks it would be 46.5 inches.

After sandwiching and pinning the quilt I used the walking foot to ditch stitch the block edges and quilt diagonal lines across the surface through the colored squares. Only the muslin areas were unquilted. Every morning I chose a different design from Leah's website and sketched it by hand a few times before quilting one of the muslin areas. Warmed up, I'd move to Ocean Waves. This baby quilt was completed in about a month and only took that long because I just quilted one design a day.

Over that month my quilting improved and I finally created my own designs on some of the blocks.

Tree Bark design from FMQ Project 

Swirling Petals design from FMQ Project


My Baby Owl design (in the border this time)
Three varying sketches as I worked through ear tufts, eyes and beak.

From the "Can't Do" whine to the "Happy Dance" hooray. Thank you, Leah, for sharing your expertise so generously. It's finally linked to the FMQ Friday here

Fret not; enjoy the day.

Ann

Wednesday, April 17, 2013

Pretty in Pink T-Shirt Quilt

Here's a young friend's t-shirt quilt. Since her drill team was named Red Jackets, red was the obvious choice for the sashing or border. Wrong. She wanted pink only. All that pink needed some separation so I added a narrow inner border. But even that black fabric has small pink dots on it.


In addition to t-shirts, this quilt has part of her team jacket, a pocket from band practice shorts, the logo from a ball cap and the poodle from a dance costume. Anything washable can be included.

Ball Cap Logo

Practice shorts pocket (top right) & Poodle with leash
Fret not; enjoy the day.

Ann

Sunday, April 14, 2013

Ocean Waves

Here's my revised Ocean Waves which may be more traditional. I've been (re)constructing it this past year... off and on. Each block has 49 pieces; it's not a beginner's pattern.

I chose a six inch center square. To make the triangles divide that number in half. The hypotenuse of these triangles finished 3 inches so I cut 4.25 inch squares and then cut two diagonals across the squares to get four QST (quarter square triangles.)

Piecing the blocks looked straightforward - alternate dark and light triangles. Not quite. You don't want to know how I did it but I assure you, it was the most difficult manner possible. I recently found very clear and much easier directions on Quiltville. As luck would have it her blocks are the same size as mine. Another advantage of Bonnie's method is the ability to check and trim the size of the squares as you progress. I wish I'd seen it earlier.


I'm slowly quilting the large squares. Feathers sound good but not a wreath.


Fret not; enjoy the day.

Ann

Thursday, April 11, 2013

The Wave That Never Was

Ocean Waves should have been finished a while ago. It was intended to be a wedding present. The couple planned the wedding for more than a year and I started the quilt in time but... Someone who wore white kept changing her mind. Naming no names, mind you.

First she wanted all pastels. I cut triangles. Then perhaps not so many pastels. I replaced triangles. Could I use fewer pinks? I made more triangles. What about teal and brown? More triangles. Are we seeing a pattern here? She wanted a soft blue center square. No, not that fabric. Not that one either. The third choice (which I'd pieced in fourteen blocks) wasn't quite right. That's when I put it aside.

Ocean Wave blocks with the wrong blue centers.

After the wedding I picked up some excellent muslin and recommenced piecing. I vowed not to show it until every stitch was done. Oops; I forgot. Guess what? She loves it but... They're planning to buy a larger bed. Will the quilt fit it? I hope so; the top was 102" square but will probably shrink from all the quilting.

I agree with the lady in white. This light blue center doesn't make it... although it might be a good choice for a baby quilt.

Fret not; enjoy the wedding. The quilt can wait.

Ann

Monday, April 8, 2013

What's the Center of Attention?

The next packet in the shoebox contained 25 khaki-and-white nine patches. At one time our bee exchanged blocks and I suggested these. Trading innocuous blocks (you know, the ones that don't look like much) might let everyone branch further in their individual styles. What could be more low-key than khaki? No one else liked the idea and the blocks went in the shoebox.

Simple khaki and white nine-patches on point alternate with dark red and chartreuse hourglasses to create the design of this quilt. A chartreuses and dark green inner border is followed by a dark brown outer border.
Nine-Patch Hourglass Lap Quilt
There was just enough dark red to make this lap quilt. I enlarged the 4.5" nine-patches with four red triangles and added alternate hourglass blocks. Chartreuse is the complement of the dark red. A couple of the nine patches have the greatest value contrast, but the eye focuses on the second most value contrast - the red/chartreuse areas - because it's larger. Sometimes the original block doesn't need to be the center of attention. I like the red lozenge shape and the chartreuse stretched stars.

Feathers, parallel lines, and stippling are highlighted in this quilt detail.
Detail of machine quilting
The border is flying geese but my first version looked a bit different. When I sketched this design on graph paper (yes, I still use the stuff) it looked great. It looked okay when pieced. But when I snapped a photo before quilting, it looked horrible. The longer I looked at the corners the worse they appeared. It had to be ripped out and replaced. Small change; big difference; worth the trouble.


Sketches I made for the quilting designs in the chartreuse hourglass and flying geese. Given the contrasting colors and values in this traditional styled quilt, I chose to change thread color too. I quilted a black feather in the outer border. It's not visible at all and was so hard to see while quilting that I turned the quilt over and quilted from the back.


The quilting thread is Metler Fine Embroidery and the batt is Mountain Mist Cream Rose, a lightweight batt very suitable for warm climates.

Fret not; enjoy the day.

Ann

<a href="https://www.bloglovin.com/blog/6844739/?claim=5pd3e3tmy5e">Follow my blog with Bloglovin</a>

Thursday, April 4, 2013

Finding Value

Here's a low contrast quilt; the block is Grandmother's Choice. I wanted to evoke a 30's feel without using any 30's-style fabric The center and border both have the same value range. The center blocks are each enclosed by identical sashing which makes them appear like discrete units. Value variations cause some to recede and others to stand out. The border changes value in steps (like a mini radiant nine-patch) which tricks the eye into sweeping across the area rather than focusing on a single spot.


Pastel fabrics in yellow, blue, green and pink are used to make this Grandmother's Dream quilt.

Have you heard of a Gray Scale and Value Finder? I use it every time I make a quilt. It prevents many fabric mistakes. It is printed on card stock, found at art supply stores and still costs less than four dollars.


Starting with 100% black, each rectangle increases white 10% and decreases black 10%. The lightest rectangle is 10% black, 90% white. While they are numbered 1-10 there is no consistency between manufacturers whether 1 is the darkest or lightest. Just lay out fabric, place the value finder on top and squint. The fabric has a value (percent black or white) where it fades into the value finder. For example, my carpet is a 2.

We frequently hear that value is more important than color. The Gray Scale helps quilters track values across all their fabrics. Trading blocks is easier too because you can refer to the value scale (assuming everyone in the group has the same brand.) No, they don't work for every fabric. A large scale print with lots of color may have different values in different places.

The first one I owned had small holes made by a hole punch but these larger openings are better designed. The Color Wheel Company manufactured my current value finder. Other than a fondness for their products I have no relationship with them. Let me know how it works for you.

Knitters should consider this too. I saw color and black-and-white photos of gorgeous Fair Isle knit sweaters. Sometimes the pattern (and all the hard work) disappeared in black-and-white because yarn color changed but not value.

Fret not; enjoy the day.

Ann

Monday, April 1, 2013

Radiant Nine Patches

How often has this happened to you? I was cleaning a closet and found a shoebox of leftover nine patch blocks in the back. Oh, I remember them! First is a stack of ten radiant nine patches in blue. The pattern was published by Blanche Young. Catherine and I made a queen-size quilt for an auction and these were my leftovers... twenty years ago. Although we had lots of fun I wanted to wait a bit before beginning another. It's probably been long enough, don't you agree?

All values of green, blue and purple are paired in this quilt of six-inch nine-patch blocks.
Radiant Nine-Patch quilt
Because it's a value study the x's and o's should be very low contrast as you move from light to dark. We used an analogous color scheme I want to try again although greyed colors were the style back then. I chose mostly blue-green, blue & blue-violet from my stash. To emphasize the value changes rather than the fabrics, the blocks finish 4.5 inches which means each small square was cut two inches.
This nine-patch block demonstrates using fabrics of similar value to create the radiant effect of the larger quilt.
Example of a Radiant Nine-Patch block

The innermost border is 1.5 inches of a lovely pink print while the next border is a half inch of blue and green stripe. The outer border is larger four-patch squares which shade from medium to darker values in the corners.

Three borders: a pink-backroung floral, a blue and green stripe and a large pieced outer border of blue, green and purple.
Detail of the border of a Radiant Nine-Patch quilt

This time I used metallic and rayon threads to add some shine. Since it looked aquatic, I quilted ammonites (I have to get some geology in here) and starfish with lots of waves and swirls.

A large ammonite is quilted in rayon and metallic threads.A large starfish is quilted with rayon and metallic threads.

It's still a lovely pattern, perfect for beginners too.

Fret not; enjoy the day.

Ann