Saturday, January 28, 2017

Adding a Second Sawtooth Border to the Spiderweb

Thanks for all the helpful comments. Your new ideas helped me clarify my thoughts. Being able to articulate them advances my understanding. Some suggestions might have worked better but I'm constrained by the fabric on hand. Running out of yellows {in addition to all the previous background fabrics.}

Several changes make me happier with this quilt. First, pulling some of the wider small triangles creates a more uniform narrow strip. Now it doesn't look so chaotic. More may come out. {There are probably enough leftovers for a new quilt. Sigh.}

I rotated the sawtooth borders so the yellow was on the outside. While it may look better against the toile, it's too dark against the applique vine. At least, it is for me.

Spiderweb quilt with Sawtooth border, yellow to outside.

I tried, without luck, to find something on hand for another narrow border. All the colors that might work are very short, not enough to go around. That worked for the vine border but I'm not ready to to carry it another round.

So I forged ahead with a second sawtooth border. This one is composed of 5" by 7.5" triangles cut casually around thirty degrees. The background fabrics are light greens this time. Even in this poor lighting, the color change emphasizes the yellows in the narrow sawtooth border while the size change balances the borders. And I like busy.

Spiderweb quilt with possible sawtooth borders pinned

Everything is still in rectangles but I feel more confident about sewing the borders. I'm more secure that I don't want another floater border. It would divide these into discrete rows which might make their improvisational character a distraction instead of a feature. Does that make sense? If everything was neat and tidy then floaters would highlight that aspect. Although scrappy, the spiderwebs are neat and regular. The color changes make your eyes move; the floater stops them.

The quilt fills the entire wall but the room is too small to take a full photo.


#AHIQChineseCoins

As soon as this is sewn I plan to pull fabric for #AHIQChineseCoins. I notice Julie's well into construction. What about you?

I've been looking over my Chinese Coins Pinterest board for a month now {Yeah, I started before everyone else} and several groupings come to mind. First is a "boxing" effect caused by using sashing fabric as some of the coins. Look at these examples.

Oldest is this 1930s Pennsylvania Amish quilt on this page. (The first link goes to a photo but the second goes to the site where it is published. The quilt is almost at the bottom but the entire article is enlightening.) She only used two fabrics. I see hints of both old Venetian blinds in an abandoned room and conversely, exotically folded fabrics such as Rami Kim creates.

Another 1930s example is this homespun Chinese Coins collected by Roberta Horton. (Again, first link = photo, second link = website.) The sashings are tan plaids. I'm not sure that any were used as coins but somehow there's a hint of "boxing" to me. And I admire the way the coins are all cut from plaids on the diagonal.

By using bright red sashing and a triple border, Jane Weston created a boxed feeling without using any of the sashing fabric as coins. The few, deliberately softer reds she chose as coins contribute to the "boxing" but I think the border is the biggest factor. Try covering up the border yourself to see what a difference it makes.

Finally, Summer Reading by Timna Tarr. By merely rotating her design ninety degrees she made the boxing effect into beautiful bookcases. {I love her color sense, too.}

Enjoy the day, Ann
Tuesday, January 24, 2017

AHIQ 2017 Invitational Begins and Linkup 17

Kaja and I plan some changes to AHIQ this year to help newer quilters embrace this movement. Even experienced quilters have written of their diffidence with improvisation so we hope you'll enjoy our Invitational, too.

We invite you join us as we start a new quilt idea {or kernel} each quarter. The first month will introduce our quarterly theme. We'll share our progress the second month as well as our improvisational ideas. There could be finished tops to share by the third month. We hope you will write and link posts on your progress monthly.

Participation in our AHIQ 2017 Invitational is entirely optional. Continue to post your current improvisational or utility quilting, too. It wouldn't be improv otherwise.


#AHIQChineseCoins

I'm starting this party with a Chinese Coins strippy quilt. While making one last year, several more ideas occurred to me, always a good sign. This design can easily combine scrap quilting and improvisation. It's friendly to both traditional and artistic styles, beginners and experienced quilters, and has more variation than you might expect.

Chinese Coins or Roman Coins probably refers to the fact that these highly developed civilizations created standard coins quite early. At its most basic, rectangular scraps sewn together like stacks of coins form columns. These are sashed with lengths of a single fabric... or not.

There are few exact instructions. The strips can be any width or height as can the sashing and these can vary from one column to the next. You can even omit the sashing. Columns can be turned vertically or horizontally. I've seen strip columns made of crazy piecing, UFO blocks, and selvedges. {Some people would classify these types as strippy quilts but let's be more general.} Repeating the sashing fabric in some of the strips gives an open grid design.


Traditional Example

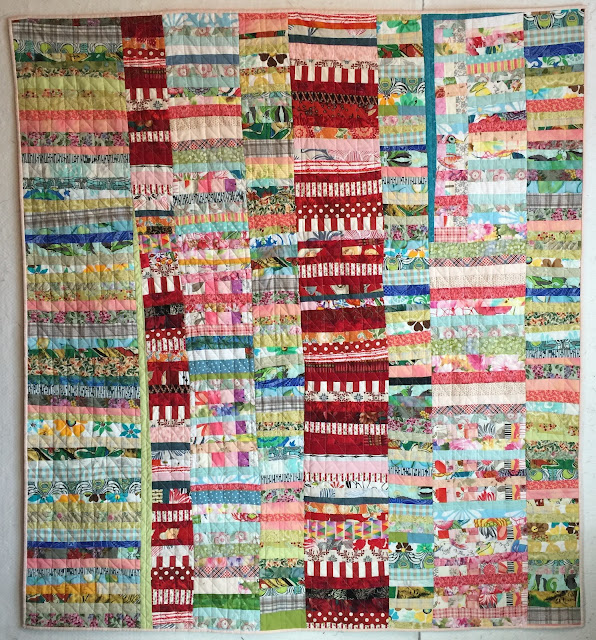
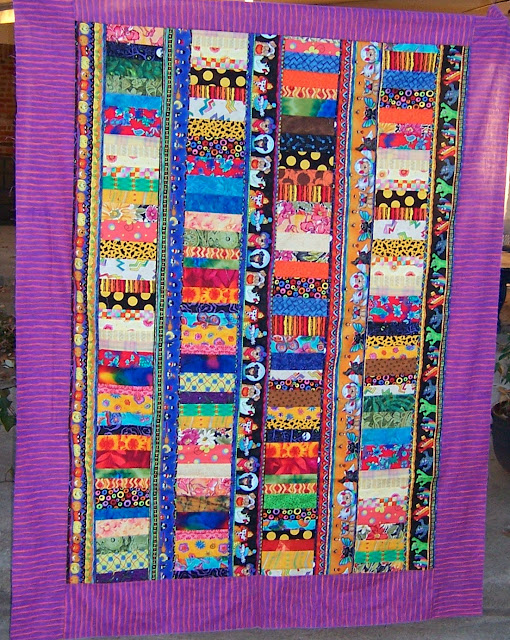
This is a philanthropy quilt I made years ago. The sashing was cut from a single striped Halloween fabric. Six-inch-wide coins of various heights were sewn together randomly until they matched the length of the Halloween fabric. Everything was cut with rotary tools. Notice the same fabrics appear in each column.

Striped Halloween fabric forms sashing between columns of colorful coins to create this happy quilt.
Halloween Chinese Coins scrap quilt
Improvisational Example

Next is a more improvisational version of Chinese Coins. Each column contains only one of three sets of fabric. Many of these came from my scrap bag but there are also remnants and yardage in it. I used both rotary tools and scissors to cut the strips. Once the columns were sewn, I butted them together to trim overlap and determine where vertical strips were needed to fill empty spaces. More notes about this quilt on posts listed here.

Stacked Coins, Chinese Coins or Roman Coins in reds, pinks, blues, and greens.
Chinese Coin Improv string quilt
More Examples Across the Internet

Here are a variety of quilts that push the boundaries of Chinese Coins classification. Some are more improvisational than others. Most of them have additional aspects so their makers may not consider them Chinese Coins. I group them because they have a basic design of stacked strips in columns (or rows).

Sometimes the simplest construction highlights the most masterful quilting. These are listed first because of their straightforward {basic} construction. But make no mistake. Each of these is a masterwork of fabric, layout, and style.

Chinese Coins by Freddy Moran, used with permission. Photo by M Beach
  1. Freddy Moran made this Chinese Coins with her signature colorful fabric.
  2. Gina Abayan of the Philippines created her quilt from solid fabrics only. She rotated her work 90 degrees so the coins are vertical. Her columns (now rows) appear to be hand-cut but about equal width.
  3. Wanda at Exuberant Color also rotated hers. She organized her printed fabrics by value so well that you can almost see the sun highlighting this quilt.
  4. Cassandra Ellis lists the variety of "found fabrics" used in Katie's Quilt in her post. It's also rotated. {Am I seeing a theme?}
  5. Edeltraud Ewert created one of my favorites which seamlessly crosses boundaries between traditional, improvisational, and even modern. Art at it's best.
Applique can easily be incorporated into this design.
  1. All a Flutter by Judy Crane appliques trees, leaves, and birds on a Chinese Coin background. Notice the strips are divided by color and the coins are rotated again.
  2. Mel Beach used a McCall's pattern to applique cheerful floral vines with cute buttons on the sashing between her Coins. As usual, her color sense delights.
If you want to try more challenging improvisation or think Chinese Coins is too simple, look at these three quilts.

Improvisational variation of Stacked Coins quilt in green, yellow, tan, brown, and white.
Build Me a Wall by Kaja Ziesler, 2016 (Used with permission.)
  1. Kaja's Build Me a Wall incorporates vertical strips (rather than sashing) and reverse applique squares into a basic columnar Coin layout. Her middle section divides into two columns at the top. Notice the visibility of each column despite the fabric repetition. The vertical seams create their own boundaries. Her borders unify the composition without encasing it.
  2. Sue Kelly recently made a top based on Point Reyes seashore. Her final version reminds me of horizontal Chinese Coins with sashing strips in several colors and widths.  
  3. Nettie Young of Gee's Bend created Stacked Bricks in 1928. Her quilt is composed of rotated double brick (or coins) columns that are sashed and posted.
Do you need still more inspiration? Check out my Chinese Coins Pinterest board or Google "Chinese Coins", "Stacked Coins", or "Strippy quilts."


Getting Started

Although we are approaching this improvisationally, I was planning to write instructions to aid beginners until I found Mary Johnson at MaryQuilts and HeartStringsQuiltProject already posted great directions. Her traditional version guides you through the basic construction.
  1. Overview on Chinese Coins quilt.
  2. Construction directions.
How much fabric? Assuming a 50"x60" quilt {without borders or sashing} and 2"x5"finished coins, you will need between 2.75 and 3 yards of fabric. Changing the coin sizes, adding sashing, or any other variations will alter the yardage requirements.

Are you in? Then go through your scraps, remnants, and yardage for the colors and fabric that speak to you. Try sewing some coin blocks or units. You don't need to sew an entire column all at once. Let's meet back here next month to share where we are, what we've discovered, and any questions we have.

Be sure to tag your photos with the hashtags #AHIQ2017Invitational and #AHIQChineseCoins so everyone can find them more easily on social media.

Enjoy the day, Ann

InLinkz removed because it was hacked.

Saturday, January 21, 2017

Improvisational Sawtooth Border

While I like the vine border, the quilt doesn't seem finished. There is no more of the star background, the light blue gingham, or the bird toile. What to do? Try a contrasting color.

About a month ago, Nana suggested adding yellow, {a color she seems to love as much as Monica.} Yellow perks up against the aqua so I cut a bunch of improv triangles about 4.5" by  2-4", When sewed they trimmed to rectangles 4" long by a variety of widths.

Spiderwebs with second border layout

I'm not feeling the love. There are too many things going on here. The angles of the triangles are incoherent. Might work in a quilt with more improv but just looks odd on this quilt. This border is too narrow to be the outer border.

Thinking yellow might be the problem I cut some in pale green but don't like those any better. So it's not the color. It's really a size and angle issue for me.

Nothing is sewed except the individual rectangles. Timeout for thinking.


Enjoy the day, Ann

Tuesday, January 17, 2017

Vine Border Complete

It feels like the applique took an inordinately long time but that's not true. Improv machine piecing takes just as much time.

The border came out well. The cardinals look like birds... well, like folk art birds. The leaf fabrics worked well. I like the unrealistic, but mostly quiet colors. It's darker than the toile and quieter than the spiderwebs - exactly to plan.

Cardinals sit on a leafy vine border around two sides of this scrap spiderweb quilt.
Spiderweb quilt top with vine border

I'm considering another border. Partly because I prefer bed size quilts but also because it looks unfinished. Hmm.

Next week begins the AHIQ Improvisational Challenge. Each quarter we will introduce a quilt or technique that can be adapted as improvisationally as you choose. We hope you'll join us in our exploration of utility and improv quilting.


Enjoy the day, Ann

Saturday, January 14, 2017

Leafing Out

The vine is sewn; the cardinals will fit. I only want a few of them but perhaps a bit more upright.

Pinning cardinals and leaves on vine border

I pinned some leaves to check the angles and the spacing. Would some look good directly under the cardinals?

The vine was easy to sew but I'm having more trouble with the leaves. My stitches wobble very far from the edge at times. I try slower speeds {and even the half-speed button} but before too long I'm back in the Grand Prix. Changing to the overlock foot helps a bit {except for my speeding tendencies.} When the wire on the right is positioned along the raw edge, it creates an eighth-inch seam... until I sew too rapidly. "Slow down on curves" is not sinking in.

Attaching leaves by machine applique

Mary at Mary and Patch is machine stitching raw edge applique by sewing around each piece twice. Also, Cathi at Gertrude Made used this same technique to applique her lovely bird. The casual feel of the stitching is very appealing. Too bad some of my leaves are sewn and tied off. I hate thinking about redoing them but dislike even more my current poor technique. At least I found a possible solution before it's quilted.  Gotta love that.

Making haste slowly but I'm still sticking to one project at a time. For now. I will need another Grandmother quilt next month and plan to quilt the red and yellow string top soon.

Red and yellow string quilt top

The green string was quilted with channels, the blue with double row checkerboard. I'm trying to figure out another simple no-marking quilting design to try.

Enjoy the day, Ann

Tuesday, January 10, 2017

Making Leaves

My first thought was to use lots of colors for the leaves but I decided the cardinals would be bright enough. The vine fabric is a blue-green but most of my greens are on the yellow side. I pulled all the blue-greens I could find in my stash and scrap bag. A few are crazy prints that may or may not work out. We'll see.

Green and blue fabrics for leaves

Preparing fabric using Lara's book, Crafted Applique, took most of the day but this method is easier on my hands. {I needed physical therapy after my last attempts to hand quilt. I now limit handwork to prevent recurrence.} My previous work with her directions worked quite well but I'm curious how this will hold up to daily use. Frankly, I wonder how long any raw edge applique will last. {QS says it will last as long as I live. What a comedian. Also a good point. This is a quilt for me and that's how long it needs to last.}

Stephie and I traded fabric scraps last week.  I thought mine looked like some of her flags for Fete, the quilt she's making for her sister's birthday. {Aren't sisters a wonderful gift in themselves?} She thought hers would make a good binding for my neutral string quilt. Plus she send some extra Quilty365 circles with hand stitching. Lucky me.

Fabric scraps, Quilty365 circles
and a card from Stephie!

We took the train to San Francisco and saw this magnificent dome in Westfield Centre.

Emporium Dome,
Westfield Centre, San Francisco

Originally built as the Emporium Building in 1896, the first dome survived the 1906 earthquake but fell during the subsequent firestorm. The current dome was built in 1908 and restored about thirty years ago when the shopping center was built.

It reminded me of another San Francisco landmark. Almost forty years ago Neiman Marcus purchased the old City of Paris building with its glorious white and yellow stained glass rotunda. The dome was added in 1908 when department store was rebuilt following fire damage after the 1906 quake. Despite being listed on the National Register of Historic Places, the building was torn down in 1981. The new structure incorporated the original rotunda and is again a favorite city landmark.

City of Paris dome, Neiman Marcus, San Francisco

This dome reminds me of Sunshine by Monica at Lakeview Stitching. She handles yellow so masterfully.

Enjoy the day, Ann

Saturday, January 7, 2017

Dieting Cardinals

Putting those chubby cardinals on a quick diet was easier than expected. I traced part of my first design but slimmed their heads and tummies. The outline is also an easier curve. If I keep this up I'll be ready for art school soon. 😉 The Slender Cardinal Template PDF is now on my tutorial page.

Slender Cardinal templates

DH and I had a very quiet holiday but managed to travel several times. We finally visited Hearst Castle. My last visit was many years ago. How many? Well, there was only one tour at the time so my mother and I walked all over the place.

This visit turned out like a scene from L.A. Story. Steve Martin's character wanted to go take a trip with his girlfriend but he was the weekend weatherman. He prerecorded his spots because "it's always sunny and seventy in LA." Of course, it stormed all weekend and he was out of a job. We chose the worst day to visit: stormy, blowing, cold {for California.} The hills run straight down to the Pacific from the house but we couldn't see it. We couldn't even see ten feet in front of us so touring the gardens and grounds was out of the question. Nevertheless, the rooms are stunning and we enjoyed our visit.

Hearst hired architect and civil engineer, Julia Morgan, to build La Cuesta Encantada with reinforced concrete to withstand an 8.2 earthquake.  I was particularly taken with the ceilings. Some were from Spanish monasteries and European castles. Shipping them amazed me and then Julia installed the ceilings in new rooms designed to their dimensions. Other ceilings were contemporary plasterwork.

Antique painted wood and contemporary plaster ceilings at Hearst Castle.
Ceilings at Hearst Castle

Hearst and Morgan also installed contemporary and antique tiles throughout the house and grounds. I loved the rooster and donkey window screens in a tower bedroom.

The lower right tile is in the kitchen and contains a Latin motto... with a typo. It either reads "Sine ipso factiv est nihil" meaning "without him nothing was productive" or "sine ipso facto est nihil" meaning "without him nothing was done." Which do you prefer?

Hearst Castle tiles and window screen, 

The lamp with statuette was in one of the guest houses while the lampshades were in Hearst's personal suite. They were made of old vellum in such poor condition they weren't able to be rebound into a book. The top one is a record of indentured servitude while the bottom is a musical score. Can you say cutter quilt?

Desk lamp with statuette and two lampshades of antique vellum

Enjoy the day, Ann

Sunday, January 1, 2017

It's All About the Cardinals and KofB #12

Happy New Year! Wishing everyone good health, good friends, and safety in 2017.

QS informed me this quilt needs cardinals - the favorite birds of our sister and grandmother. I'm not sure how they will fit in but know I need them on hand before sewing the vine. Since my drawing skills are lacking {or at least my confidence in those skills is lacking} I combed the web for easy bird outlines. The final two choices were:
  1. Beth Donaldson posted a number of free quilt blocks from old newspapers, including the Cedar Waxwing and Hermit Thrush.
  2. There are too many "bird on a wire" silhouettes to list. Best thing? Very few have legs... and they look good. That should make it easier.
  3. EDIT: How could I forget Barb's bird when it's part of her blog header? Love the way she added part of the wing in silhouette.
It took the whole evening to draft simple cardinals. I planned to cut the crest off some for other birds or perhaps draft hummingbirds.

Cardinal Silhouette templates ready to use

My t-shirt quilt friend sent the beautiful flowers for Christmas. The bouquet contains lilies, carnations, and roses with special additions of pine and bright red berries. The berries are "the berries." Perfect. What a kind gesture.

Looking at the quilt top again, my cardinals are too fat. Those toile birds are sleek and streamlined. Back to the drawing board.

In case I change my mind, I placed a pdf of the cardinal template  on the Tutorial page downloading. Let me know if there are problems. This is my first attempt at pdfs in Blogger.

Streamlined toile bird silhouettes

At 6.75" this border is more narrow than I hoped. I'm not sure how to curve the vine and also avoid tiny leaves on the outer curve. {Like most beginners} my eye is caught by the most elaborate applique. Quite beyond my expertise.

Possible vine ideas were distilled to simpler, diffuse ones that might better fit the style of my quilt.
  1. The border on Stamp of Approval by Tonya Alexander. Easy curved vine, nice big leaves, yoyo berries. Now I wonder if the leaves are too fat. They match my chubby cardinals but everything may need to go on a diet.
  2.  Is there a way I can incorporate Susan McCord's string pieced leaves? Their longer, skinnier style matches trim birds.
  3. Quilted with Grace posted her first hand applique. I love the multicolored leaves and the groups of berries on this vine.
  4. Of course, Aunt Millie's Garden by Piece o'Cake has two beautiful vine borders. The first is too wide for my border but the narrower is a charming way to make leaf-like flowers.
  5. Jan Hutchison made a quilt from Applique Affair by Edyta Sitar. Jan's second photo shows a section with only a few leaves, a bud, some berries and a bird. Hmm. All the elements I want.
After rereading parts of Collaborative Quilting by Freddy Moran and Gwen Marston, I cut my vine fabric 1.5" before folding. The final width ranges from one-half to five-eighths inches.

I pinned it in a very curvy fashion. Too curvy for the relatively narrow border so it will be changed next week. I think diffuse leaves all the same size will be a good first vine.

This vine is too curvy for the border width.

How do spiderwebs fit with butterflies? I designed the triangles of the webs with my kaleidoscope ruler. Weak, but there it is.

Want something a bit more butterfly-y? Janie at Crazy Victoriana pointed me to Missouri Star Quilt Company's latest YouTube video, Easy Strip Butterflies. It looks like a great way to use some remnants. I see a baby quilt in the near future.

Enjoy the day, Ann

InLinkz removed because it was hacked.