Tuesday, January 28, 2014

Flying Squares Quilt

Although the center of a traditional Flying Squares block is background fabric, I made my quilt from some six-inch nine-patch blocks traded with friends. The traditional center would have more sense of movement. To change the nine-patch to a flying square I simply added a 8-by-2" rectangle and a 2" square to each side with partial seaming. Many people have already posted directions for partial seams; just Google it.

Flying Squares blocks made of light and medium prints on muslin with a border shading from light to dark Crazy Ann blocks
Flying Squares quilt

The border is a block named Crazy Ann (which seemed very appropriate!) The windmill effect of the stars adds to the sense of flying.

There's an inner border of muslin and two-inch squares to maintain the floating effect of the blocks. But that meant the corner blocks had to be slightly elongated. I drafted those on graph paper. Sorry, the sketch is now lost.

Detail of quilt  with Flying Squares blocks made of light and medium prints on muslin with a border shading from light to dark made of Crazy Ann blocks
Detail of Flying Squares

This is still one of my favorite quilts. I love the vintage feel of pastel-to-medium prints on muslin and the parallel line quilting.

Enjoy the day. Ann

Wednesday, January 22, 2014

Finished Border for Trip Around the Block

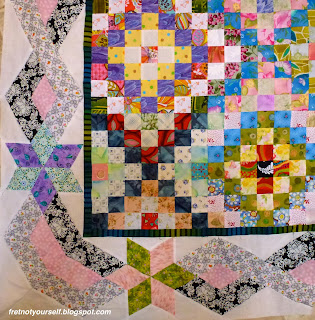
Alternating with the variable stars, I've been piecing the border for my Trip Around the Block quilt. I think it's worked out very well, too. Lots of starts and stops with hexagonal blocks but it was a good challenge. Since the quilt is so large this is just a portion showing the mitered corner.

Multi-colored quilt in a Trip Around the World variation; narrow green and black inner border; larger outer border of stars with braided black and white fabrics.

Sandwiching will have to wait until the previous one is quilted.  Perhaps next week.

Enjoy the day. Ann

Saturday, January 18, 2014

National World War II Museum, New Orleans

Everyone knows about Bourbon Street and the French Quarter in New Orleans but we went somewhere different this trip. The National World War II Museum was founded by historian Stephen Ambrose, author of Band of Brothers. It currently encompasses three huge buildings on Magazine Street. I thought it would be a collection of military memorabilia we'd look at for half a day. Boy, was I wrong.

There are loads of planes, tanks, transports, weapons, uniforms and medals representing both Allied and Axis artifacts.

Silver American planes from World War II. Painted white stars inside blue circles on the wings; red wingtips and tails, yellow tips on the propellors.
Overhead view inside the Freedom Pavilion

Some are unexpected. For example, the odd-looking white capsules near the right turn sign in the photo below are German bomb shelters.

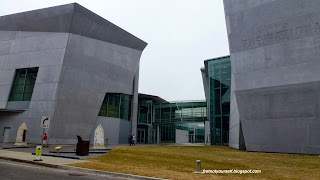
Large, monolithic buildings of battleship grey stone and tempered glass house the Victory Theater and large exhibit halls at the World War II Museum
View of more buildings from the main entrance
to the National World War II Museum.

Mr. Ambrose interviewed thousands of veterans and survivors of the war. (A friend of ours related his interview lasted four hours. He thought it would take half an hour.) These oral histories are the strength of the museum. They provide the textual explanations of the displays. Some written but the most moving are audio.

There are floors of exhibits that fluidly intersperse artifacts with large dioramas, interactive maps and small rooms where personal narratives and photos are available at the push of a button. One was a discussion of the end of the war which included opposing viewpoints by veterans of the US and Japan.

Diorama showing grey ships and planes heading to the beaches of Normandy for D-Day. So closely packed one could "almost walk from ship to ship."
Diorama of a small section of the D-Day landing.
To scale except this is only 1/40 of the width!

We saw two 4D presentations: Beyond All Boundaries and the USS Tang.

Replica of the USS Tang with light blue walls and grey floors, periscope mounted in the center, various gauges and meters attached to the walls.
USS Tang presentation

The staff and volunteers are extremely friendly and helpful. I can see why this is the premier attraction in New Orleans. We reluctantly left at day's end... after the third call for closing.

Enjoy the day. Ann

Wednesday, January 15, 2014

Variable Star Border Attached and Ready to Quilt

I just finished these liberated variable stars with a variety of reds and whites/tans to make the stars sparkle. They make a delightful border for an older top. What a perfect pick-me-up!

Log cabin blocks composed of red and cream rectangles for the center. Variable Star blocks of many different red fabrics on cream and white backgrounds for the border.
Liberated Variable Star border

Sandwiched during the commercials of the football games this weekend.

Enjoy the day. Ann

Saturday, January 11, 2014

Scrap Back for a Quilt

Every quilt needs a back which takes lots of fabric and gets expensive. Using tiny scraps is more frugal but can add so many seams that quilting becomes difficult. I usually pull some older fabrics from my stash. I prefer to incorporate some extra pieces from the top or from previous quilts. I've always made backs this way, even when everyone else put muslin on the back. I think of it as "creating jobs for future quilt historians." They'll have twice the fabric to document and date. ;-)

The back of this quilt includes extra diamonds and strips from the front. The pieces are small but in a limited area. The back of Road to My Sister's House is an enlarged block from the front. None of the green fabrics was large enough and this solution let me use them all. The size of the green squares maximized the scraps remaining. Then the sashing width was calculated to fit the back properly. (It was easier because the quilt is square.)

Occasionally I have long, skinny pieces trimmed from the sides of another quilt back than can be seamed into a strippy back. (I'll look for a photo.)

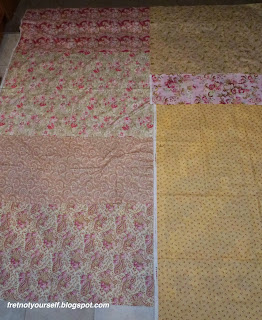
This time I pulled fabrics that have been languishing for quite a while. The front has lots of reds, whites and beiges so I first chose soft pinks and beiges for the back. Most are half or quarter yard width-of-fabric (WOF) cuts. These are laid on the quilt top to ensure there's enough fabric to cover it. But the darkest beige in the first set of fabrics is about five inches too narrow.

Quilt back layout #1

I found a quarter yard of pink floral to replace it.

Quilt back layout #2 - with pink floral

There was also a pink plaid in the stash.

Quilt layout #3 - pink plaid

Then I remembered a tiny bit of cowboy faces on red. How would that look? I had to piece the fabric with some red strips to make enough for this section.

Quilt back layout #4 - cowboy fabric

Now the left side of the back is too quiet. I pulled the remaining face fabric - cowgirls this time.

Quilt back layout #5 - cowgirl & cowboy fabric

Once the layout is finalized I piece it. This one is very easy. Cut the selvedges off. Sew the fabrics into left and right panels and then sew them together.

Keep in mind it's easier to baste the quilt sandwich when the back is at least four inches larger than the top. This quilt is about 70 inches wide while the back is 82 inches wide. The extra width will make a skinny strip I can use on a future back.

Enjoy the day. Ann

Tuesday, January 7, 2014

San Francisco for New Year's Eve

We went to San Francisco for a short New Years vacation. California has good public transportation so we rode Caltrain into the city then switched to a streetcar for a short hop to the hotel.

In addition to cable cars, San Francisco uses a collection of vintage streetcars. The original date and location where it was first put in use is documented on each car. I have to say, the conductors are very patient and pleasant.

After unpacking, we strolled down the Embarcadero with bicyclists, unicyclists and scooter-riders. So many people, pets and wildlife out enjoying the perfect weather! This was my first time to have Dungeness crab. It's currently in season and so delicious.

Coit Tower pierces the blue sky to the left of the Transamerica building. Buses, cars and many people are visible in the foreground.
Coit Tower and the Transamerica
building from the Embarcadero.

Dark brown harbor seals rest on wooden pontoons while white and grey seagulls perch on the pilings as a large black and red cargo ship sails into San Francisco Bay
Seals, seagulls and ships 

Afterwards we took a pedicab back to the hotel where we watched the fabulous lights on the Bay Bridge over coffee. The ever-changing lights danced all night long. Crowds grew in the streets as the evening wore on but we had the best seats for the fireworks show at midnight. They are staged from barges in the Bay near the Ferry Building. Glorious!

The LED lights on the cables and supports glow against the dark sky and waters of San Francisco Bay. A yellow and green streetcar passes along Embarcadero Street in the foreground.
Lights on the Bay Bridge... and a streetcar below

Enjoy the day. Ann

Wednesday, January 1, 2014

Block Piecing Tutorial: A Method to Maintain Order

I enjoy making scrap quilts. The seemingly random arrangement of fabrics interests me and I love the depth achieved by using fabrics that don't quite match. We are so much smaller than a quilt (no matter how large we think we are.) Mismatching colors in clothing looks weird most of the time but adds so much dimension to a quilt. When I work on blocks like the variable stars I take time to arrange the lights or darks in ways that add sparkle.

Sometimes, however, I lay out a scrap block in a particular order only to sew the wrong sections together. It's so annoying. Here's a way to avoid this problem.

1. Lay out the block as you'd like it.

Nine 2.5-inch square patches of red and cream are laid out to form a star
The nine patches of this variable star block are laid out as I intend to sew them.

2: Chain piece pairs of squares from the columns starting at the top left. Place the top left and middle left pieces right sides together and sew. Repeat with top middle and middle pieces, chain piecing them to the previous pair. Repeat again with the top right and middle right. Do NOT cut between these three chained pieces but cut after the third (right-most) one is sewn. (This is where I'd sew an ender to keep the thread from tangling.)

Three pairs of red and cream squares are sewn together on a Bernina sewing machine with thread linking the pairs into a chain.
Chain piecing the two squares from each row.

3. Finger press seams to opposite sides and open.

Layout of red and cream nine-patch block showing three pairs of squares sewn with chain piecing intact between them.
The first two squares in the first two rows are sewed
and the thread is still chained between them.

4. Now chain piece the next square in each column to the previous sewing. Place bottom right piece to the right section, right sides together and sew. Repeat with bottom middle piece and middle section, chain piecing them to the previous set. Repeat again with lower left piece and left section. Again, do NOT cut between the chained pieces but do cut after the third one is sewn. (Sew another ender.)
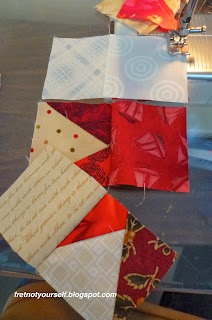
Red and cream squares of a nine-patch are chain pieced into three columns to maintain the order of the pieces.
Chain piecing the bottom squares
to each column.
Ender #1 is in the background.
 
5. Finger press seams to opposite sides and lay open. The block is linked by the sewing thread you didn't cut. Everything should be in order.

Three column of a block are chain pieced together to maintain the order of the squares.
Two sets of chain piecing completed.
(Sorry, the columns look like rows
so you can see the chaining.)

6. Place left and middle columns right sides together butting seams and sew. Sew an ender. Cut.

Two columns of three red and cream squares each are sewn together to in the penultimate step of making a Variable Star quilt block.
Sewing two columns together.
Notice how chains hold the
third column in place on the left.

7. Repeat with last column. Sew a fourth ender. Press and admire.

The final column, chain pieced to the main section, is ready to be sewn to the nine-patch block.
Two columns sewed.
Ready to sew the last column.

The block is now sewn in order. Yea!

A variety of red fabrics create a star on the cream and white background of a Variable Star block.

This method works for any block that breaks down into squares such as four-, five-, seven-, nine-patches. And did you notice I sewed four enders making this one block? That's how I get so, so many scrap blocks finished {which is both a blessing and a curse.} Do you have questions? Let me know.

Wishing everyone peace and joy throughout the New Year.

Enjoy the day. Ann