Tuesday, September 26, 2017

AHIQ25: Use Your Words

Today's the last day for this invitation to use your words on quilts but it won't be my last time to use this technique. Summer vacations put quilting on hold but hopefully you had some time to work on a project or at least to think about a future project. There are so many ways to incorporate words and letters: applique or pieced, free-hand or accurately.

I've been focusing more on the mechanical "how" of adding words but what you choose to add is even more important. What moves you to creativity? A poem, a family scene, a political commentary? There is no ambiguity about your meaning when it's written.


Phillies Quilt Back

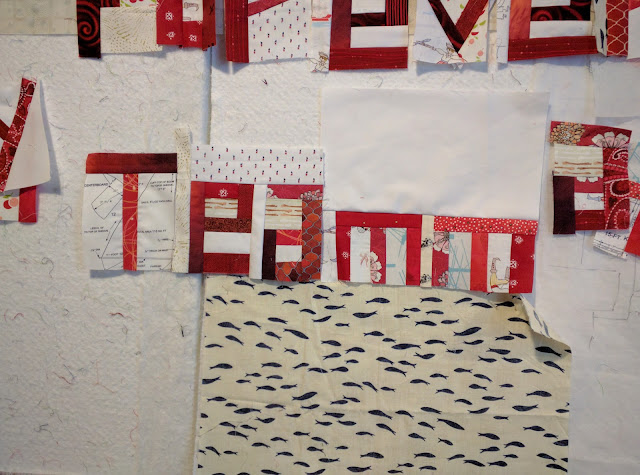
This is becoming a two-sided quilt. I made the words into sentences, added a new phrase, and now need to fit them all into a back. It must be large enough yet not cut any words off so I pieced it with the top underneath.

Pulling all my neutrals, I first placed smaller bits where they might best fill in. I'm finding I like the effect of turning the corner with the same fabric. Look at the white above and to the right of Phillies for an example. Odd, because my original idea was to NOT sew same fabrics together.

Arranging sentences to fill a quilt back

Probably because they were left-adjusted on the wall, that arrangement became my favorite. Except the "for who" line was too long. I considered right adjusting the answering line but... No, that's too much trouble.

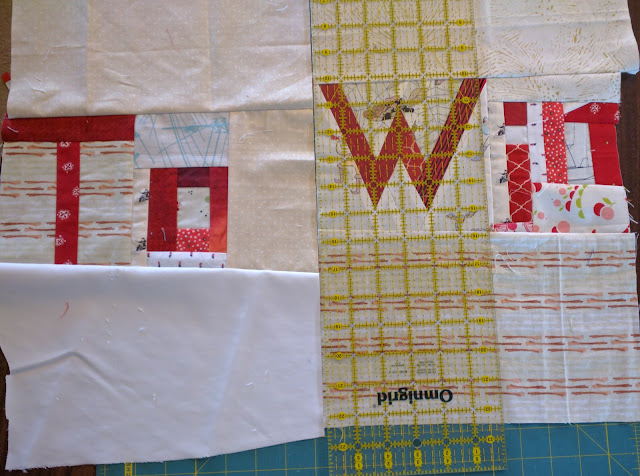
There was one puzzle piece, the stripe below "my teammates" which required partial seams. Not too hard. Fortunately, I had switched to ruler use and squaring the fabric as soon as the words were together. It was easy to determine the size of that rectangular bit.

At this point, the back is still too small by about ten-inches lengthwise and fifteen-inches widthwise. Since I've never been very interested in matching front and back (and don't want to risk cutting off any letters) I intend to frame the sentences. Here are three fabrics I considered for for a border. While I like the black and white best, I don't want anything to compete with the words. The red might disguise the beginning letters too much. What's left? White.

Choosing fabrics to frame the quilt back

Unfortunately there wasn't quite enough white so the lower right has the last bit of that white-and-blue from the sashing plus two shirting remnants. I know one is from a trip to NYC but have no idea where there other came from.

Phillies baseball quilt back features team phrases
Finished back for Phillies quilt

Yes, I'm deliberately cutting off the top line again to give the recipient privacy. Above his name is a band of white. The top and back are ready to go and the back is larger than the front by at least two-inches on each side. Hopefully this will make basting a breeze.

What does the front look like? Here it is, covering the design wall.
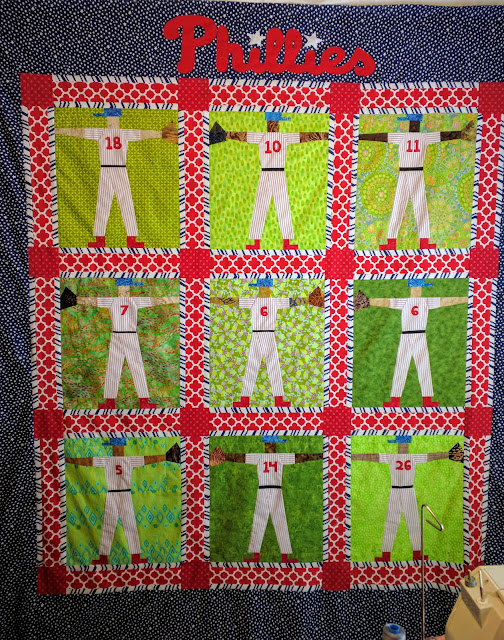
Phillies baseball player quilt in red, blue and white
Philadelphia Phillies quilt
Woo hoo. I'm ready to baste and quilt!

PS: I know there are two sixes on the shirts. One is for a Phillies player while the other played at LSU (Louisiana State University) when the FO was there. {Actually, three of these numbers represent LSU players.}

Enjoy the day, Ann

InLinkz removed because it was hacked.

Saturday, September 23, 2017

Applique Numbers

Although they make me laugh, these ballplayers are missing something. There's too much empty space on their uniforms. And in the yard. I haven't figured out what to do about the grass but..

Phillies ballplayers in unnumbered jerseys

I bothered FO {that's Future Owner} for a list of his favorite players and their numbers. With a serious drop dead date and threat to add Giants players to the quilt. Ha. I'd feel guilty but it worked. He sent the list, I graphed the numbers and appliqued them to the chests. I thought they were perfectly straight but these two are slightly aslant. Whoops. It adds to the folk-art charm, right?

Player numbers appliqued on jerseys of Phillies baseball quilt.
Adding numbers to the Phillies ballplayer jerseys
All that's left is slow, careful cutting. I'm out of the pinstripe so can't make a mistake here. Sure wish I'd numbered the jerseys before sewing the uniforms. It would have been much easier.

This coming Tuesday is AHIQ linkup. Are you ready to share your words? I am! And I can't wait to see what everyone else has done.

Enjoy the day, Ann

Thursday, September 21, 2017

Bloggers Quilt Festival Entry

The online festival slipped my mind until I saw Linda and Audrey's entries. They looked so lovely I had to post along with them. So here's my Spiderweb quilt.

Spiderweb string quilt

This quilt started with the vintage floral that make the background stars in the center. I drafted my own version of the Spiderweb block so I could play with the web layouts. By encircling the outer ring with a single color and including more shades of that color inside the webs they sparkle like jewels.  (The photo below shows the true colors of the quilt.)

Spiderweb string quilt, detail

Taking the vintage background as a sign I decided to applique a border, something I haven't done in years. What fun to make a beefy vine for the cardinals to sit on. Colors like no leaf ever added more joy. It's all machine applique. The vine is a tube; the leaves and birds were treated by Lara's method in Crafted Applique.

The quilt needed more {at least, to me} so there are rows of casually cut triangles in two sizes.

Then I started quilting: spiderwebs and spirals inside,

Spiderweb and spiral quilting designs

feathers, loops, and free motion doodles in the borders. Those loops were a blast. And very easy. I marked the midline so I'd close each loop in time and just went for it.


Thanks to Amy for again hosting and arranging all the details for this Bloggers Quilt Festival.

Previous posts about this quilt here.

Enjoy the day, Ann

Tuesday, September 19, 2017

Quilting TATW

Trip Around the World quilts are simply grids - like those we can mark for fancy quilting. At two-inches, they are just a bit larger than usual. So I decided to quilt orange peel on this one. I don't have to mark, it's a change from the diagonal grid I often use, and I want to see what it looks like at this scale.

Gentle curves with walking foot create Orange Peel design

I used the regular straight stitch with a walking foot and turned on the half-speed button. I'm a pedal-to-the-metal kinda gal. Actually I turned it on by accident and found it really helped the curves. Starting at a four-corner intersection, I angled the foot left while counting to two slowly, then center for another two, then right for two back to the next intersection. {That's lots more than two stitches. It just helped me keep a symmetrical arc.)

Once the serpentines were completed in one direction, I rotated the quilt ninety degrees and sewed the same curves on the other side of the blocks.

Quilting curves on all sides to finish the squares

They are not perfect but they are improving. Another nice surprise is how quickly this top becomes a quilt. Since I mostly make large quilts, it's a pleasant change to imagine a finish in the next few days.

If  you want more walking foot quilting ideas from an approachable, enthusiastic teacher check out Mel Beach at Piece, Love & Happiness. She always has a new tidbit to share.

Enjoy the day, Ann

Saturday, September 16, 2017

Bunches of Backs and Some Improv

Doubling Down on Backs

All summer long {Beach Boys version here} I've been giddily making quilt tops with no thought to the rest of the work involved. Now reality sets in. Seven quilts in the queue and five were sewn this summer.  Fortunately I picked up several quilt batts on sale.

The next step is to make some backs. The easiest way is to lay the top on the floor and cover it with fabric. Here's a glimpse of the newest five.

Quilt backs ready to pin baste

I have very low standards for backs. As long as the fabric is good quality and the combination doesn't make me sick, it's a go. Older fabrics preferred since this is a great way to use 'em up and move 'em out. {Rawhide!}

Not the most exciting part, but an important step in the process. Now to pin, quilt and bind them.

Improv Pillow-to-be

I've been admiring Chris English on Instagram. Like Kaja he works with vintage shirts but makes pillows instead of quilts. My small group is sold on experimenting with improvisation and, although we probably don't have his exact process, we sure are having fun.

These are three shirts DH "retired", cut into strips: a faded denim-colored corduroy, a plaid, and a solid white. They are all 100% cotton but the white is also no-iron. They mean it. It hardly holds pressing at all. Hopefully, quilting will take care of that.


Clockwise from the lower left: cut shirts into strips, sewed strips into sets, cut and sewed strips together. Stopping now until our next work day.

Enjoy the day, Ann

Tuesday, September 12, 2017

Piecing Sentences

Still working on the Phillies quilt but I have progressed to the back where I'm adding pieced words. And it's so much fun. Why did I hesitate so long before trying it?

After piecing his name one letter at a time, I totaled each remaining letter and sewed batches. It worked well until the m's. There are two, right next to each other. For some reason I pieced them exactly the same. It looks a little dorky. Oh, well. Dorky is good.

Freehand pieced letters work better when sequential letters do not look exactly the same
Each freehand pieced letter should be slightly different, especially when they are sewn sequentially.

Of course, adding these sentences to the back is a major point but, as importantly, the back needs to be filled. So why cut fabric from the sentence below when I'll just sew more back onto it? Instead, I simply straightened the seam line between the two words and squared up the perimeter.

Use rulers to space the pieced-fabric words.


I thought this would be enough but it still needs something else. One more sentence or phrase.

Building sentences from pieced letters to make a quilt back.

The "For who?" quotes Aaron Rowand who played fearlessly for the Phillies until signing with the Giants in 2008 and helping them win the 2010 World Series. {Yes. I searched until I found a great quote that has a link to the Giants. Even if they are in the cellar this year.}

Enjoy the day, Ann

Saturday, September 9, 2017

CCII Sewn at Last

Taking a break from the outer border of Chinese Coins II: Stacked Bricks was a smart move. I needed time away from it but hadn't realized it has been over a month. I am trying to marry conflicting guidelines: 1) give quilts enough time to evolve and 2) quit tucking projects away for years.

This quilt originated with a photo of Nettie Young's Stacked Bricks. Link in this post. Interestingly, Monica at Lakeview Stitching was concurrently inspired by Nettie's quilt. Although they all different, I can see the relationship between them.

Fabric strips arranged vertically in this Chinese Coin quilt variation
Chinese Coins II: Stacked Bricks top

Several pennants were replaced. It wasn't difficult but certainly was a pain in the neck.  As each pennant was removed, I laid it over another and then trimmed the new one to fit exactly.

Cutting new pennants to fit the old

Layering and slicing sets of strips worked very well until I moved pennants around. When I changed my mind about their order I realized I'd created a mess. The angles and curves are slightly different for each and required lots of adjustments to keep the border level. For examples of places where true freehand works well, look at Stephie's Fete and Sujata's Endless Mountains. Stephie uses freehand to make all her pennants different. Sujata actually maintained the order of cutting in her outer border. {She chose fabric order well.} For someone like me who changes her mind frequently, cutting with a ruler at a set angle would have been a more rational choice. I am going to try layering/slicing/rotating again but swear to determine all the colors before cutting anything.

By the time I reached the corners I simply needed a fail-safe method. I  squared up the corners of extra pennants, laid them on large background squares {at least two-inches larger than the finished size}, and cut both sides. {The mid-section of light fabric went straight to the scrap bag.}

Cutting corner squares

Now it needs a back, quilting, and binding.

So many people stricken with disasters. Floods in Texas, Florida, the Caribbean, India, Nepal, and Bangladesh. Fires throughout the North American West. Magnitude-8 earthquake in Mexico; aftershocks expected. Heat wave in Europe.

"Sometimes we come to gratitude too late. 
It's only after blessing has passed on that we realize what we had." 
Philip Gulley

Let's all lend a hand. We will need one someday, too.

Enjoy the day, Ann

Tuesday, September 5, 2017

Strippy Nine-Patch Quilt Finished

Binding this quilt has been my evening project while watching the news and/or baseball. It's very heavy. Hmm. Why would a large quilt be heavy? DH is delighted we are keeping this one. Me, too.

Strippy Nine Patch quilt

It's too large to get a photo of the whole quilt so here's a second picture with a slightly different view.

Strippy Nine Patch quilt

Designing these borders was great fun but I really love what Peg chose for quilting. The curved grid on the lights, the feathers in the red.

Border detail of Strippy Nine Patch quilt

A view of another corner that hints at the heavy matchstick quilting in the white.

Border detail of Strippy Nine Patch quilt

Peg added that same quilting in the red and pink strips The simple orange peel arcs makes a lovely contrast.
Quilting details on Nine Patches

Yet another detail shot. Love it. So glad Peg quilted it instead of me.

Quilting detail on border of Strippy Nine Patch quilt

And then I put it in the wash... And it bled. With two color catchers and Synthrapol. Actually it bled everywhere except onto the white. Go figure. Fortunately I set quilts to dry on the floor for a while after washing. The more it dried, the worse the pink looked. But at least the color hadn't set.

So back in the wash with Synthrapol and color catchers three more times until the red quit bleeding. Then repeated day-long soaks in oxygen (not chlorine) bleach to get the color transfer out. Finally back to normal. Lucky catch.


Quilt Details
Size: 84" x 100"
Design: Original
Batting: Mountain Mist Cream Rose 100%cotton
Thread: 
Quilting: Long Arm by Peg Collins, Alamosa, CO, various designs


Peg doesn't have a website but she's on Pinterest. With her permission, her email is: collinspeg(at)hotmail(dot)com if you'd like to consult with her about your own project.

This is an older quilt so I haven't written much about it. The previous post is here.

There's still time to link to Kaleidoscope of Butterflies 20 and consider joining our Butterfly QAL. Details on the linkup.

Enjoy the day, Ann

Friday, September 1, 2017

Let's Make Butterfly Blocks: Kaleidoscope of Butterflies 20

It's time for another Kaleidoscope of Butterflies linkup. Last month I decided to make some butterfly blocks. Simple ones. I've looked at them for years and have a Pinterest board here if you'd like more information. Cathy has also made several darling variations.

At first glance, many of the simple butterfly blocks look alike but close observation reveals variations. The low angle wings on Yoko Saito's signature quilt {second photo down} create a curved effect. I'm sure these are larger blocks simply because of the room needed for those signatures. {What a beautiful quilt this would make for a reunion.} I like the four-inch size of Rita's blocks but also prefer the way the wings don't reach the corner on Mrs. Schmenkman's six-inch block. The wings on her five-inch version at the end of her tutorial are farther from the corner.  Fussy, aren't I?

Of course, what I prefer may not be your choice. Use any butterfly pattern you like or make your own as I have here. The only person you need to please is yourself.

Four-inch Butterfly blocks with straight and tapered bodies

So I drafted my own blocks. In addition to low angle wings I also wanted to consider is whether or not to taper the body. I've seen this on some dragonfly blocks but none of butterflies. My tapered body changes from one-half-inch to a quarter-inch. Here are my templates with two wing angles and changing bodies. Download and print them if you wish. Each butterfly should measure four-inches finished so check your printing before use. You can always draft your own or use the angles on your rulers. FYI: Rita's butterfly wings have a 30-degree angle.

Straight Bodies

The straight bodies are easier because left and right sides are the same as are all four background pieces.

1. Cut body strips 1" x WOF. Subcut into 4.5" lengths.
2. Cut background pieces 2.25" x WOF.
3. Cut pairs of wing pieces 4.5" x 2.25".
4. Place wing and background fabric wrong sides together.
5. Cut out the numbered templates for the one wing and one background piece. Place them on appropriate fabric and cut two mirror-imaged wings and four backgrounds ADDING seam allowances.

Cutting fabric with paper templates

5. Place backgrounds on wings right sides together and sew with quarter-inch seams.
6. Press seam allowances towards the wings.


7. Trim each wing set to 4.5" x 2.25" centering the wings in the lengthwise direction while also making sure seams are the same distance from short edges on both sets.


8. Sew narrow side of wings to each side of a body.
9. Press seams towards body. Seam allowances meet at center of body.

Butterfly block with straight body

Tapered Bodies


Working these out took several iterations. I never could get it to finish to size with templates as such. So here's what I finally did.

1. Cut tapered center body strip from overall sketch. Use with wing and background templates from straight body butterfly.
2. Cut body fabric into strips 4.5" x WOF.
3. Place tapered body on fabric and cut, adding seam allowances. Rotate body 180 degrees to utilize fabric most efficiently.

Cutting tapered butterfly bodies

4. Cut wing fabric 5.0" by 2.5" and place wrong sides together. Notice the unit is a half-inch larger than the straight set.
5. Cut background fabric 2.5" by WOF and keep with wrong sides together.
6. Using straight wing template, center on appropriate fabric, and cut pairs with added seam allowances.
7. Using straight background template, center on appropriate fabric, and cut two pairs with added seam allowances.

Laying the templates for cutting 

8. Place backgrounds on wings right sides together and sew with quarter-inch seams.
9. Press seam allowances towards the wings.

Wing seams pressed in and spread

Looking at the photo above, it's easy to see why the templates were cut oversized. Trimming a bit off each side will square the block up in the end.

10. Trim each wing set to 5.0" x 2.5" or at least straighten the inside of the wing set. Then carefully center the wing to be trim to 4.5" but only trim the bottom end of each wing set (the part that will start at the narrow end of the butterfly body. In my photo that's about 7/8" from the inside edge of the wing. Do not trim the other side yet!


11. Starting at the narrow end of the body, align wing sets and sew. Be sure to sew from the narrow end of the body because the taper causes the wings to spread. Sewing from the wide end will make the resulting block too short! See above photos.

12. Press seams towards body. Trim to 4.5" square block. All four sides will need a slight trim, so center the ruler along the center axis of the body. For a 4.5" block, that's 2.25".

Butterfly with tapered body ready to trim

Seam allowances overlap near bottom of body.

Four butterflies with tapered bodies

The blue butterflies wings are centered better than the orange ones now that I've figured out how to trim them before sewing to the body (steps 10-11.)

This is the first group of fabrics I've pulled for these blocks. The grey is the background for the straight bodies while the green is the background for the tapered ones. On the left are wing fabrics that look good on both backgrounds. On the right, the top set will make wings for the green while the bottom set looks better on the grey.

Butterfly fabric choices

Bhavna Mehta

Have you seen Bhavna's work recently? A fine artist who works in paper and embroidery, she recently combined art and social justice in a very creative manner. Monthly this year she sells a First Gift whose proceeds are all donated to a specific non-profit. And look! Several of them include Monarch butterflies!

I'm impressed with her savvy solution to the constant requests for artists to donate work for auctions. In the US at least, the artist gets only a minimal amount of tax write-off and undersells herself on the open market but devaluing her work. Read one of many articles here. Bhavna's method allows artists to maintain a respectable price and generously fund social justice. Artists deserve financial justice.

Enjoy the day, Ann

InLinkz removed because it was hacked.