Tuesday, February 23, 2021

Hatcheting More Scraps

There is a strong strain of individualism and risk-taking in Texas. We'll do what we want to now and worry about the future later. 
This is a case in which the future blew in and hit the whole state.
H.W. Brands, historian at UT Austin

Personally I made it through the winter storm in Houston with no broken pipes but turned off the water all week. And I have lots of quilts. ;-) There were so many on the bed to stay warm, I couldn't move once I got in. By Sunday many were wearing shorts.  

It shouldn't have been this bad; however, our legislature never required power plants to winterize so many chose not to despite similar problems with storms in 1997 and 2011. Most of Texas' energy comes from natural gas and almost half went offline Sunday and Monday; however, several state legislators blame renewable energy that only provides about 10% of our power. Wind turbines in colder northern states {that were properly winterized} did not freeze. 

Mayor Turner led us through Hurricane Harvey, the Covid pandemic, and now winter storm Uri. He and his staff worked all week to open warming stations and distribute food and water. What a good example they set by continuing to do their jobs in difficult circumstances.

Quilting


Funny how this works. My Hatchet blocks inspired Wanda to make her own version. The quiet beauty of her quilt inspired me to try a new quilt with a limited color palette: yellow and green. It was an easy pull because the fabrics are in a pile on the floor. They either needed to be sewed quickly or packed. 

Part of the reason Wanda's quilt looks so good is the uniform quiet background she used. I don't have enough of any cream right now {and I'm still in "use it up" mode} but I found a small collection of quieter prints that work with these light colors. 

In addition to the backgrounds, there are eight greens and two yellows for the ribbons. Halfway through sewing it's obvious they aren't working as ribbons.  


The next idea was a "wave" through the fabrics but this layout looks worse if that's possible. The abrupt line between yellow and green looks more like a shoreline.


The most common layout of Hatchets is the X. I thought about alternating yellow and green Xs but {of course} they aren't evenly distributed. So they need an arrangement that disguises that fact. Starting with a yellow X, I surrounded it with some green and then offset the next yellow X. Suddenly an idea appeared. 

If you know me, you know I will end up with some mathematical solution. Something's a bit off here.


But a couple of minor changes on the bottom rows settled that.


With the design laid out on the wall it was easy to sew up. 


The plan is to gift this as a toddler quilt. The recipient's mother loves yellow and I think these old-fashioned fabrics will suit her well. 


Reading

When Nora deliberately overdoses she arrives at The Midnight Library, a sort of way station between life and death. Each book is a parallel life based on every different decision she could have made. Infinitely many books. Mrs. Elm, her former school librarian and current librarian here, directs her to look at her regrets and see how the other path turns out. But other people don't stay the same so some books lead to wildly different relationships with people in her life. 

I enjoyed Matt's idea that "the road not taken" isn't always smooth and perfect.


Monthly FUR (Fabric Use Rate) 

Although Hatchet 3 and Shadow Star are finally complete tops, there were no actual finishes in February. YTD = 2 yards.

Enjoy the day, Ann

Tuesday, February 16, 2021

Circling the Shadow Star Quilt

(Fascism develops) not just through the terror of police intimidation, but by denying and distorting information, by undermining systems of justice, by paralyzing the education system, and by spreading in a myriad subtle ways nostalgia for a world where order reigned.
~Primo Levi

Quilting


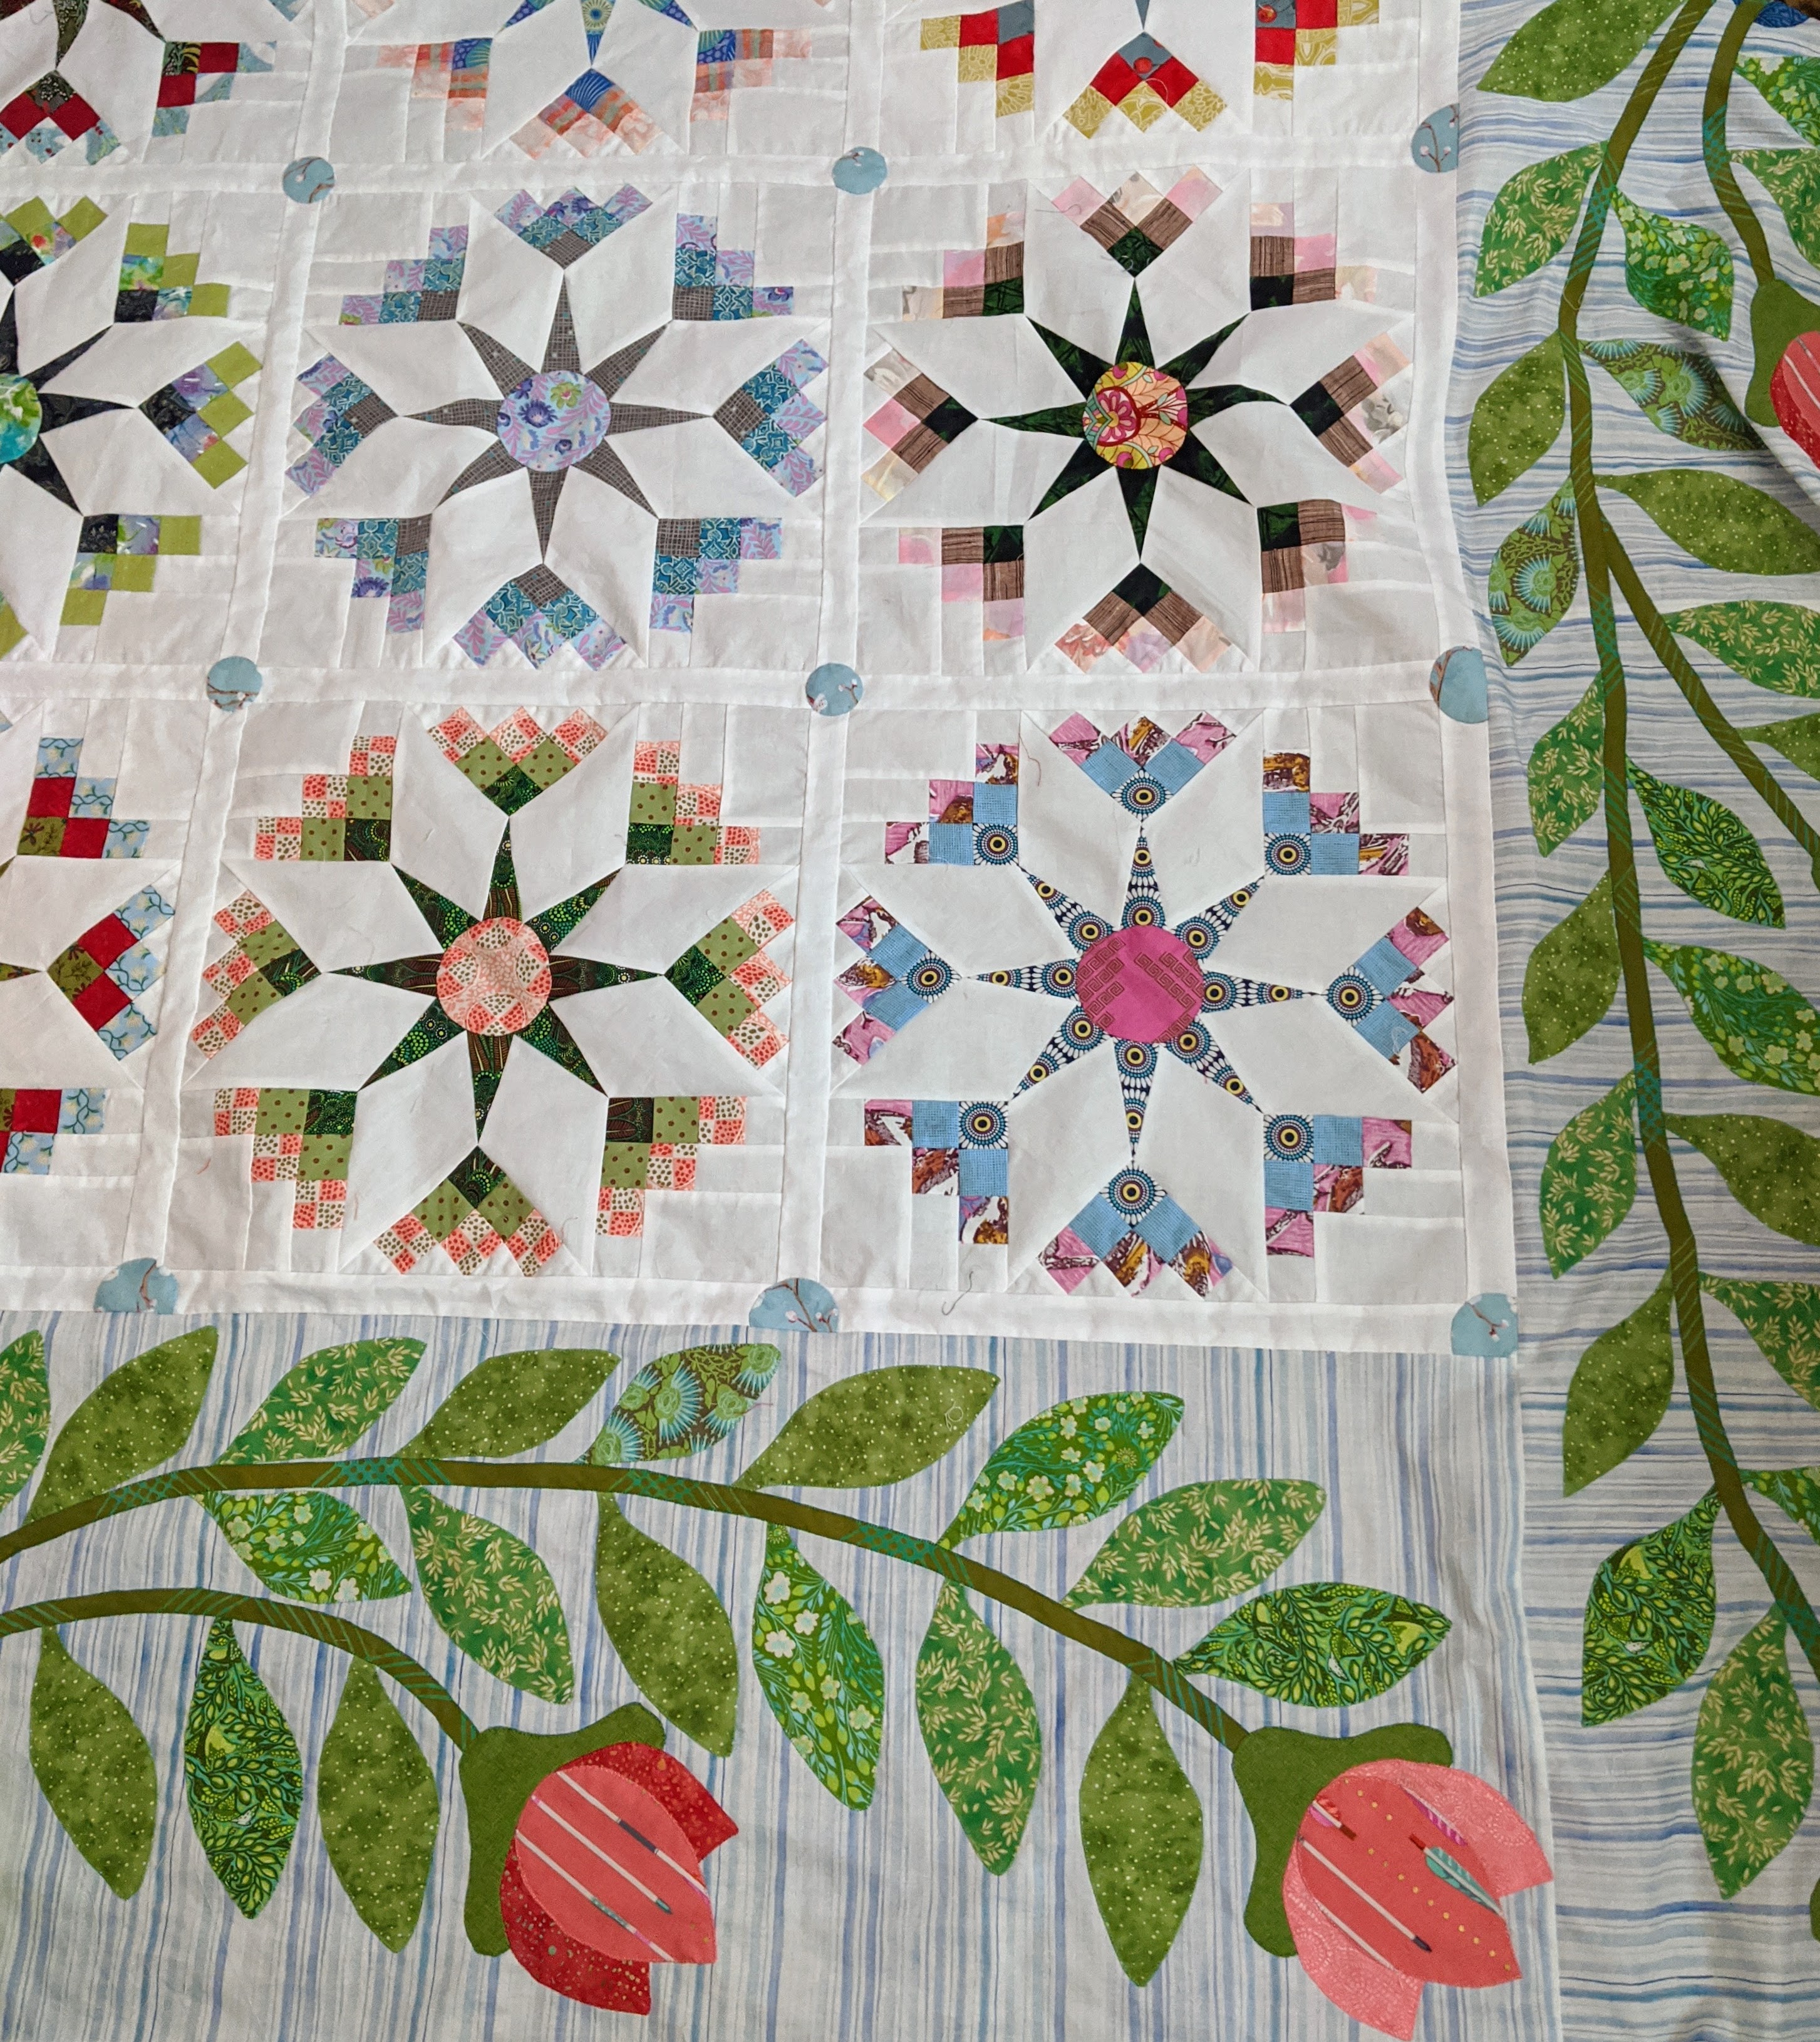
The border of Shadow Stars caused me lots of trouble. My great-aunt's quilt didn't have any border but adding one would update the design. Over the years I've seen many beautiful borders. For example, this gorgeous Weeping Willow tree border from an antique quilt in the American Folk Art Museum has long been one I'd like to interpret. My skill set is not up for those but pieced Pine Trees seemed like a good idea until I realized that putting them on point left too much open space {and I couldn't figure out a way to fill it that didn't overpower the rest of the quilt.} So those blocks and the Shadow Stars rested for a while; the tree blocks are still resting.

Eventually appliqué became the solution. There's an appliqué vine on the Spiderwebs but I didn't want to repeat the sinusoidal wave of that vine. Nor did I want raw edge appliqué. The Stars called for turned edge. Linda Jenkins and Becky Goldsmith made a straight vine on one of their quilts. Love the shading of the background here. But it seemed too contemporary with my white stars. 

When a family friend now in college took flower arranging for her art elective, she shared some of her work at Zoom dinners. Now I know what Hogarth curves are. Those S-shaped designs wouldn't fit in this space but they got me thinking about the many Baltimore album quilts with beautifully elaborate vases.  It took many iterations to simplify one of those into this border. There wasn't room for lots of flower height above the vase and the vase itself is so basic. No reverse applique, no curlicues. OTOH, fussy cutting a large print elevates the vase.

Once the borders were attached, there was too much contrast between them and the center. Who'd have thought pale blue, green, and white could create such a stark difference. The green is stronger so adding some light blue to the center might be the answer. 

Blending border and center by adding small blue circles
Shadow Stars with small circles only

The first circle attempts were small but slightly larger than the center post but the border delineation still seems too sharp. Adding only half circles along the border creates a bit of fuzziness but the center is stark.

Blending border and center by adding blue half-circles
Shadow Stars with border half circles only

It's more work but the quilt needs these dots/circles/spots of color in both places - at the posts and along the border. But now the circles seem vanishingly small. Too innocuous?

Blending border and center by adding blue circles and half-circles
Shadow Stars with small circles
and border half circles

Just to be safe, I tested larger circles at the posts. They overpower the stars.

Blending border and center with large blue circles and half-circles
Shadow Stars with large circles
and border half circles

I snapped a quick photo when the work was half done to double check. On the left is a complete contingent of circles while on the right the circles are only along the border. FYI, everything is hand appliquéd but the border circles are only sewn halfway. When they are all attached, I'll go back and resew the border so the other half of those circles will disappear. Simply appliquéing them all around won't work; some of the leaves are in the way.

Shadow Stars circles in progress

This was perfect work for the evening hours. It took a few days to finish, then I rechecked all the seams looking for twisting. 

Shadow Star quilt top ready to quilt

Now it's off to my longarm quilter. I decided not quilt anything this large again. Smaller work is better for me these days. {We'll see how long that resolution lasts.} I'm looking forward to this as a summer quilt on the bed. 

Reading


Madeleine Albright, former US Secretary of State, wrote Fascism: A Warning in 2018 but it's even more pertinent now. She starts with the beginnings of fascism in Mussolini's Italy and moves to Hitler. Subsequent chapters discuss more current world leaders.

She defines fascism as "majority rule without any minority rights... that involves the endorsement and use of violence to achieve political goals and stay in power. It's a bully with an army."

Her solutions are to get involved locally and talk with people with whom you disagree. Good starts. We also need to ground discussions in reality rather than conspiracy. 
Enjoy the day, Ann

Tuesday, February 9, 2021

Sewing Borders on the Shadow Star Quilt

Sisters are the perfect best friend.

Quilting


Unraveling on the edges of the completed borders drove me to attach the first three before finishing the fourth side. Here's the first side sewn.

First border sewn on Shadow Stars quilt top
First Vase and Vine border on Shadow Stars quilt

The next step was to sew the opposite side then to sew the third side, longer to accommodate the width of those border sides. An additional vine helps fill the space. 

Adding third Vase and Vine border
to Shadow Stars quilt

But there's a small problem. Someone stretched this side when creating the sketch. {I wonder who that could be?} It's not just that the seam allowances were forgotten. So... I'll be moving the final flower and perhaps a couple of leaves. 

A second flower unit is overlaid on the first to test moving of the applique
Testing adjustment of flower to fit side of quilt

With a petal from the fourth side, I tested the needed movement. This will take a couple of days. 


Reading

I finished several books in the past few weeks.

The Red Address Book by Sofia Lundberg relates the life of Doris Alm in flashbacks as she pages through her old address book. Born in Sweden, she became a maid in Madame Serafin's house upon the untimely death of her father. Madame took her to Paris where... Well, read the book for more. The vignettes are short; some characters repeat. Although her life spans 96 years the story only brushes world history.

Benjamin Franklin's 13 virtues have long interested me. Gretchen has the same interest bet she created her own set of virtues to guide her through a school year in Happier at Home. Like the quote from Ursula LeGuin's Left Hand of Darkness, Gretchen sees both sides of the coin can increase our happiness (or discontent.} So collecting and purging, staying home and going out, limiting time and taking all the time are all included in this book.

I'm much older than she but found some thoughtful ideas in her mix of "memoir, science, philosophy, and experimentation." 

My Bed by Salley Mavor is a permanent part of my collection of children's books. Salley illustrates her books with tiny, meticulous hand stitched 3D bas-reliefs of children sleeping around the world. As a maker I adore her work. As a grandmother I love the inclusion of world cultures to raise my grandchildren's awareness and appreciation of others.

Enjoy the day, Ann

Tuesday, February 2, 2021

String Tulip QAL Month 1

"The world will still be imperfect, because men are imperfect. 
Good men will still be killed by bad, or sometimes by other good men, 
and there will still be pain and disease and famine, anger and hate. 
But if you work and care and are watchful, then in the long run 
the worse will never, ever, triumph over the better. 
And the gifts put into some men... 
shall light the dark corners of life for all the rest, in so brave a world."
~Susan Cooper in The Silver on the Trees

Quilting

Welcome to the first month of the String Tulip QAL. 

String Tulips 2 quilt

At AHIQ we issue biannual prompts to focus our creativity and our discussions {somewhat.} However, this time we are trying a QAL. Using my String Tulips as a starting point, I'll post directions here and on AHIQ the first Tuesday of the month. 

We have the whole month for each step which helps it fit in between the many projects we all have. You can try it or not. Change it up to suit yourself - larger blocks, different flowers, flowers in the border. Whatever. That's why it's improv. 

This month we address the string blocks, the ones in my border, because that was the first part I made.

Four ESS string blocks form an X

Block Plan

There's no way to figure every size and variation of these blocks. I'm writing what I did previously. Make your own alterations. My 42-inch square baby quilts used five-inch finished string blocks. The X shows up when you put four blocks together. Even if you make a different size quilt, keep that fact in mind.

As I wrote last month, you will need 64 string blocks to make only Electric Socket Shock {a quilt of all string blocks} or 48 string blocks to make the String Tulips quilt variation but it always helps to have some extras. 

Cut paper foundations 5.5" square. Use newsprint or even copy paper and cut with paper scissors or an old rotary blade since the paper will ruin it for fabric. Here's a sample Electric Socket Shock block to scale with a 1" marker to check. It looks like the sketch below. 


The foundation has a quarter-inch seam allowance; however, bulky seam allowances may require wider seams.

The diagonal lines are merely suggestions but drawing a few on each sheet serves as a reminder of the direction of the expansion. {Ask me how I know.} Your actual seam lines depend on the width and shape of your strings. All of mine are different widths. I found the sequence of values more important than the widths. 

The critical part is the way the strings widen from one end to the other. They don't need a huge difference in the width; most of mine differ from a quarter-inch to an inch at opposite ends. I.e., the wide end might be 1.5" while the narrow end is 1.25". Just ensure that the narrower ends are all at the same end of the block.

My sketch has the seam along the main diagonal but my blocks have the first/main string {more or less} centered along that line instead. Either way is fine. 

Strip Sizes

The red lines on the foundation point out is how little fabric will show {and how much extra bulk will be added to the seam allowance} if you aren't careful. I learned {the hard way} that the width of those outer strips should be 1.5" or more. That doesn't mean you can't use narrower strings; just put them closer to the center.

The three center strips need about eight inches to cross the diagonal while the shortest ones are about four inches long. {The longer length of the side strips took me a while to visualize. I kept trying to put little HSTs there. While they work with regular string blocks, they don't work with ESS blocks.} You can certainly use even longer strings and trim after they are sewn.

Sorting

Because my scraps are often short bits, I pulled strings long enough for the center and set them in one pile. That ensured there were enough long ones to finish my blocks; they weren't used up early in shorter lateral positions.

After that I pulled randomly but generally left the lights for the sides. I usually put darks or bright mediums in the center but there are multitudinous ways to order the strips. What should you do? Whatever tickles your fancy.

When there is a value difference between the center section and the sides, the X shape shows up better although it's not very visible until four are set together.  Light and dark are relative; they depend on which fabrics you're using. If you are hesitant, consider using a Grey Scale Value Finder. 

It's hard to visualize how well your blocks are working until you put four together. So make your first four, and look at them before making adjustments.

Here are my first 12 blocks. No rhyme or reason in their construction. Narrow "blades" {the center of one section of the X} and wider corners or vice versa change with the value choices. A strong value contrast creates a defined edge of the "blade" in the center while a subtle value contrast widens the blade... or causes it to disappear. Where do you see the "sides of the blades?" What do you think made that happen? Does it help or hurt to alternate darker and lighter fabrics in the corners? Your opinion is the only one that matters in your quilt.


Twelve Electric Socket Shock string blocks

Matching colors on each side of the center strip could be an interesting idea but, as has been written in many scrap quilt books, value is more significant than color.  Or consider alternating light and dark strips. So many possibilities.

The yellows on the first ESS made the quilt vibrate. And it didn't take many to achieve that result because of yellow's high intensity. 

Blocks that don't seem to work can be used for tulip petals later on. Or they can go on the back. Or you can donate them.

Cutting

There are some choices for cutting. {That's why it's improv.} If you have wider strings/chunks, consider cutting them diagonally like this. Not corner to corner! Try for a 3/4" or greater width at the narrow ends of the strips to leave room for seam allowances, to reduce the bulk on the edges, and to better utilize all your scraps. I call this a wedge. Remember, it doesn't take much difference from end to end; the cumulative effect of several wedges increases the expansion.

Cutting a strip into two wedges

If you have a chunk of fabric, you can cut several wedges like this. They don't have to be the same widths.

Cutting several wedges from a chunk of fabric

If your string is already a wedge or triangle, just leave it.

This string went in to the scrap
bag as a wedge/triangle.

If you have a long {WOF} string, leave it until you are ready to place it. Then you can cut it to the appropriate length and create a wedge.

Sewing

Shorten your stitch length to aid when removing the paper later. 

Place a long {eight-inch} wedge on the main diagonal and sew another wedge each side. {If you choose a different-sized block, the longest string is about 1.5 times a side length. Yes, technically the correct measurement is 1.41 but 1.5 is easier.}

If your string is already a wedge, just sew the regular quarter-inch seam. 

Two wedges sewn with quarter-inch seam

Or sew a seam allowance that starts with a quarter-inch at the wide side and increases a bit {3/8" or 5/16"} at the narrow side. The excess seam allowance can be trimmed back by hand or by flipping back both the string and paper and trimming. You can leave the excess but I found the extra fabric at the narrow end makes the block's seam thicker which becomes hard to iron down once blocks are sewn together.

Because I frequently use any paper lying around, I always fold the papers back {and then straighten them out again} after every seam. Call it pre-creasing. They tear more easily later. Don't do this with fine or fragile paper.

Fold paper back after every seam
to help it tear later

If using a really narrow string simply sew the quarter-inch seam; it's only one tiny string and won't lose the expansion effect.

The Corners

As you reach the corners, it's often easier to use a rectangle at at least 4" by 1.5" or more. There will be some waste but it may be better than sewing a wedge on the wrong side. {Ask me how I know.}

A 2.5x4" rectangle
completes the lower corner

Pre-test your strip placements by overlapping the seams to ensure it reaches as far as you want. Sometimes the string covers the corner but frequently the last strip doesn't quite reach. 

String in lower left won't
quite cover the corner

Here are three ways to handle it. 

1. Use a larger wedge or chunk instead.

Don't worry about it being too large. It's easy to square up later... even if there's some waste.

A wide wedge or chunk
covers the corner with extra room

2. Adjust your final trim to avoid the problem.

Here, the paper peaks out a smidge behind the final strip on the right. 

The lower right strip is a bit short
of the width needed

Turn the block over to evaluate if it can be eliminated by trimming a bit differently. In this case, moving the 5.5" ruler to the right and down for the final squaring up resolves the problem. 

Back of "a bit short"

This solution does not work for precision piecing; however, these are improv blocks and seam lines don't need to match up. 

3. Move the final strip closer to the center
If the last open space on the foundation is too small {less than 1.5" wide} consider moving the final strip towards the center and sewing a new quarter-inch seam allowance based on the top strip. 

Give the corner strip more room 
by moving it towards the center


Final Details

Press after every pair of strings is sewn {one on each side of the first.} If the foundation is heavier paper I steam the back {paper side} each time, too, to weaken the paper for tearing later. 

Blocks can be trimmed to any size, larger or smaller than the foundation, as long as the fabric extends that far. Trim from the front or back of the block, whichever wiggles less. The paper does not adhere as well to the mat or the ruler so take your time and be careful. Mine get  trimmed as soon as they are finished; however, because of all the bias edges, I don't remove the paper until I'm ready to sew them into the top. I just keep them in a stack where they won't fray or stretch. 

Special thanks to Gayle, Sharon, and Maureen for proofing and testing this post. Their suggestions improved the clarity. For more information, Maureen kindly agreed to post her impressions and samples on her blog, MysticQuilter. 

Please post photos on the AHIQ blog if you can. Feel free to post your progress anywhere - on whatever social media you use and your own blog but we'd appreciate tagging it with #AHIQStringTulipQAL so they can easily be found. We always enjoy details about how you personalized your version. The process is more interesting to us makers.

String Theory at the Iowa Quilt Museum

The online gallery tour is available for $6. It's set for a single viewing so get your coffee ready and use your largest screen. I feel very fortunate it's available for us at home. 

Enjoy the day, Ann

Tuesday, January 26, 2021

Finally Adding Flowers

People overestimate what they can do in a single day and 
underestimate what they can do in their whole lives.
~unknown but possibly Bill Gates


Quilting


With the vines and leaves finally sewn, it's time to sew the flowers. There have been several iterations as you can see by the "cut and paste" of the template under this border. After recopying the entire swag once, I wore out and simply cut the old flower out and taped a new version in. Why? Because the petals extended too far and ended at the edges of the border fabric. 

The flower base that covers the vine end was simplified, too. It's now a unique three lobed shape without specific leaf structures.

One tulip version had three separate petals that were too difficult to deal with. And I don't think they used less fabric than this simple bowl. It's definitely easier to sew this one that fits over the base easily. Since hand-quilting is not planned, the extra thickness shouldn't matter.  

A lightbox is used to place tulip petals on the border.
Lining up the tulip petals

Then a teardrop petal was appliquéd on top. After looking at several placements, I matched the base of the teardrop with the base of the cup but the three petal points are lined up with the drawing underneath.

Basted tulip petal is pinned in place on an applique border
Pinning the final tulip petal

Here are two of the vines extending from the center vase. The quiet speckled green print was a gift from my friend, Gayle. Thank you. There wouldn't have been enough leaves without that addition. 

Two vines extend from a blue vase in this applique quilt border
Vine and leaf detail

And here's one side of the shorter border. Wow, that pink stands out. 

Two vines with pink tulips extend from a blue vase in this applique quilt border
Half of a vessel and vine border

Do you see the rabbit in the vase print? I'm still considering re-applying the base of the vase. That curve is off a smidge.

QS gifted me some owl fabric at Christmas. Ever since college, my sisters notice and send any and all owls they encounter. This heavier linen blend made a simple, useful tote.

Tote with brown owl print and yellow


Monthly FUR (Fabric Use Rate) 

A kawandi placemat and the tote were finished in January. We are in the middle of home repairs so sewing slowed significantly. YTD = 2 yards.

Electric Socket Shock QAL

The first post is next week. Are you ready? I can't wait to see what everyone does with this basic block.  

Did you see it? The Iowa Quilt Museum has a new exhibit, String Theory, about... {wait for it}... string quilts. How timely is that? Works from the ten quilters and collectors in the show include my friends Sujata Shah, Fern Royce, and Rod Kiracofe.  

Curator Linzee McCray defines string quilts as "thin lengths of fabric sewn onto a foundation." They are usually considered utilitarian as evidenced by the random foundation papers on the backs of unfinished tops. The technique lends itself to "happy accidents and intricately planned designs alike." 

The first Zoom meeting was last week and featured Rod with Siobahn Furguson discussing their quilts.  More meetings are planned on Tuesdays at noon CST. You can sign up on the museum's website. {I'd link it here but it's not https. Doggone it. So look up their name.} They also plan a gallery walk online for $6 - the regular admission price. I can't wait and only wish I could attend in person!

Enjoy the day, Ann

Tuesday, January 19, 2021

Never Ending Leaves and a Few Bud Bases

It is possible to read the history of this country as one long struggle to extend the liberties established in our Constitution to everyone in America.
~Molly Ivins

The US turns to healing our bodies and souls with the inauguration of President Joe Biden and Vice-President Kamala Harris tomorrow. I will be but early to watch. Let's commit to more than watching though. Let's become involved, especially in local matters and primaries, so horrors like these last few years don't happen again.

Both the 2016 and 2020 elections showed that the majority of Americans did not support the policies of the group that came to power in 2016. By neglecting to participate early, by waiting to see who and what "the parties" promoted, we lost the opportunity to shape those policies. A small group of dedicated, single-issue radicals swung our national agenda shamefully and cost us hundreds of thousands of lives.

Adults know we have to do things we don't want. Sometimes it's working every day, putting on a smile when we would rather go back to bed. Creating equitable political structures is another duty of adulthood - if for no other reason than to keep sadistic, misogynistic, and racist opinions out of the laws of our land.

Quilting


I cut out all the leaves starting with the smallest fabric remnants to maximize diversity. They were then sorted into four piles like dealing cards so each border has basically the same ratio of each fabric. Here is my set for the second side. Oh, my fingers hurt from all this sewing. Even with a thimble.

A stack of hand basted leaves with pincushion and thread spool
Basted leaves for a quilt border

Of course, the first two sides are shorter than the last two so I started sewing them first. Then the leftover leaves were set aside for the longer sides. It's not a perfect system but maintains some semblance of diversity.  

Again the leaves are blanket-stitched so their stems nestle under the vine. I shortened both the stitch length and the zigzag. My Bernina also has a mirror image function that lets me align the "teeth" of the blanket stitch to either side. That makes sewing easier, too. 

Bernina 1240 set to applique leaves with a blanket stitch
Blanket stitch by machine

Once the leaves are sewn, I re-pin the vines and sew them down. Then it's time to add the flower bases. This template has had the most changes. At first I planned a double-lobed leaf on each side, kind of like a dumbbell. It was too difficult to machine quilt and I ended by including the base with the leaves. Actually it now just looks like a larger base. Whatever. It works. 

A stack of hand basted flower bases with scissors and pincushion
Basted flower bases for an applique quilt border

In the plastic bag the bright pink flowers are cut and ready to be basted next. It's taking about three days to get all the parts basted and another day to pin just the leaves. Then sewing, repinning, more basting. Not a lot to show at the end of the week but I'm sticking with it. It's time to get this top done. I only hope it looks as good as my sketches. 

Lectures

One of the unexpected joys of the pandemic is the upwelling of internet meetings that allow international speakers and audience to interact. And one of the benefits of multiple program chairs is the diversity of vision they provide. Sue Bianchi, one of our program chairs, arranged a unique speaker for our December guild meeting - Harriet Riddell of the UK spoke on Street Stitching Around the World. Artists must be brave to put their work out for public response but Harriet takes it to another level. She takes her electric sewing machine around the world to stitch the scenes in front of her. The audience in the street power her machine by pedaling a bike. Sounds crazy, yes? What a opportunity to interact with people, build connections, and build a portfolio of ever-increasingly skilled work.

Last week I joined the first lecture of The Black Index: Artists in Conversation sponsored by the Getty Institute. The online exhibition curated by Bridget Cooks and this month's lecture included two conversations. Professor Leigh Raiford interviewed Lava Thomas about her pencil sketches of the Montgomery bus boycott mug shots. The history Lava researched for this series reminded me of Patricia Montgomery's swing coats. 

After a short break, curator LeRonn Brooks and Whitfield Lovell discussed his drawings of card players. Photos of family and friends playing cards highlighted how the cards are the intersection between the viewer and the subject. Whitfield took time to choose the correct card for each person. In a way, this reminded me of Susan Shie's Tarot Cards althought she did it the other way around, chosing a card and then created images for it. Susan embellishes her work with extensive writing across the surface. 

Interestingly both textile artists wrote on their work while the others did not. Another feature that struck me was the use of well-known people as models versus "the man in the street." It recalled artists who were paid for commemorating prominent people versus Impressionists who sold work using unknown models or family. The various reasons give us food for thought.

Replays of this lecture are available at the Getty and more are planned monthly.

Enjoy the day, Ann

Tuesday, January 12, 2021

More Leaves and my Light Table

Whoever is careless with truth in small matters cannot be trusted with important matters.
~Albert Einstein

Quilting


String Tulip QAL will start the first Tuesday in February. Thanks for responding so enthusiastically. Like our usual prompts, I will post steps in successive months. 

February 2 - ESS string blocks
March 2 - Tulip petals
April 6 - Center details
May 4 - Putting it all together

The instructions are not a mystery; they will recreate the three quilts I made with this design. The mystery is what you make of them. Everyone is encouraged to alter the instructions to suit their own plans. I can't wait to see where you take this.

Meanwhile, Shadow Stars continues. I estimate it will take eight more weeks to finish all four borders. My blog documents my process rather than being a source of continual eye candy and it's important to reflect the actual time it takes. Consequently these may not be the most exciting posts but I'm sticking with the program. 

I drafted leaves in three sizes and made mirror images of all. The vines were pinned in place before the leaves are arranged so the stems can hide under them. Then I removed the vines to keep them out of the way of the presser foot. {Don't ask me how I learned to do that.}

A Bernina sewing machine is used to applique leaves to a quilt border
Sewing leaves to border with machine blanket stitch

Laying all these parts out properly is quick. Using a light table makes it easier to orient the applique on the borders. Years ago I had an "old school" light table that used an incandescent bulb. Eventually the toggle on/off switch broke. DH found this fantastic LED light board that is much thinner {about half an inch} and puts out no heat. My only problem is that my hands are frequently cold and the touch-sensitive switch doesn't always recognize it. Rubbing them together for a minute usually takes care of the issue. You know what they say, "Cold hands, warm heart."

The light table is bordered with ruler measurements which make placement easier.  It also works for real artists. 

LED light table rests on part of a quilt's vine border
LED light table

On the back the table is raised by four small pads that raise the table slightly off the surface. And for the record, information to order by phone or email is taped to the back. With this photo I'll be able to remember it even if the sticker comes off or fades. 

LED light table contact information


It's been a great present. DH is clever at finding just the right equipment.

The kawandi placemats have been perfect anecdotes for these tumultuous times. Choosing scraps from the bag with soft music is a respite from the outrageous behaviors of terrorists and traitors. Perle cotton makes the quilting much easier. DMC's manufacturing process is excellent. 

Here's the third one. It includes the last bird from the Spiderweb border fabric. I found another scrap with a similar blue-green background to add to this placemat and it unifies the design better than the previous one. 

Third placemat kawandi

Reading


I finished The Dark Vineyard by Martin Walker, his second in the Bruno series. Since I started reading this series late, I'm pacing myself - one every two months. Two young men arrive in Saint-Denis to start vineyards. One wants to create organic wine while the other is the heir to a large American wine business. Both seem attracted to the beautiful young Quebecoise student who is working in a wine shop for the summer. Martin write lovingly of his adopted region. You wish you were there for the wine-stomping parties and the truffle omelet dinners or even to walk through the woods with his basset hound. This is a series to treasure.


Rhys Bowen's The Last Mrs. Summers came through a library loan. Although recently married, Darcy leaves Lady Georgie for an assignment and she joins her friend, Belinda, to view her recent inheritance of a small cottage in Cornwall. The story is inspired by Daphne du Maurier's Rebecca {which I read in high school.} A good read on a rainy day.


Hoping everyone can be vaccinated soon. Stay safe.
Ann

Tuesday, January 5, 2021

AHIQ Prompt January 2021: String Tulip QAL

"Hope" is the thing with feathers -
That perches in the soul -
And sings the tune without the words -
And never stops - at all -

And sweetest - in the Gale - is heard -
And sore must be the storm -
That could abash the little Bird -
That kept so many warm -

I've heard it in the chillest land -
And on the strangest Sea -
Yet - never - in Extremity,
It asked a crumb of me.

~Emily Dickinson 

2021 opens so hopefully. Here goes!

Quilting


As always, many ideas for a prompt run through my mind but something different kept coming to the top. Repeated comments about the angled strings and the tulips gave me the idea for a quilt along instead of a prompt. So this time, let's have an Electric Socket Shock QAL. I was asked if there's a pattern. Answer: Of course not. I was making it up every step of the way. But it's a simple variation of a string quilt and those are always useful for clearing out the scraps. And it will force me to write something down.

Electric Socket Shock quilt


I'll start writing guidelines for us and we'll head out. Remember, they are merely suggestions. Change anything you want or go in a completely different directions. That's why we love improv.

Interestingly the tulip quilts were constructed like kawandi. I started with the border and worked my way in. So we will do the same with this QAL. We will start with the string blocks and then move to the string tulips. You can make one or both parts and add your own variations. 

String Tulips quilt

My previous quilts are about 40" square - baby quilt sized but you should choose a size that works for you. The final size will determine how many blocks you need to make. And BTW, my blocks were 5.5" unfinished/ 5" finished. Feel free to change those up, too.

You'll need assorted strings and scraps, about 2/3 yard for the background {more if you make a larger quilt}, and some leftover binding for the tulip stems. Or you can pull from your stash. Or go shopping. I also used newsprint for a base. You can do that, or nothing. If you sew with a fabric base, you should increase your seam allowances due to the extra bulk.

Are you in? Let me know in the comments. If it's a go, we will start sewing next month and continue monthly.

Enjoy the day, Ann

Tuesday, December 29, 2020

2020 in Review

Don't cry because it's over; smile because it happened.
~Dr. Seuss

Not about the pandemic. We are all crying over our losses. But another quiet holiday at home with only video chats for company got me thinking. When our forebears moved, they left everyone and everything they knew behind. They didn't gather together again. At best they had letters. That's why album quilts became popular - a way to memorialize absent friends. Don't you know our foremothers took those quilts out on holidays and traced the names and verses on each block. How grateful they must have been to have that one tangible link to their former lives.

No plans for New Year's although there has been time to talk with all my family this week. A group of us watched Soul together online. There's an app for that but I didn't find it easy to use. Thank goodness several people are tech savvy. We got rolling about an hour late but enjoyed sending comments back and forth. Popcorn and a comfy seat for everyone - because we were all at home. Today I hope to call more friends. And I will smile as I see {or hear} every person. Then I will pick up some mementos from my parents and grandparents and sit for a while remembering all the good times we had.

Quilting


Despite or because of all the horrors, 2020 turned out to be the year to clean up and clear out. All it took was staying at home for months to get us to focus on overflowing storage - the drawers, the cabinets, the attic, the garage, and the shed. Sheesh! More UFOs found the light of day as DH and I cleared and cleaned the entire house. He sorted, tested, scrubbed, and sold or donated loads of computer and electronic equipment. I actually met my frequently listed but always unmet goal to whittle my stash in half. It's now three shallow boxes. {That's not counting the box of clothing fabric or the box of projects in progress. However, the remaining projects are all in that one box instead of being hidden - and forgotten - in various locations.} 

I had {and may still have} more fabric than I will use in my natural lifetime so it was actually a relief to work through so much of it. Sewing two dozen pillowcases for family, another two dozen tote bags for foster children and family, and a dozen quilts absorbed much of my excess fabric and leaves room for new purchases in the year ahead. The quilts fell into three {occasionally overlapping} categories:

Scrap, stash and strings quilts:

Stash, scrap, and string quilts in 2020
 
{Although the fabric is older, several of the designs are new or new-to me, including two with tulips. Loving them!}

Star quilts:
Star quilts in 2020

and quilts made from the Parts Department: One for a friend

Multicolor Ocean Waves scraps center around red print squares on point
Ocean Waves scrap quilt 3 


and another for me. 

Large Square Deal quilt block forms central medallion surrounded by Crossroads block border
The Square Deal quilt


Hooray for using fabric and blocks that have been "resting" on shelves for a while.

There was also a Christmas stocking for the newest grandchild and two aloha shirts. 

The Shadow Star top is almost complete. {Another pile of blocks that have been waiting on the shelf.} It should be finished in January and then will be off for long arm quilting. My arms can't move that much fabric around as easily as they used to and every stitch will show on the solid white. 

So, what's up for 2021? I'm not making many predictions and plans this time. We do have a new AHIQ prompt which we'll share next week. And I could make up some of the clothes... but right now, I'm relaxing, reading, and chatting with family. Just what the doctor ordered!

Monthly FUR (Fabric Use Rate) 

No quilts completed in this month either. But I finished one more kawandi, several tote bags and the Christmas stocking. That took11.5 yards. The 2020 year total is 165.5 yards. I hope to start the new year with some finishes of the two big quilts I've been working on: Wheel and Shadow Stars. We'll see how quickly that pans out.


Reading

Nann recommended The Address Book by Deirdre Mask and I just finished it.  The subtitle highlights the main points: What street addresses reveal about identity, race, wealth, and power. Without addresses, people can't vote, obtain bank accounts or jobs, get fire or ambulance services... or pay taxes. Without addresses, citizens have no identity. 

Deirdre began in Indian slums, moved to ancient Rome, then discussed the neuroscience of smell and mental mapping. Empress Maria Teresa numbered every house in her country to know who could be drafted for military service. 

Some of the first addresses numbered buildings by the year they were erected. Philadelphia led the way with odd numbers on one side of a street and evens on the others as well as assigning one hundred numbers to each block.  Europeans developed boulevards and parks while Americans used a grid with numbered and lettered streets. 

Stories of how countries name streets and number buildings ranged the globe but she ended the book with three new methods: what3words, Google Plus codes, and  Facebook Robocodes. 

Wishing everyone a healthier and happier year ahead. Peace, love, and true goodwill! 

Happy New Year, Ann

Tuesday, December 22, 2020

Another Kawandi Placemat and More Tote Bags

Life is not fair but government must be.
~Ann Richards


There was time to finish a second kawandi placemat. Sujata gave me the idea when she suggested an appropriate size for her class. And I need a new set and what fun to work on something small in the evenings for a change. 

Kawandi placemat

This time the fula were sewn between the layers at the first round of stitching - just as Sujata recommends - but I didn't make quarter circles. Instead, they are folded into thirds, making them very thick and difficult to sew. I won't do it again... unless I forget. Sheesh.

All the fabric came from my scrap bag, including the bird prints. Each placemat will have one of these somewhere. But the colors don't match my dishes. We'll have to see what happens with these.

Tote bags

I found two adorable print {remnants} - the blue with space drive-ins and Charlie Brown's shirt stripe in the lower left. The others are pretty cute, too. The totes are fully lined, not to make them reversible, but to make them stronger.

Between my aloha shirt and DH's, there's enough remnants to make all the backs. So that and the birds are the unifying design elements. I suppose I can turn them over it a calmer placemat is wanted.

Several family members requested my tote bags. Although they have no pockets or special features, they are large enough to hold a large supply of toilet paper, paper towels, or general groceries. Some people have plans to carry sporting equipment in them. Whatever the bags are wanted for, I'm delighted to make them. 

The totes took 10.5 yards and the placemat used another half yard. Eleven yards this week - not that any reduction of the scrap bag is visible. How is this possible? Elves is my answer.

Merry Christmas to all!

Enjoy the day, Ann