Saturday, June 29, 2013

Scrappy Trip with Borders and a Mini-Tutorial

Here's the finished top. The narrow diamond border incorporates similar colors with a different shape for added interest. And these were not that hard.

Scrappy Trip quilt made of mainly greens and pinks.


Revised 8/11/13
The original instructions seemed unclear to new quilters so here's a revision. I started with a square quilt made of nine blocks set three-by-three. The length and width are the same.
A bit of math background:
  • A diamond is a rhombus. (A square is also a rhombus.) 
  • Their sides are all the same length and their opposite angles are congruent – the same measure. 
  • All the angles of squares are 90° but diamonds are usually other measures, like 60° and 120°, 45° and 135°, or 30° and 150°.
  • Directions saying ‘cut a two-inch diamond’ refer to the length of one side of the diamond not the length along either diagonal. 
  • Looking at traditional blocks, the diamond is usually set against a square or right triangle; that’s why this measurement works.
My strips are already 2” wide so my diamonds will finish 1.5”.

Constructing the border:

    • Lay out three strips white/green/white angling the beginning as shown to utilize the most fabric. (A below.)
    • Sew strips with quarter inch seams.
    • Measure a 45° angle by aligning the ruler’s 45°line with the seam line of the strips. Cut the angle. (B below.)
    • Measure two inches from the angled edge and cut one set of diamonds. Repeat until you have enough sets. Make straightening cuts when needed to keep a true 45° angle. (C below.)


    1. Sew the diamond sets together as shown (quarter inch seams) until they are slightly wider than the finished width of the current top. (My top was 36" after subtracting the outer seam allowances.)
    2. Add an extra white diamond to each end of the border.
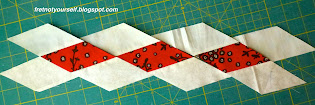
    Diamonds set out tip to tip with one extra white diamond added to each end of the strip.
    1. Press the sewn strip gently to open the seams. Don't rub or use steam; just press up and down.
    2. The edges are uneven so measure a quarter-inch from the wider-angled diamond points and trim.
    3. Also trim the short ends of the strips a quarter-inch from the diamond tip.
    Line up ruler edge one-quarter-inch past the diamond points and trim the borders.

    Border strip with one side trimmed.
    1. Measure the length of your strip from the endpoint of the left-most colored diamond to the endpoint of the right-most colored diamond. 
    2. Trim excess. The border on my quilt was 37.5"; the red diamond sample here measures 12.125“ long. 
    All sides trimmed with quarter-inch seams past the diamond points. Measure the length and width of the border from point to point.
    1. Subtract the finished width of the current top and divide by two. This is the finished width of the inner border. In my case: (37.5 – 36) / 2 = 0.75”.
    2. Add seam allowances and cut strips for the inner border to that width. No matter the length of the diamond border, it will always fit because the width of the inner border is chosen last. In my case: 0.75 + (2 * 0.25) = 1.25" wide.
    3. Sew and press the inner borders to the quilt.
    4. Carefully pin two opposite sides of the diamond border easing in fullness as needed.
    5. To make the corner blocks (squares-on-point):
    • Measure the finished width of the diamond border from one wide-angle point to the other. It is always an odd measurement. Mine is about 1-11/16” finished. 
    • Draw this size square on a piece of graph paper.
    • Find the midpoints of each side and draw a square on point.
    • Check that the size is correct.
    • Paper piece.
    1. Sew corner blocks to the final two diamond border strips.
    2. Attach the final two diamond borders to the quilt, matching the intersection of the borders and easing fullness as needed.
    3. To keep the quilt square, measure the length of current top across the middle and make the first two sides of outer borders these lengths. 
    4. The last two sides of the outer border are this length plus twice the width of the outer border.
    I hope this helps. Fret not; enjoy the day.

    Ann


    Wednesday, June 26, 2013

    Scrappy Trip Blocks Finished

    Here are the Scrappy Trip blocks I made last week. Two inch squares made 12 inch blocks. I cut all the squares for a single block and laid them out before sewing. Not the quickest method but it certainly was fun to have so much control over placement. Still planning a border.


    Constructing these blocks I learned to choose a general layout carefully. For example, repeating rows of light, medium and dark is both boring to construct and dull to view. The blocks improved when the rows were more randomly placed. 

    I wanted a red/pink/orange main diagonal but found the intersection of those rows unappealing. So I alternated r/p/o on the longest and second longest rows. 

    Fret not; enjoy the day.

    Ann

    Saturday, June 22, 2013

    Scrappy Trip Around the World Block

    Many quilters made this block the last few years; however, the first one I saw was at PIQF this winter. I've made several regular Trips but was intrigued by the increased number of fabrics and setting choices of this version. So I started one. Here's my first layout, all from my scrapbag. The green in the lower right is leftover from binding the Log Cabin.

    Scrappy Trip Around the World quilt block

    Fret not; enjoy the day.

    Ann

    Wednesday, June 19, 2013

    Apron Strings

    It wasn't a string but is was a scrap. Less than a half yard remained after binding the nine patch snowball quilt. I found a polka dot scrap in similar colors. The low contrast between the fabrics worked very well for the apron.


    I made this apron like my grandmother did: 35-40 inches wide and 20 inches long; 30 inch ties and 18-20 inch waistband. (Ok, her ties were shorter but I like to wrap and tie in front.) Since these were remnants I made some adjustments. The center panel is french seamed to keep raw edges from showing. And there was just enough to make one pocket.

    Fret not; enjoy the day.

    Ann

    Saturday, June 15, 2013

    A Lighter String

    String quilts are a wonderful connection to our own past and to our quilting heritage. But the extra  thickness with the muslin was getting me down. So I decided to try stringing without a foundation.

    String quilt in darks and lights. Potholder construction.

    First sort strings into lights and darks; I didn't follow this rule very strictly. Both groups contain several mediums of the same value although my second (strictly followed) rule was that each fabric could only be on one side. Next I sewed strings from one pile or the other until I had an eight inch block. After cutting them into QST (quarter square triangles) I sewed a light & dark together.

    Eventually I figured out how to sew a light block and a dark block together like a 'potholder' which could be cut into QST to make four new blocks at once. Eureka. But not as unique as I'd originally thought. A few months later a friend shared a magazine article with the same method. Later I found this great video from Missouri Star Quilt Company and Three Dudes Quilting. They use jelly rolls but it's the same method. The video is short and very easy to follow; take a look.

    For the mathematically challenged: Two original blocks become four new blocks. Since they must be the same area, they can't be the same size. The new unfinished block size will be 0.707 times the original block size. (This is one half times the square root of two.) Mine started at 8" but ended at 5.656". The new blocks are never a routine size but can always be trimmed down if needed. If you plan to use these in combination with other blocks think ahead.


    This is a good project to sew over time. The 'potholders' stack nicely. Once they are cut open the new blocks are all bias edges, so wait until there are enough to finish your top. I made most of these blocks a year or more ago.

    Meander quilting on String quilt

    The alternating diamonds of light and dark are called a barn raising set. The blocks aren't log cabins so in each quadrant, all the darks go one way and all the lights go another. When I originally laid out the blocks they looked odd - either because the strings were different widths or because I had so many mediums on both sides. Finally I added sashing and posts again. Although the sashing still alternates between a light and a dark depending on which side of the block it touches, it makes a zig-zag in this rather than crosses like Red and String. Because of the use/abuse this quilt will probably receive, I meander quilted all over.

    This block is fun and easy. The quilt is going to college and hopefully will graduate in four years!

    Fret not; enjoy the day.

    Ann

    Wednesday, June 12, 2013

    Racing Out of the Block


    Do you remember Pretty in Pink? I also made a quilt for her sister who wanted her favorite nightgown included. It was very faded and worn so I cut it into hearts, put pink fabric behind and scattered them across the surface. Names of family members and favorite pets were machine stitched onto some of the hearts.

    Nightgown hearts near pieced & appliquéd block
    This t-shirt block required the most applique... and the most effort to keep the quilt flat. I think racing the car out of the block looks pretty good, though. I pieced two and a half sides and left "flaps" that I pulled through to the front and machine appliquéd onto the sashing. See Part Piece/Part Applique for a short tutorial on this method (although a smaller flap would be easier the first few times.)

    Fret not; enjoy the day.

    Ann

    Saturday, June 8, 2013

    Red and String

    The Dallas group traded red and string blocks in a desperate attempt to reduce the size of our scrap bags. Made on a ten-inch muslin foundation, one side had to be a red triangle but anything went on the other. Since I didn't need another project, they sat around until a neighbor was graduating.


    The foundation makes the blocks very thick. I'd already fought that thickness on the Watermelon quilt so this time I added a half inch sashing. Now the thick string seam allowances meet exactly under the narrow sashing. No pressing problems this time. 

    I used two different post colors (orange and yellow) and varied the sashing with the side of the block. Cute, done, off to college in the right color!


    Fret not; enjoy the day.

    Ann 

    Wednesday, June 5, 2013

    Vintage Apron Pattern

    I couldn't help myself. It was a necessity. Slobs like me need full aprons; it's the only way to keep clothes unstained. But I can't stand to have something tie at the back of my neck. Then Vogue patterns were on sale and this retro apron caught my eye (#8740.) The fitted bib front goes on over the head. No straps to adjust, no sagging. Perfect! The scalloped hem used yards of seam binding which went on very easily.


    The serendipitous feature is the wonderful waistband. It's the easiest I've ever applied. After basting the skirt and bib wrong sides together, encase that seam with the waistband which then turns UP! So clever. I will definitely use this technique again.

    Fret not; enjoy the day.

    Ann

    Saturday, June 1, 2013

    Princess Feather Quilting


    I designed the quilting to fit the fabric. Feathers won't show on the dark floral but were added anyway. The solid areas seemed to call for a wreath but not more feathers so I drew a Jacobean-style leaf with stems that extend to all corners of the solids.

    Free-motion quilted wreaths on pastel fabrics
    Detail of front. Feathers do not show on the dark.

    Here's the lovely lavender sateen cotton for the back. Since it had such a wonderful shimmer I used rayon thread too, changing colors frequently.
    It was fun to link this up with Leah Day's FMQ Friday. Technology makes it so easy to see what others are doing and share ideas and results. Thanks.

    Free-motion quilted wreaths and feathers on pastel sateen
    Back of Princess Feather showing all the thread color changes 

    Fret not; enjoy the day.

    Ann