Tuesday, December 25, 2018

The Newest Christmas Stocking

Merry Christmas, y'all!

The year began with the intention of finishing a Christmas stocking for G3 {the newest grandchild} by summer. That plan quickly dropped by the wayside. I finally finished it mid-December, working almost to the wire. It's the cutest one yet - if you like gaudy and loud.

The white rectangle covers the recipient's name for privacy but it's written in green sequins for extra bling. 'Cause Texans can never have enough!

G3 Christmas stocking

All the stockings I've made have a Christmas tree


Christmas tree and mitten on velveteen stocking

and an event from space that occurred in their birth year. This one is the Juno satellite circumnavigating Jupiter's poles. Juno is still actively exploring Jupiter. In fact, NASA posts photos regularly on its feed and social media. 


Juno satellite circumnavigating Jupiter,
beaded Christmas stocking

Then it's open season on ornaments. My mother's stocking had pink bells which reprised on her namesake's. That was fun.

Beaded Christmas bells on a stocking

DH suggested holly when I ran out of ideas. Well, I didn't run out of ideas but many don't work out given my limited artistic ability and use of sequins. A tiny manger was one charming idea that was never realized {Who'd believe sequins and mangers don't go together?} although there is hope I might fashion a sheep one day...

Holly and berries beaded on a Christmas stocking

Most stockings have six or seven felt-and-sequin ornaments. Any remaining space is filled with shiny snowflakes, stars, and random buttons and beads. The deer and bird buttons were special finds at a quilt show. They are plastic with a shank on the back. Very easy to add and non-toxic. The bird fit perfectly on the Christmas tree. How lucky is that?

The felt ornaments crowded the bottom this time leaving a bare spot at the top. {Someone didn't arrange them properly.} Hmm. Searching the internet, I found special glass beads that filled it perfectly. Success and a new idea. 

I'll be upgrading all the stockings as I see them. Each branch of the family tree will get the same bead. G3 and her parents have penguins. Daddy dibs-ed them first. {Is that even a word? We said it in the past tense but there's no way to write it.} There are enough beads for a few future siblings, too. Sounds like a fun task to me but hey, we all know I'm uniquely wired.

While the stockings aren't washable and dry cleaning will take the color off the sequins, they can be gently brushed or vacuumed and carefully stored in bins. There are other ways to make them last. For instance: Each seam is sewed twice and zigzagged around the edges. The lining doesn't extend to the toes. It only goes to the ankle so gifts won't put pressure on that angle when an orange nestles at the bottom.

Sewing the stocking after all beading is attached

This stocking is hung by the chimney with care. G3 loves the way it jingles and I love sharing this heritage with another generation.

Previous stockings with construction pointers:
  1. Mine and my offspring's
  2. G1 and G2 stockings in progress
  3. More progress
  4. G1 and G2 stockings completed

Mel Beach emailed me last week that she pulled my name for a set of Lyric Kinard's Start Your Art cards. Then Lyric mailed not one, but two, sets.

Lyric Kinard's Start Your Art cards

They include warm up exercises to help you start making art whenever you feel blocked. I shared one set with my small group. Thank you Lyric and Mel for opening my eyes.

Enjoy the day, Ann

Tuesday, December 18, 2018

A Finish in the Nick of Time

It's gotten cold regularly since Thanksgiving. Funny how that happens. I recognize the air cooling but don't need extra layers until... Bam! It's freezing. Now the bed has an extra winter quilt, my sweaters are front and center of the drawers, and I'm sipping hot tea throughout the day. However, one hardy hummingbird shows up at the feeder several times a day. He must use so much energy in this cold weather.

I've secretly been planning this quilt for the other grandmother of my our darling granddaughter. And finally, it's done. And gifted. Just in time for Christmas. Hooray.

Chinese Coins XII quilt with tulips

Once it was quilted I had some trouble choosing the binding. Green? Blue? I really liked the mottled blue and white {left side} but it's a stripe. Sewing it next to the striped border didn't seem right. Also, while there are busy {and older} prints among the Coins, the  borders and sashing are more crisp. Oddly enough, the blue stripe is only a year or two old; one of the newest prints in this group. So it's not the age of the fabric but rather the style.

The same applies for the busy green prints on top and right. They are just too busy.

Binding choices

The green leftover binding at the top looks best. Some of the greens inside the quilt are a bit more chartreuse but this matches the outer border stripe. The length is a bit short so one of the other greens was added.

I started the back with the center fabric in the spring colors MFG {my fellow grandmother} likes. It matches the purple and blue sashing on the front. There wasn't quite enough {as usual} and this older shirting plaid was the only thing that seemed to blend. It came from the NYC garment district a decade ago. The hues don't work with the front very well but this can just be a two-sided quilt. Aren't they all?

Chinese Coins XII quilt back

Any of those busy binding choices would have worked better with the back but the front is the star. The back will just have to clash a bit.


Spiral and loop quilting detail on Chinese Coins XII

Quilting designs added more fun. Spirals, leaves, loops, and fans. 


Free motion quilting fans, loops, and leaves on Chinese Coins XII

I {sort of} matched the thread with the fabric: peach and yellow were closely matched, light blue thread for blue and purple, green on the border.


FMQ on Chinese Coins XII quilt shows better after washing

These Coins were part of my final push to empty the scrap bag. One top worked very well but the next did not, so I cannibalized those strings, surrounded them with solid sashing, added tulip fabric for fun and ended up with this charmer. Much better.

Quilt Details
Size: 40" x 42"
Design: Chinese Coins
Batting: Mountain Mist Blue Ribbon100% cotton
Thread: blue and yellowAurifil 50/2 cotton, peach and green Gutermann cotton 
Quilting: walking foot SID and FMQ motifs


FMQ on Chinese Coins XII shows better after washing

Christmas Stocking for G3

The newest Christmas stocking is almost complete. Oriental Trading Company had some darling glass beads screaming my name. My idea is to add the same one to each "family group." {DH, my offspring and I will get the Owls. Dibs.} BTW, the grandchildren are numbered here so G3 is my third.

Glass beads from Oriental Trading Company

My goodness! I wish my kids' stockings were as adorable as the ones my grandchildren are receiving. {Although they looked like the "bees' knees" when I made them. It just shows my beading and bling-ing skills improved over the years.}

Special items like these are only readily available with the advent of the internet. I've no idea what local shops might carry them now or who did in the past. Finding something seemed very random; you had to be walking by a store and it caught  your eye. Once you became proficient in the craft or recipe or whatever, you knew where to get the supplies but it seemed harder for novices to even realize they needed better supplies.

Isn't that what happens with any new endeavor? When we first try knitting or quilting or any other craft, the toughest part is finding good quality materials. Or even finding the materials at all. The internet has made it much easier to source them. Now we can search by photos, too. What a wonderful world and an exciting time to be alive.

With peace and goodwill to all.

Enjoy the day, Ann

Tuesday, December 11, 2018

Chinese Coins X Completes a Pair for Twins

This quilt is very similar to the previous one. I planned to gift it to siblings but friends expect twins soon. Perfect timing.

The quilts include many of the same fabrics but previous one has yellows on the outside while this one has blues. Also, I was running out of Coins {Is that even possible for me??} so I used the very last of the green leaves to extend shorter Coins to finish columns.

Chinese Coins X quilt

Again it's quilted using yellow and blue threads with the walking foot perpendicular to the Coins. Simple but effective.

Chinese Coins X quilting detail

The photo below contains glimpses of the backs and bindings of both quilts. All are from my stash and binding leftover box. I love the blue pebbles; there was enough for one entire back. The other has an old Kaffe with a sliver of those pebbles to make it wide enough. Another connection between this pair.

Backing and binding details for
Chinese Coins quilts IX and X

All this dark binding was already seamed and they make a lovely sharp edge.

Here they are after washing. As always, I like the way quilt crinkles when the batt shrinks in the {tepid water, gentle cycle} wash.

Chinese Coins quilts IX and X
after washing and drying

Fair warning, the quilts shrunk about 3-4 inches.

Chinese Coins IX and X quilts folded and ready to gift

Previous posts:
  1. Creating IX and X from leftover Coins
  2. Tops sewn
  3. Chinese Coins IX quilt finished
Quilt Details
Size: 38" x 40"
Design: Chinese Coins
Batting: Mountain Mist Blue Ribbon100% cotton
Thread: yellow and blue 50/2 Aurifil cotton
Quilting: walking foot SID and parallel lines

Quilted, bound, signed, washed, and blocked. In the mail tomorrow.

Enjoy the day, Ann

Tuesday, December 4, 2018

Chinese Coins IX Quilted

This is one of two similar quilts that were part of my Chinese Coin demonstration. Although they incorporate basically the same fabrics, they look {slightly} different. That makes them perfect for twins and I happen to know a family expecting some. It's time to finish these and gift them.

Chinese Coins IX quilt

Very simple walking foot quilting; parallel lines crossing the coins. I did SID between the columns and switched from yellow to blue thread to match the columns.

Chinese Coins IX quilting detail

Previous post:
  1. Using leftover Coins.
  2. Top sewn. 
  3. Starting the quilting.
Quilt Details
Size: 42" x 41"
Design: Chinese Coins
Batting: Mountain Mist Blue Ribbon100% cotton
Thread: blue and yellow Aurifil 50/2 cotton
Quilting: walking foot SID and parallel lines


Last week I attended Fern Royce's Working Small class at our guild. What a delightful day working on five techniques with an organized, friendly, and relaxed teacher. Fern sews improvisationally in different ways than I so it was a treat to learn new constructions techniques.

First we inserted a simple skinny curved strip {the middle sample.} Then we played with multiple skinny strips {on the left} and dancing squares {on the right.} All of these are small, no more than six inches wide.  One thing I learned was how much more carefully fabrics must be chosen when working so small.

Three samples from Working Small with Fern Royce

Additionally, I worked with these soft tans, something I haven't used in a while.

Fern teaches monthly at Bay Quilts where the work of her students is being featured this month.
Enjoy the day, Ann

Tuesday, November 27, 2018

French Clothing at the Getty Center

How do the holidays sneak up on me? I vaguely recall the years everything was finished during the summer which made Christmas a delight of visits, services, friends. Those days are gone. Now I am surprised when Halloween says, "Boo!" Then it's just a skip and a hop to Thanksgiving, Christmas, and New Year's.

With supreme smugness, I sewed several small tops this summer planning to create a stack of baby quilts. Well, I didn't quilt them and now... I need five. Fortunately they are small and should finish quickly.

Here's the first one under the needle.

Quilting Chinese Coins IX baby quilt

The Getty Center

Another post of the previous perfection before the fires. I'm using it as a respite from assembling kits to help survivors. Terrible as they are, there are other disasters worldwide. Let's all help our neighbors - those in our hometowns, across our countries, and around the world. Money is the best donation although we need to make sure it's going to reputable charities.

Anyway, back to LaLa Land.

Darling DH insisted we visit the Getty Center Saturday since he knows how much I enjoy this museum. It's on a hillside with great views of both LA downtown and the ocean... at a distance.

View of LA and the Pacific Ocean
from the Getty Center

We rode the bus to the base then took the free tram up to the museum.  {There's also paid parking but you still take the tram.}

It's very modern and open - white travertine and glass. We need sunglasses outside but the weather was lovely. Once you pass the entrance there are a collection of buildings with many terraces on multiple levels. Also gardens, outdoor cafe, indoor restaurant, fountains, statuary.

View of the Getty Center inside

J. Paul particularly collected furniture and decorative items. Not to imply there aren't loads of paintings but many of those have been added since his death. So after a leisurely survey of one exhibit, we went to lunch and then split up. DH chose to view Art of Three Faiths: a Torah, a Bible and a Qur'an displaying illuminated manuscripts while I attended a lecture on French fashion... for two hours. Fabulous!

Maxwell Barr brought a live model to demonstrate the craftsmanship involved in the daily wardrobe of 18th century French nobility. Starting as she arose in the morning, he worked through six changes of clothing. Along the way he discussed makeup - purchased at paint stores and applied with silver knives exactly like painting a canvas. Queen Marie Antoinette had the reddest cheeks; princesses next reddest, etc. Woe betide she whose cheeks were redder than her rank allowed!

The model dressed to receive company in her boudoir. Notice she wore a hat indoors.

Morning deshabille in 18th century France

Mr. Barr copied this luncheon ensemble from a painting which he showed on the screen behind the model. The fichu is only from the 19th century since they rarely last long. Her gown was definitely this short; they became longer as the day wore on.

Maxwell Barr explains details of dressing
for luncheon in 18th century France

Evening gowns were one basic style: a skirt short enough to display her shoes {because they had diamonds} then an over-robe that fastened in the front but also laced in back. The pleats in back are French style. English style was fitted in back.

Robe francais

Women's sleeves were constructed to keep their arms slightly bent. In fact, the seams would rip if straightened so servants {or an attentive gentleman} were required to pick up anything a lady dropped.

The live display was matched with slides as he pointed out the details of clothing and fashion. Details matched: prints, ruffles, length, etc. although the diamond buckles were now only paste.

Mr. Barr noted how the clothing blended or fit with household furnishings by showing photos of past exhibits that displayed mannequins in furnished period rooms. One of those was Dangerous Liaisons, a 2005 exhibit at The Met.

He emphasized this point with a photo of these mannequins in a modern living room. Very silly. I'd never considered how our furnishings match our clothing. While our chairs encourage slouching and curling up with feet on the furniture, theirs allowed women to sit while wearing panniers - wide seats and short arms. You know the style.

I hope you have an opportunity to hear him or another costume historian some time.

Enjoy the day, Ann

Tuesday, November 20, 2018

The Square Deal and the Venice Canals

While the outer border is not as blue as I want, it seems to be done. There are enough extra blocks to make one or two toddler quilts. It seems silly to continue making "slightly better" blocks and I'm out of that light blue that looks so good to me. Time to sew it up.

The Square Deal quilt in progress: working on the outer border

Before the wildfires, business took DH to LA and I tagged along for fun. The first day was spent wandering through the Venice Canal neighborhood. Built in 1905 to mimic the waterways of its European namesake, it originally included gondoliers singing in Italian for the tourists. However, most of the canals were filled in by the 1920s (voted by the city but costs paid by the neighboring homeowners) to allow cars. The few remaining blocks were saved because there weren't enough houses to cover the costs of infilling.

No gondolas now. It's all privately owned with one narrow street paralleling the beach that allows autos. Only a block from the beach and so, so quiet.

Here are views of the canals and their bridges. I especially enjoy the variety of homes spanning the past hundred years.
Venice Canals, Venice Beach CA

A few detail shots. Look at the wavy panes in the windows. And the balcony railing would be a good quilt border. Most of the homes had a small yard in front that included a dining room. How lovely to eat al fresco daily. There must not be many mosquitos; no screens.

Details of the Venice Canals

There's a charming fountain in the lower right photo. Loved the casual design with upside down flower pot base and copper spigot mouth. It made such a relaxing sound, too.

History of the Venice Canals can be found on this website.

Sorry this post makes the area appear pristine and perfect. Venice is about 20 miles from Malibu where lives and property have been lost in the Woolsey Fire. The worst fire in California is the Camp fire near Paradise. So many people have lost everything. Photos of the devastation frighten me more than hurricanes. Absolutely nothing left.

Enjoy the day, Ann

Tuesday, November 13, 2018

Bordering the Square Deal and the Grand Canyon

Liking the microdot inner sashing, I was ready to sew the center together but decided to make a Churn Dash of the innermost triangles. The first attempt included very narrow pink rectangles {no photo} but quickly grew to squares for more presence. The extra pink balances the weight of the Square Deal.

The Square Deal quilt in progress: working on the borders

With that part looking good I sewed on the mermaid inner border before going to bed.

In the morning the quilt appears too dark and/or heavy with four black crossroad blocks in each corner. Reducing that to two made it much better but there's another, larger problem.

Where did the blue blocks go? The yellow, green and pink blocks in the outer border make a decent contrast with the red ones but have little relationship with the center strips and HSTs. Looking back at my original layouts, the darker border adds needed presence while the light blues make the center sing.

The Square Deal quilt in progress:
working on the outer border

So now I'm reworking the outer border.  I'm not done but it looks better.

On to the Grand Canyon

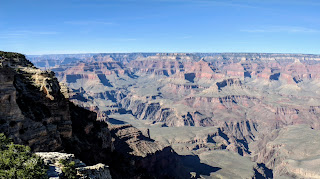
Despite a lifetime in geology, I'd never been to the Grand Canyon. So glad I made it last week, especially because it was off season {meaning the North Rim was closed.}

My visit started at the Desert View Watchtower. It highlights the Painted Desert  to the east and the beginning of the Canyon. Inspired by native art, the watchtower incorporated Pueblo designs and styles including native artwork on different levels.

The further west along the South Rim trail, the deeper the canyon and the more complex the carved channels. Eventually that appears to be all one can see. I never knew it was this size: 277 miles long, 1 mile deep, 3 miles wide.

Desert View Watchtower

Grand Canyon from Yavapai Point

Elk posed all over the park. While leaving a calf was casually nursing along the road but I couldn't get a photo. (S)he was so tall I doubt mom will allow that much longer. Two more cow elk from a harem of five grazed near the parking lot. The bull elk rested in the trees nearby.

Cow elk grazing near the
Grand Canyon Visitor Center parking lot

We're already planning our next trip. So much more to see.

Enjoy the day, Ann

Tuesday, November 6, 2018

Sashing the Square Deal

Once the center {minus one block that kept falling down} was arranged, I started laying out a border. The darker border seemed to make more contrast but a single round lacks weight. A second round on the right creates better proportions.

Starting a border around the Square Deal block

With that start in hand, it was time to think about the sashing and inner border. The inner and outer blocks are different sizes. About six inches is required to get them to fit together. Black was too dark {forgot to photograph}. I next tried some narrow strips of Chinese Coins. {Surely you didn't think the last baby quilt used up all those skinnies.} Now there's no contrast; this is not the solution. Finally I realized the white design wall was trying to tell me something. I cut some mermaids printed on white. All the strips are the same width {and a bit larger than necessary} while I consider whether they should be the same or different widths.

Testing sashing and border fabrics

Making borders and sashing of the same fabric doesn't thrill me either so a different white print was cut. It has blue microdots although it reads white here. After trying it as a border, I decided it looks better as the sashing between the four quarters of this block.

Then I added Crossroads blocks on three sides.

Laying out sashing and borders on the Square Deal

The quilt must be repositioned on the design wall to finish the fourth side.

In the meanwhile, my family and I attended the State Fair of Texas. We went every year while my children were growing so it was fun to introduce a new generation to the Fair. Events have changed. We still enjoy the trained animals, the milking contests, and the beautiful jewel-like jelly competition. We watched pig races and performing rescue animals.

Pig races at the State Fair of Texas
 
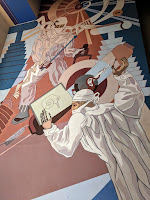
The murals dating from the Great Depression were restored a few years ago - ready for a new generation to enjoy.

Mural from the
Hall of Varied Industries,
State Fair of Texas

These umbrellas shading a lunch site are new. Colorful day and night!

Umbrellas shade a lunch area
at the State Fair of Texas

VOTE! It's election day in the US. I wonder how different our lives would be if everyone was required to vote like Australians. Much more emphasis on the center; much less from the fringes. It sounds good to me.

Enjoy the day, Ann

Tuesday, October 30, 2018

A Square Deal

Right before sewing things together, I found a huge flaw in my design: it would be just under fifty inches. Too large for a baby quilt and too small for a throw. This one feels like a keeper so it needs to be larger.

A double border overwhelms the small center {no photo} but increasing the block to a 16-patch makes it a bit larger without ruining the design. This works well for me. The layout works, the right scale looks good, and it adds eleven inches to the length. Two weeks later and I'm almost back to square one. Haha.

The Square Deal quilt block

In Jinny Beyer's Quilters Album of Patchwork Patterns, this block {without the strings} is called The Square Deal. It first appeared in the 1932 Kansas City Star. Was it named for Teddy Roosevelt's domestic program whose basic goals included conservation of natural resources, control of corporations and consumer protection? I'm not sure; however, anything that strengthens the middle class, reins in oligarchs, and protects our environment would be welcome to this day.

Work slowly continues on the sawtooth sashing for the New York Beauty/Rocky Mountain Road. Each uses twenty-one triangles. Currently I'm working on a few sets at a time so something is always "almost done." It's so depressing to work for a couple of hours and only see one triangle added to the overall lengths. Just a way to fake myself out.

Sawtooth sashing for
New York Beauty/Rocky Mountain Road

Enjoy the day, Ann

Tuesday, October 23, 2018

Maps, Sashing, and Humboldt County

When I'm uncertain how to proceed with an idea I just ignore the situation and work on something else that "needs to be done" so I feel like I'm actually progressing... but I'm not. My friend, Mel, laughingly calls it Productive Procrastination.

Somewhere the map from Valerie Goodwin's class devolved into ignorance and, despite my interest in map quilts I'm confused how to sew something other than a paper map re-creation, petrified of making a mistake, worried that the resources will dry up or disappear. As if I'd ever run out of fabric in my lifetime.

To avoid facing these issues, I've been sewing sawtooth sashing for the Rocky Mountain Trails/New York Beauty quilt. A good thing since they've been in a pile for a couple of years. With 38 complete now, I'm halfway through.

Sawtooth sashing strips

I finally forced myself to start cutting and sewing fabric for my first map quilt. Funny thing. As I sewed, the project became easier. Yes, there are mistakes places I'm not completely satisfied with my work; however, the top went together much more quickly than expected. And many new ideas are inspiring me to create more map quilts. Details of the map project are on AdHoc Improv Quilts.

With the map top completed, there was absolutely no quilting this weekend. Instead we visited friends in Humboldt County. First we drove through coastal redwood forests. Topping out near 400 feet, they are the largest trees on earth, grow in cool regions near the ocean from San Simeon north into Oregon, and collect much of their water from fog.

Humboldt Redwoods State Park: Founder's Grove

Taking a break, we walked the Founders' Grove loop at Humboldt Redwoods. It's less than a mile, very flat, and includes some of the largest trees in the park. The opening in this redwood is much taller than me; my outstretched hands couldn't touch the top. Inside the hollow extended two or three stories. How many people have sheltered in this cozy room over millennia? Top right is the root structure of a toppled redwood. Bottom right is the 346-foot Founders Tree. I never could get the entire tree in a photo. That sign is about two-feet high.

It was foggy and chilly. Temperatures on the road were mid-60s (17 degrees C) but dropped to the 40s on the trail. Brr.

Back in the car and on to Eureka where we toured the Dick Taylor Chocolate factory. This "bean to bar" chocolatier started when two carpenters read about chocolates on the way to a wedding. They purchase beans from several places to make single source chocolates. On the table are two cocoa pods with a roaster behind them. Afterwards they let us sample all their varieties. I liked the Belize but the others preferred Madagascar chocolate.

Dick Taylor Chocolate factory tour

With beautifully clear weather we took an afternoon harbor cruise on the Madaket, the oldest boat in continuous service in the US. It also contains the smallest licensed US bar. Don't you love all the qualifiers?  We saw several islands with numerous birds and sea lions.

Madaket harbor cruise ship

Sunday morning meant a trip to Los Bagels. On their opening day they had a problem with the bagel maker. Instead of bagel shapes, they got slugs - oval shapes with no hole in the center. They cooked those anyway, topping them with a mix of dried onion, garlic, and seeds which they named Slug Slime. They are a big hit to this day as well as a lesson to us all. Not every mistake is a disaster. Open-minded thinking can help us all reorient our results.

Los Bagels, Arcata CA

Enjoy the day, Ann