Friday, February 28, 2014

Steam Punk Blocks

Quilting

For years I've wanted to make an airplane propeller quilt. Is it because of the curves? Or because, having sons, I am always looking for masculine patterns? Or because my grandfather loved to take us to the airport to watch planes? Not sure; but it's perennially attractive. Jeannette Bruce of Gone Aussie Quilting posted an invitation to join the Steam Punk QAL Flickr group last year. And guess what Steam Punk looks like? Yes! A propeller. So I joined and thoroughly enjoyed all the fabric combinations everyone made but... I had so many UFOs to finish first. This week I've finally started.
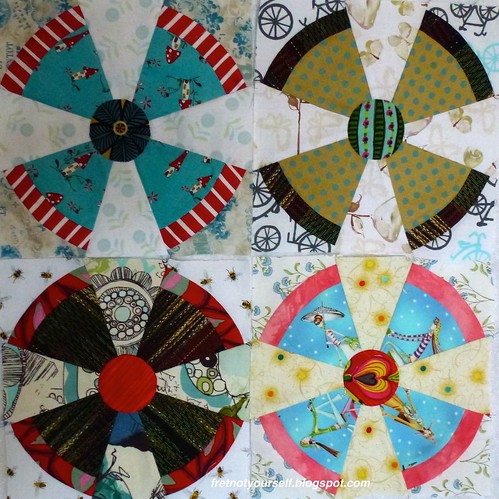
These nine-inch blocks resemble airplane propeller and are made with strongly patterned prints.
My first completed Steam Punk quilt blocks

The pattern by Australian Jen Kingwell came from Amitie Textiles. It arrived in the US less than a week after I placed my order. (Wow! Very quick.)

Then with unusual wisdom, I had a set of templates made by Rodney Shimogawa in Woodinville, Washington. His Etsy shop is Customplastic. What a meticulous craftsman! They are perfectly made with the template letter and a quarter-inch seam allowance etched on each thick acrylic template. And they arrived within a week, too! Honestly, I could rave for paragraphs about the templates. Why haven't I used them before? It just takes a small rotary cutter to cut around the curves.

My third super-smart idea was to order Bigger Perfect Circles by Karen Kay Buckley from Amazon. (I usually choose the hardest way. Can you tell I'm thrilled with all this uncommon brilliance?) The smallest template in this packet is the finished size of Jen's center, 2.25". So I cut the circles with the thick acrylic templates then I sewed a wide running stitch on my machine (everyone else does this by hand) and gathered them over the Perfect Circles. See this YouTube video by Karen Johnson for directions. And they are... perfect!

Here's what I learned sewing these first blocks. Curved pieces and odd angles mean the ends do not line up. If you're accustomed to squares this can throw you off. Pin liberally.

Sewing the propeller

1. Pin it! For the propeller, propeller edge and corners, fold the pieces in half and crease the center. Then mark with a pin and match the centers.

Mark the center of these pieces with a pin

2. Pin it! For each curve, pin the centers together first.

3. Then use a pin at the seam line of each edge. Notice that the fabric edges on the "straight" sides don't match up. They won't. Just make sure the corners of the seam line do.

4. Once you have a pin straight through the corners, use another pin to hold it in place.

5. Then pin halfway from each side and the center. Add more pins to help keep the back from pleating. I prefer to sew with the concave side down against the feed dogs and the convex side up. Do what works for you.

6. When both curves are sewn, gently press with a dry iron or finger press.

Pinning & sewing sequence from left to right.
Use the same process for both curves of the propeller edge.

Sewing the propeller to the background wedge.

7. The propeller and the background wedges are NOT the same angle so the ends do NOT match up. Pin it! Put a pin in at the sewing line of the propeller center and then through the sewing line of the background center. Look carefully at the arrow at the top of the photo below. There is a little "rabbit ear" where different angled pieces join.

8. Put a pin in at the sewing line of the propeller edge. It should be along the arc of the propeller edge. Then pin through the sewing line of the background edge. Look at the bottom left arrow to see very slight "dog ears"... not a long as the rabbit ear ;-). The top fabric in the example on the right is bent back a bit. Sorry.

9. Sew from center to edge to keep center from shifting.

Pin the propeller wedge to the background wedge.
Notice narrower width of the background wedge.

Sewing the propeller together.

10. Since the propeller and background wedges are different sizes, you can't butt the seams together when joining pairs.  (Yes, together they form a 90 degree angle but each one is NOT 45 degrees.) Pin the center seam line of one to the same point on another. Then pin the outside edge at the seamline. Notice they don't quite match up.

11. Add more pins to the side and sew from center to side.

12. Repeat for the other half of the block.

13. Finger press the seams in one direction.

14. Pin the centers at the point where the wedges meet. Then pin the edges. Sew from side to side.

Top left: Wedges are not the same angle.
Bottom left: Pin by matching seam line intersection points.
Right: Sew halves together, carefully matching center.

15. Unsew the middle inside the seam line and finger press in the same direction as the seams.

16. Press gently.
Unsew the center and spin it.
Press seams in one direction.

I hope this helps as you make these delightful blocks.

Edit: Here are two later posts. First a revised construction idea and next the finished quilt.

1. Having trouble sewing the block to size? Try this.
2. Finished Propellers and Planes quilt.

Enjoy the day!
Ann

Wednesday, February 26, 2014

Scrappy Trip 2

There were a few leftover squares in the scrap box; leftover colors, too. But I wanted to use them up, so I sorted by the number of identical squares... 8, 7, 6... Rows were chosen by which set had the correct number of squares. I wasn't sure how good it would look. But here it is.

A small quilt of nine Scrappy Trip blocks is bordered in pink and white.
Scrappy Trip baby quilt with mock eyelet border

Years ago I made a border like this and thought it might work here as well. I measured an old piece of eyelet to recreate a pink ribbon threading through it.

Eyelet Border design

Ideally the inner and outer strips should be the same width but I may scallop the edge. A wider outer edge leaves that option open while I decide. What do you think? Also I may make a bow of the remaining pink for the corners.

Here's the top without a border. Isn't it interesting how a simple border changes a quilt?

Scrappy Trip without a border

Enjoy the day!
Ann

Wednesday, February 19, 2014

Rayna Gillman Workshop Results

Oh, what a lucky break! Somehow I discovered that Rayna Gillman was speaking at the East Bay Heritage Quilt Guild in Berkeley last summer. Although not a member, I snagged the last spot in her workshop.

Blue, black, white, chartreuse and yellow fabrics are pieced into a blue-black batik to make this small quilt.
My quilt from Rayna Gillman's workshop, 24" x 22"

Rayna encouraged us to bring fabrics that had been languishing or that we found challenging. And I had a perfect example. My dear friend, Catherine, gave me this beautiful Java batik in yellow, blue, black and white. She'd stored it ten years but was never able to cut into it. Foolishly, I was certain I'd use it very soon. That was twenty years ago.

Original batik I wanted to use in the workshop

I finally cut a bit off but as you can see, I had no real vision of how to use it. I guess I thought I could place it wholesale on the design wall and mess around the edges. Hopeless! Although it looked wonderful in the morning (when no one else had anything up) by the end of the day it was a mess. Still, it was so enjoyable to watch other quilters develop their pieces. Isn't the interaction with others and the privilege of watching their creative process one of the the most stimulating parts of a workshop?

Modules completed at the end
of Rayna Gillman's workshop

At the end of the day I happily rolled it up, took it home and put it on the wall there. I cut up more fabric, moved pieces around but finally took it down. Then last week Bron encouraged me to bring the pieces over and lay them out again. This time I could see the problems - parts needed to come out, sections needed to be unsewed and the entire piece should be smaller. Reading the book helped.

So many more ideas are running through my head now that this one done. Even another idea involving the batik!

Enjoy the day!
Ann

Wednesday, February 12, 2014

Woo. Pig. Sooie! Another Finished Quilt

When my son attended the University of Arkansas I made a quilt in his college colors. In fact I made enough blocks for two quilts thinking the second set would work for a Razorback friend. Of course, he graduated several years ago but... (insert various excuses here.)

I finally pulled the blocks out again. Exactly 63. Most log cabin layouts have centered designs which use an even number of blocks. Where was the 64th? However, sixty-three makes a seven-by-nine quilt: off-center but appealing. It just needed a border.

Another year passed until I was ready to piece it. Gwen Marston's liberated variable stars looked like just the ticket to perk up this quilt. They were fun and relaxing to make since you don't worry about the star points. I like this one better than the first one. (Don't tell my son!)

Red and cream log cabin set in an off-centered barn-raising style with a border of red variable stars.
Razorback 2 quilt finished

The open spaces in the border gave me room to write the recipients' names, college, graduation year. My favorite is the college yell!

The Razorback yell, "Woo, pig. Sooie!" is embroidered on the border of the quilt.
Razorback yell

Here are the fabrics I considered for the binding: dark brown, white, tan with dots, dark red, black with white lines, and white on white.

Binding choices for Razorback 2

In the mail today. Off to the East Coast. Woo, Pig. Sooie!

Related posts:
Liberated Variable Stars
Block Piecing Tutorial
Ready to Quilt
Razorback 2 Quilt

Enjoy the day. Ann

Thursday, February 6, 2014

Razorback 2 Quilt: Log Cabin with Variable Star Border

I'm almost through with quilting! It's named for the University of Arkansas mascot since it's for a pair of alumni. While printed fabric doesn't show quilting as well as solid fabrics, straight lines on the red diamonds look great.

The feather is a new method for me. It's a gentle C-curve that just touches the previous feather and then it echoes back to the spine. It was very easy. While planning the stem I realized that any narrow design will work in that area. Since I FMQ spirals best I added those.

The quilting is a simplified feather of gentle c-shapes surrounding a stem filled with spirals.
Feather and Stem quilting detail

I chose Leah Day's FMQ Project Tangle of Lights for the border. It's more open than many free motion designs and the starlights complement the variable stars. The quilting is about the same density as the rest of the quilt too.

Free motion quilting starlights and loops in the border complements the variable stars.
The border is quilted with Tangle of Lights.
Notice the fine line of quilting that holds the
edge of the border in place.

Do you see the line of black thread at the edge of this quilt? It's helpful to stitch a straight line 1/16" from the edge of the quilt before quilting to hold the top in place so the edges don't catch on the presser foot. It keeps the border from developing tucks. I usually sew this in a matching thread but wanted everyone to see it in this photo.

Hopefully the binding will be done this weekend.

Enjoy the day!
Ann

Monday, February 3, 2014

Northern Elephant Seals at Ano Nuevo

Want to see elephant seals? Head to Ano Nuevo State Park on the Pacific coast between Half Moon Bay and Santa Cruz. Can you guess how elephant seals got their name? (See photo below.) Can you guess how the park got its name? (Spaniards, New Years, 1603.)

From mid-December through March Northern elephant seals come here to give birth, nurse and mate. I took a three-hour docent-led hike 2-3 miles over coarse sand and dunes 30-40 feet tall. Juvenile males frequently rest a mile or more inland while bull seals protect their harems closer to the shore.

This young male unsuccessfully attempted to 'get a little loving' from a loudly objecting female. She'd just given birth to the pup in the foreground. See that sand cloud in the background? Seals cool themselves off by flipping sand on their bodies. (Lots of sand flew the day I visited.)

A female elephant seal rejects the attentions of a young bull after giving birth to the pup in the foreground.
Bull, female and newborn elephant seals

Birds are the surest indicator of birth. They hover in anticipation of the afterbirth. Hey, it's very nutritious. (Yeah, yuck anyway.)

Seagulls fight over the afterbirth of elephant seals. Black newborn seal is in the foreground.
Seagulls signal seal birth

Males come ashore first and carve out territory. When the females arrive, the mature bulls fight to keep others away. This gives the females time to give birth although the pups may not be his. His reward? He gets first chance to impregnate the new mothers.

Why do females put up with this? Elephant seals have the most extreme dimorphism of any mammal. Not only do males develop a distinctive proboscis (nose), they grow to be two or three times as heavy. Successful birthing frequently depends on a dominant, two-ton male fighting off less patient juveniles.

Grizzly skull is significantly larger than the female elephant seal's but the male elephant seal skull is more than twice as large.
Grizzly bear skull on the left compared
with female and male elephant seal skulls on the right.
Grizzlies have molars to chew their food; seals don't.

The females nurse their pups for 28 days then head back to sea to eat and rebuild their fat reserves. (Except pups, no one eats the entire time they are ashore so seals can lose 40-50% of their weight.) They mate before leaving shore but delay impregnation until they regain their weight. Eleven months of pregnancy but only eight months gestation.

Scientists track elephant seal movements, recently even adding transponders near their jaws to determine when and what they eat. (Mainly small fish.) Like moose, the sexes separate after mating with males following the coast north to the Aleutians and females heading straight west as far as the International Date Line. Doesn't she look like she has a headache? I was glad to realize these devices are only temporary.

Dozing in the sand, this light brown female has transponders glued to her head and back which will come off when she molts in the summer.
Transponders glued to this female will come off when she molts in the summer.

Enjoy the day! Ann

Tuesday, January 28, 2014

Flying Squares Quilt

Although the center of a traditional Flying Squares block is background fabric, I made my quilt from some six-inch nine-patch blocks traded with friends. The traditional center would have more sense of movement. To change the nine-patch to a flying square I simply added a 8-by-2" rectangle and a 2" square to each side with partial seaming. Many people have already posted directions for partial seams; just Google it.

Flying Squares blocks made of light and medium prints on muslin with a border shading from light to dark Crazy Ann blocks
Flying Squares quilt

The border is a block named Crazy Ann (which seemed very appropriate!) The windmill effect of the stars adds to the sense of flying.

There's an inner border of muslin and two-inch squares to maintain the floating effect of the blocks. But that meant the corner blocks had to be slightly elongated. I drafted those on graph paper. Sorry, the sketch is now lost.

Detail of quilt  with Flying Squares blocks made of light and medium prints on muslin with a border shading from light to dark made of Crazy Ann blocks
Detail of Flying Squares

This is still one of my favorite quilts. I love the vintage feel of pastel-to-medium prints on muslin and the parallel line quilting.

Enjoy the day. Ann

Wednesday, January 22, 2014

Finished Border for Trip Around the Block

Alternating with the variable stars, I've been piecing the border for my Trip Around the Block quilt. I think it's worked out very well, too. Lots of starts and stops with hexagonal blocks but it was a good challenge. Since the quilt is so large this is just a portion showing the mitered corner.

Multi-colored quilt in a Trip Around the World variation; narrow green and black inner border; larger outer border of stars with braided black and white fabrics.

Sandwiching will have to wait until the previous one is quilted.  Perhaps next week.

Enjoy the day. Ann

Saturday, January 18, 2014

National World War II Museum, New Orleans

Everyone knows about Bourbon Street and the French Quarter in New Orleans but we went somewhere different this trip. The National World War II Museum was founded by historian Stephen Ambrose, author of Band of Brothers. It currently encompasses three huge buildings on Magazine Street. I thought it would be a collection of military memorabilia we'd look at for half a day. Boy, was I wrong.

There are loads of planes, tanks, transports, weapons, uniforms and medals representing both Allied and Axis artifacts.

Silver American planes from World War II. Painted white stars inside blue circles on the wings; red wingtips and tails, yellow tips on the propellors.
Overhead view inside the Freedom Pavilion

Some are unexpected. For example, the odd-looking white capsules near the right turn sign in the photo below are German bomb shelters.

Large, monolithic buildings of battleship grey stone and tempered glass house the Victory Theater and large exhibit halls at the World War II Museum
View of more buildings from the main entrance
to the National World War II Museum.

Mr. Ambrose interviewed thousands of veterans and survivors of the war. (A friend of ours related his interview lasted four hours. He thought it would take half an hour.) These oral histories are the strength of the museum. They provide the textual explanations of the displays. Some written but the most moving are audio.

There are floors of exhibits that fluidly intersperse artifacts with large dioramas, interactive maps and small rooms where personal narratives and photos are available at the push of a button. One was a discussion of the end of the war which included opposing viewpoints by veterans of the US and Japan.

Diorama showing grey ships and planes heading to the beaches of Normandy for D-Day. So closely packed one could "almost walk from ship to ship."
Diorama of a small section of the D-Day landing.
To scale except this is only 1/40 of the width!

We saw two 4D presentations: Beyond All Boundaries and the USS Tang.

Replica of the USS Tang with light blue walls and grey floors, periscope mounted in the center, various gauges and meters attached to the walls.
USS Tang presentation

The staff and volunteers are extremely friendly and helpful. I can see why this is the premier attraction in New Orleans. We reluctantly left at day's end... after the third call for closing.

Enjoy the day. Ann

Wednesday, January 15, 2014

Variable Star Border Attached and Ready to Quilt

I just finished these liberated variable stars with a variety of reds and whites/tans to make the stars sparkle. They make a delightful border for an older top. What a perfect pick-me-up!

Log cabin blocks composed of red and cream rectangles for the center. Variable Star blocks of many different red fabrics on cream and white backgrounds for the border.
Liberated Variable Star border

Sandwiched during the commercials of the football games this weekend.

Enjoy the day. Ann

Saturday, January 11, 2014

Scrap Back for a Quilt

Every quilt needs a back which takes lots of fabric and gets expensive. Using tiny scraps is more frugal but can add so many seams that quilting becomes difficult. I usually pull some older fabrics from my stash. I prefer to incorporate some extra pieces from the top or from previous quilts. I've always made backs this way, even when everyone else put muslin on the back. I think of it as "creating jobs for future quilt historians." They'll have twice the fabric to document and date. ;-)

The back of this quilt includes extra diamonds and strips from the front. The pieces are small but in a limited area. The back of Road to My Sister's House is an enlarged block from the front. None of the green fabrics was large enough and this solution let me use them all. The size of the green squares maximized the scraps remaining. Then the sashing width was calculated to fit the back properly. (It was easier because the quilt is square.)

Occasionally I have long, skinny pieces trimmed from the sides of another quilt back than can be seamed into a strippy back. (I'll look for a photo.)

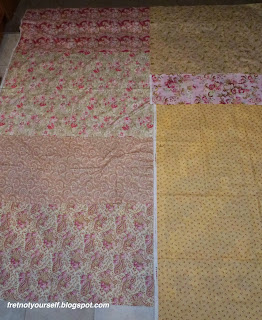
This time I pulled fabrics that have been languishing for quite a while. The front has lots of reds, whites and beiges so I first chose soft pinks and beiges for the back. Most are half or quarter yard width-of-fabric (WOF) cuts. These are laid on the quilt top to ensure there's enough fabric to cover it. But the darkest beige in the first set of fabrics is about five inches too narrow.

Quilt back layout #1

I found a quarter yard of pink floral to replace it.

Quilt back layout #2 - with pink floral

There was also a pink plaid in the stash.

Quilt layout #3 - pink plaid

Then I remembered a tiny bit of cowboy faces on red. How would that look? I had to piece the fabric with some red strips to make enough for this section.

Quilt back layout #4 - cowboy fabric

Now the left side of the back is too quiet. I pulled the remaining face fabric - cowgirls this time.

Quilt back layout #5 - cowgirl & cowboy fabric

Once the layout is finalized I piece it. This one is very easy. Cut the selvedges off. Sew the fabrics into left and right panels and then sew them together.

Keep in mind it's easier to baste the quilt sandwich when the back is at least four inches larger than the top. This quilt is about 70 inches wide while the back is 82 inches wide. The extra width will make a skinny strip I can use on a future back.

Enjoy the day. Ann

Tuesday, January 7, 2014

San Francisco for New Year's Eve

We went to San Francisco for a short New Years vacation. California has good public transportation so we rode Caltrain into the city then switched to a streetcar for a short hop to the hotel.

In addition to cable cars, San Francisco uses a collection of vintage streetcars. The original date and location where it was first put in use is documented on each car. I have to say, the conductors are very patient and pleasant.

After unpacking, we strolled down the Embarcadero with bicyclists, unicyclists and scooter-riders. So many people, pets and wildlife out enjoying the perfect weather! This was my first time to have Dungeness crab. It's currently in season and so delicious.

Coit Tower pierces the blue sky to the left of the Transamerica building. Buses, cars and many people are visible in the foreground.
Coit Tower and the Transamerica
building from the Embarcadero.

Dark brown harbor seals rest on wooden pontoons while white and grey seagulls perch on the pilings as a large black and red cargo ship sails into San Francisco Bay
Seals, seagulls and ships 

Afterwards we took a pedicab back to the hotel where we watched the fabulous lights on the Bay Bridge over coffee. The ever-changing lights danced all night long. Crowds grew in the streets as the evening wore on but we had the best seats for the fireworks show at midnight. They are staged from barges in the Bay near the Ferry Building. Glorious!

The LED lights on the cables and supports glow against the dark sky and waters of San Francisco Bay. A yellow and green streetcar passes along Embarcadero Street in the foreground.
Lights on the Bay Bridge... and a streetcar below

Enjoy the day. Ann

Wednesday, January 1, 2014

Block Piecing Tutorial: A Method to Maintain Order

I enjoy making scrap quilts. The seemingly random arrangement of fabrics interests me and I love the depth achieved by using fabrics that don't quite match. We are so much smaller than a quilt (no matter how large we think we are.) Mismatching colors in clothing looks weird most of the time but adds so much dimension to a quilt. When I work on blocks like the variable stars I take time to arrange the lights or darks in ways that add sparkle.

Sometimes, however, I lay out a scrap block in a particular order only to sew the wrong sections together. It's so annoying. Here's a way to avoid this problem.

1. Lay out the block as you'd like it.

Nine 2.5-inch square patches of red and cream are laid out to form a star
The nine patches of this variable star block are laid out as I intend to sew them.

2: Chain piece pairs of squares from the columns starting at the top left. Place the top left and middle left pieces right sides together and sew. Repeat with top middle and middle pieces, chain piecing them to the previous pair. Repeat again with the top right and middle right. Do NOT cut between these three chained pieces but cut after the third (right-most) one is sewn. (This is where I'd sew an ender to keep the thread from tangling.)

Three pairs of red and cream squares are sewn together on a Bernina sewing machine with thread linking the pairs into a chain.
Chain piecing the two squares from each row.

3. Finger press seams to opposite sides and open.

Layout of red and cream nine-patch block showing three pairs of squares sewn with chain piecing intact between them.
The first two squares in the first two rows are sewed
and the thread is still chained between them.

4. Now chain piece the next square in each column to the previous sewing. Place bottom right piece to the right section, right sides together and sew. Repeat with bottom middle piece and middle section, chain piecing them to the previous set. Repeat again with lower left piece and left section. Again, do NOT cut between the chained pieces but do cut after the third one is sewn. (Sew another ender.)

Red and cream squares of a nine-patch are chain pieced into three columns to maintain the order of the pieces.
Chain piecing the bottom squares
to each column.
Ender #1 is in the background.
 
5. Finger press seams to opposite sides and lay open. The block is linked by the sewing thread you didn't cut. Everything should be in order.

Three column of a block are chain pieced together to maintain the order of the squares.
Two sets of chain piecing completed.
(Sorry, the columns look like rows
so you can see the chaining.)

6. Place left and middle columns right sides together butting seams and sew. Sew an ender. Cut.

Two columns of three red and cream squares each are sewn together to in the penultimate step of making a Variable Star quilt block.
Sewing two columns together.
Notice how chains hold the
third column in place on the left.

7. Repeat with last column. Sew a fourth ender. Press and admire.

The final column, chain pieced to the main section, is ready to be sewn to the nine-patch block.
Two columns sewed.
Ready to sew the last column.

The block is now sewn in order. Yea!

A variety of red fabrics create a star on the cream and white background of a Variable Star block.

This method works for any block that breaks down into squares such as four-, five-, seven-, nine-patches. And did you notice I sewed four enders making this one block? That's how I get so, so many scrap blocks finished {which is both a blessing and a curse.} Do you have questions? Let me know.

Wishing everyone peace and joy throughout the New Year.

Enjoy the day. Ann