Wednesday, May 29, 2013

The Woman Who Knew Too Much


Here's an another example of how misguided I can be. Years ago someone wanted to trade these blocks in a fabric combination I knew would look terrible. But she was a good friend so I made a few, planning to piece the top and quietly give it to charity. Well, it looked much better than I thought. Changing my mind, I kept the top and donated something else. Oh, darn; there were only enough blocks for the center... because I knew so much.

Scrap quilt using black background florals and solid pastels.

It took a while to collect a variety of solids and even longer to find black background florals but I persevered. Colors kept getting brighter so the border fabrics are stronger than those in the center. Then there was a problem with the inner border. Nothing seemed to work until... We moved across country; my new friends wanted to dye fabric. Everyone else's looked fabulous; mine looked like five dirty dishrags. I knew it! I saved them even when we moved back to Texas where I finally hauled this top out determined to finally finish it.

When I can't figure a quilt out, I get all my fabric and successively pin it near the problem. I knew commercial solids and hand dyes didn't work well together. Good thing I followed my habit because the dishrags looked great. But none had sufficient yardage to make a border. So I pieced them. Where one fabric got mushy and dirty-colored I picked another hand dye and made little four patches to transition them better.

Using four-patches to soften change from one fabric to the next.
Dishrag lavender to dishrag peach

Adding the inner border meant the outer border needed to be a bit larger. Squares of the black florals in the corner solved that issue. Serendipitously the corner of each square blends with the other points! Lucky me; the top was finally completed.

The blocks are from Princess Feather and Mountain Reel Quilts by Nancy Daniel. It was one of the first designs for rotary cutters and it's an easy pattern. (This is not the quick cut Delectable Mountain. The light side is larger than the print side of this block.)

Fret not; enjoy the day.

Ann


Saturday, May 25, 2013

Part Piece/Part Applique T-shirt Block

Like Goldilocks and the Three Bears, some t-shirts are too large, some are too small and some are just right. The "just right" ones are easy; you know what to do. But what about the others?


If they're too small, use several to make one block. I sandwiched three narrow logos below. After each is stabilized with fusible interfacing, cut them generously. Because they are so thick I use a half inch seam allowance when sewing two knits together. Trim the new block to the correct size afterwards.


It's really fun when they are too big! Piece and applique the shirt. Draw the normal finished size on the back with washable marker. Then sketch where you want the seam around the extended part. Carefully cut the normal (pieced) section with its seam allowance and hand cut around the extension (applique.) Pin to the sashing and sew as much of the block as possible.

Piece the rest of the quilt as usual including the other blocks, sashing & posts. It will look like a regular top except for some unsewn places. Press the top.


Carefully cut the shirt to the end of the sewing line.

Cut carefully to the point where the sewing line ended

Turn the quilt so the top faces up. Gently pull the unsewn portion to the front and pin in place.


Check that the quilt is flat. Check again! Machine applique the t-shirt flap to the sashing using zig-zag or blanket stitch.

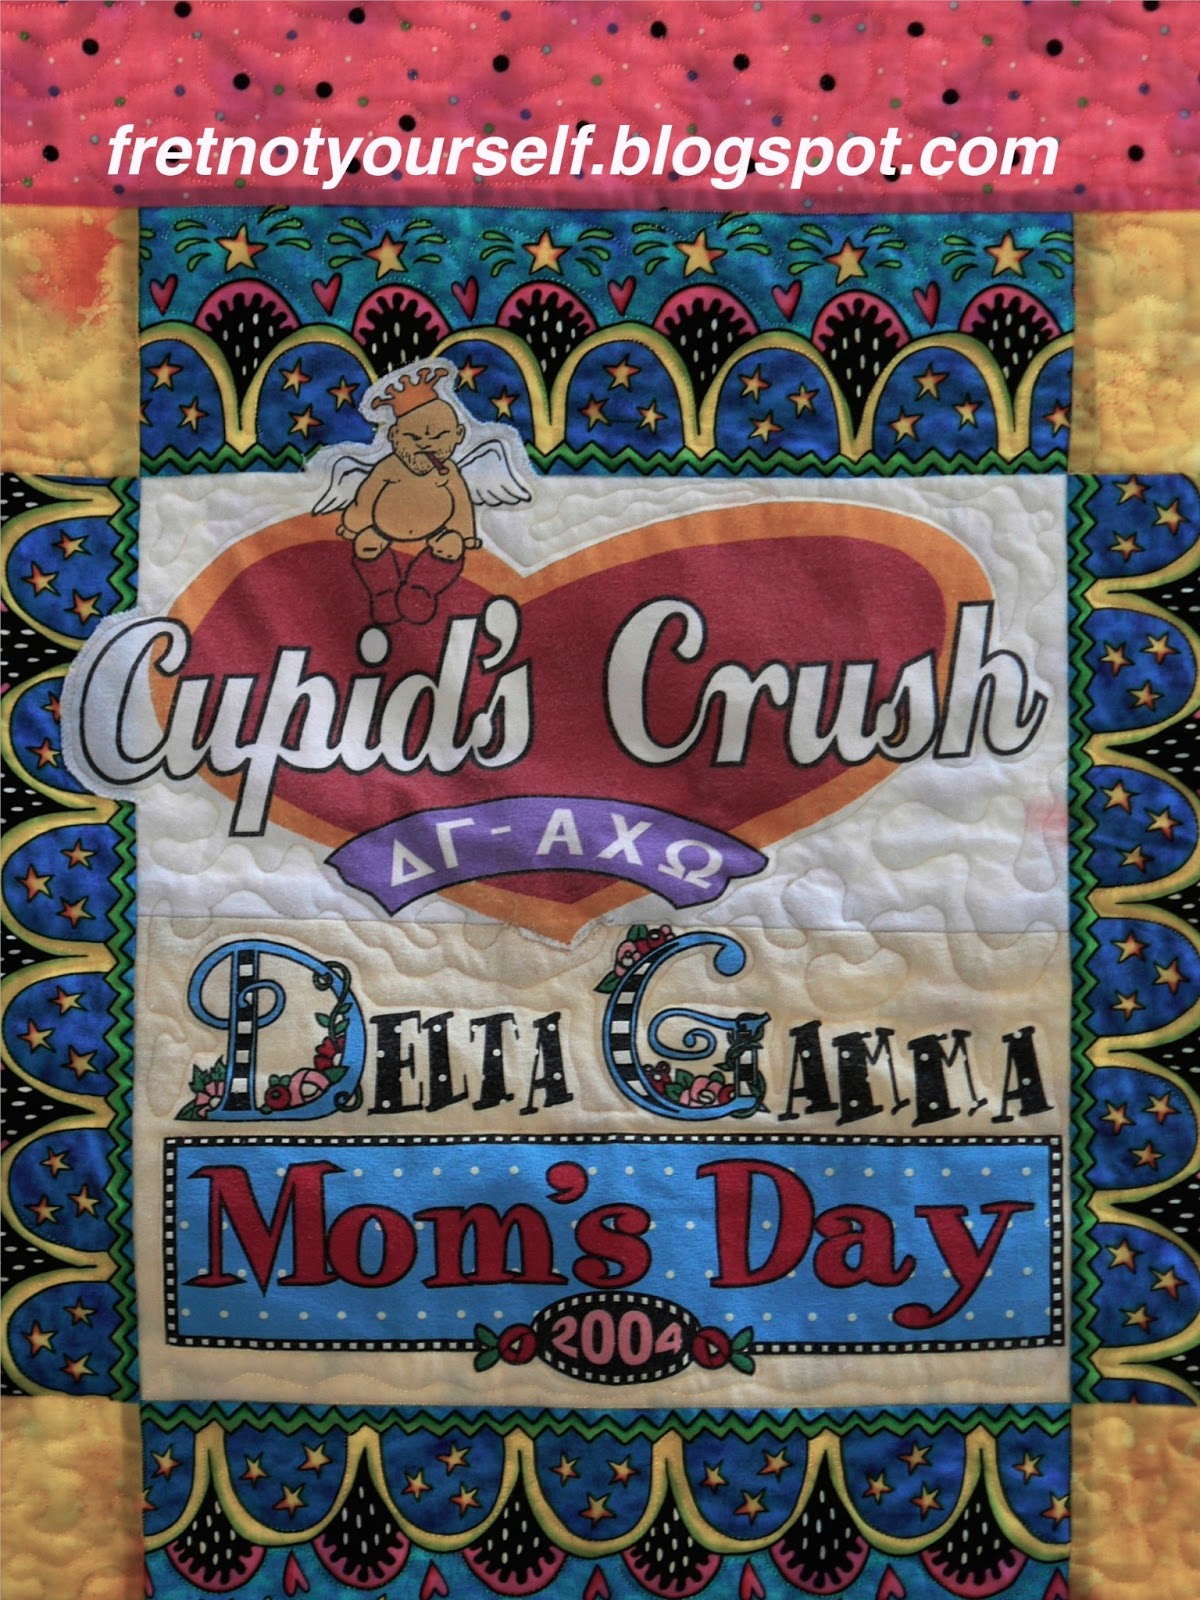
A little of both? The photo at the top contains my two favorite shirts. This grumpy, little, cigar-chomping angel always makes me laugh. Since both designs were narrow I sewed them together. But look carefully. The heart point is appliquéd into the top of the Mother's Day shirt. Then the angel is appliquéd to the sashing. Double the fun.

I'd love to see what you create! Let me know if you use this idea.

Fret not; enjoy the day.

Ann

Wednesday, May 22, 2013

Baby Bibs

While recuperating from a cold earlier this year I meandered through blogs, clicking links with abandon. Such lovely new colors! Such clever ideas! Such detailing!

Although some of my stash will never make it into a quilt, many are remnants from finished projects. What a joy to glimpse a snippet from a previous quilt; like visiting an older relative. How could it ever be out of style when it evokes such happy memories?


Amy at NanaCompany posted a baby bib pattern and tutorial here. Her work is so delicately refined; quite unlike my boisterous fabrics. But the pattern was perfectly sized for my remnants although I didn't add her ruffle. Maybe next time. I backed mine with terrycloth as she suggested. Now I have a stack of baby presents ready to go!

Fret not; enjoy the day.

Ann

Saturday, May 18, 2013

Watermelon String

I wanted a red and green quilt that looked like watermelon. Having learned string piecing from Diane Rode Schneck, I pieced these on a muslin foundation. What a juicy summer quilt! Except the weight of muslin and all the strings makes this one of my heaviest quilts. Fortunately the back is a red Rose and Hubble print whose fine threads and tight weave feel cool on the hottest days.

String quilt of green and red fabric strings.

It's strictly a complementary color scheme; there is no value difference between the reds and greens as you can see.  Although it started with scraps I combed my stash and finally some quilt shops for enough reds and greens. By the time the center was completed I knew it needed some grounding. White rind or black seeds?  I chose the seeds.


The strings of the inner blocks run parallel and the blocks are ten inches finished. The seeds are 1.5 inches. In order to fit the border properly, the outer blocks finish eleven inches. Just to change things up their strings run perpendicular.

Point to point quilting with walking foot
Border quilting detail

The straight line V's in the border were fun to quilt. I marked the center turning point with pins and 
used a walking foot. In the center of the quilt are vines, spirals and some straight lines. I hope you can see them in the photo below.

Free motion quilting fills space between point to point lines.
Center quilting detail
Fret not; enjoy the day.

Ann

Wednesday, May 15, 2013

Log Cabin Has Left the Building

Thanks for the input on the binding. Red is my favorite but I finally decided to use something different (for me, at least.) The green shows up, sets off the blocks and was fun to use. I particularly like this shade of green; it seems friendly. The sawtooth border really finishes the quilt... and it used up a bunch of extra triangles from Ocean Waves. How wonderful is that!

Log Cabin quilt with half-inch logs and a sawtooth border.

With such narrow logs, the seam allowances are half the width of the logs. Consequently the quilt is fairly thick. I used a light batt (Mountain Mist Blue Ribbon Cotton again) and quilted each log. It should take a lot of (ab)use and frequent washing - and it will need to. It's a Grandmother Quilt, a special quilt for a friend to use when her new grand-baby visits.

Signed & dated in half-inch high zig-zag
Fret not; enjoy the day.

Ann

Saturday, May 11, 2013

The Road to My Sister's House


So you weren't scared off by the wild braid in my last post? Here's what I made from those ugly fabrics. It's a personal story about my youngest sister.

Simple cross blocks combine with printed braid sashing and pieced border.
The Road to my Sister's House quilt

The class designed with the smallest squares in the morning. After lunch we cut rectangular crosses, sashing and posts to build on our stories and layer texture into our quilts. How amazingly everyone's quilt improved, especially mine! Cutting the braid the length of the fabric kept consistency along each sashing. Limiting the width highlighted its inherent motion. To me it represents the tire tracks of all those long drives. Those incredibly loud oranges became the flower centers surrounded by orange and yellow petals. (Printed circles are very useful that way.)


I added borders the following week. The inner border used all my African fabric. (It spoke to me at first sight it but had never found a home.) Again, I just played around putting fabric near the quilt to see what looked right. The outer border x's and o's represent the letters we send and the love we share. Complete o's were too static; partial o's look better. However, I quilted the phantom parts in.

The back enlarged the pattern on the front to keep it interesting.

Quilt back of enlarged blocks repeats the design from front of quilt

Fret not; enjoy the day.

Ann


Wednesday, May 8, 2013

Is Ugly Fabric Contagious?

Sue handed me some fabric one day stating, "We don't use this stuff in New England, but you're from Texas..." Backhanded compliment? Downright slam? I didn't care. The colorful pattern sang to me; I knew just what to do.

Three years later I returned to Texas with unused fabric in tow. Why hadn't I made the quilt dancing in my head? Then the Quilters Guild of Dallas offered a workshop with Sue Benner - the perfect time to get it done! In Sue's class we all used the same quilt layout but brought photos and fabrics to translate our personal vision. In the morning we took turns showing them. Everyone else previewed gorgeous batiks in sumptuous colors to a chorus of oohs and aahs. Silence fell when I showed the braid and these orange slices I picked up in a Ben Franklin sale bin.


Sue encouraged us to design a story with the small squares. At the time my youngest sister lived in a ski chalet on a dude ranch just south of Rocky Mountain National Park. (What a tough life!) Her balconies overflowed with flowers and vines. My small squares made a picture of the final mile of the road trips to her house.

New to the guild and engrossed in the process of transferring my feelings to a quilt it was lunchtime before I realized I was the only person with a table to myself. This is one way to get lots of room in a workshop.

Come see what I made with this next time.

Fret not; enjoy the day.

Ann

Saturday, May 4, 2013

Progress on Scrap Log Cabin

The border is finished - little triangles left from Ocean Waves and this project. I love to run out of fabric and keep the scrap bag small!

With so many logs (and seams) straight line quilting seemed the best choice. Originally I'd planned to stitch diagonally but then remembered an antique log cabin with spiral quilting. Each block is quilted in a squared off spiral to the center. I started with the outer (longest) log and worked in until each log was quilted once. If I'd started on the inside of the outer log I would have caught the seam allowances better. This way may be more dimensional.

Next is binding. Here are my choices.

Binding choices: Green1, yellow, green2

Binding choices: Red, green3, brown

Red is a perennial favorite but I'm leaning towards green3. The bits of red, yellow and white in the print look good with this quilt; it's dark enough to wear better with a toddler too. What do you think?

Fret not; enjoy the day.

Ann

Wednesday, May 1, 2013

Scrap Log Cabin

Scraps are such a mystery. How do so many accumulate? Why do we save them? What can we do with them? Occasionally I think it would be fun to have one way to handle scraps. Always cut squares... or rectangles... or triangles. Truthfully though, I'm too fickle.

My newest crush is cutting one inch strips for log cabins. The finished logs are one half inch wide. Wanting a scrappier look, I have them in various stages so identical fabric is placed in different rows from block to block.  I also try to avoid the same fabric progression from one block to the next.

Log Cabin block, Sunshine and Shadow set

The Value Finder helped sort fabrics. Lights are very light (8-10) but the darks range well into medium (1-5). Working with some of my strongly patterned fabrics was challenging. Sometimes I had to wait until a quiet scrap appeared before adding the next row. Some busy fabric never worked well. Some worked in shorter logs where I could fussy-cut around a big value change. Some fit in surprisingly well just as they were.

For example, in the lights at the top is a beige print with a cowboy on horseback. If I'd placed it closer to the darks, i.e., on a smaller inside log, the darks would have "crept" into the lights and the block would have lost its diagonal. On this long strip near the outer edge of a block, it adds some color (that is technically too dark) but the overall area still reads as light.

The lights also contain a variety of pastels - blue, purple, green and bright yellow. I worried they might overpower the lights in some way Finally I made most of the outer light logs from prints with beige or white backgrounds. Halting the pastels logs before they touch the next block seems to make them twinkle.

I'm still pondering the quilting design but leaning towards diagonal lines. And I need a small border.

Fret not; enjoy the day.

Ann

Saturday, April 27, 2013

Ocean Waves Away

It's done! Putting it in a show was the incentive needed to finish Ocean Waves. This is one of the few quilts  I've made without a border. It looked odd at the show but looks great on the bed.

Queen-size Ocean Wave quilt with green,blue and tan scraps.

There are no photos from the beginning of this project but I started with lots of light blues, pinks and greens. Eventually I found this fabric in my stash which seemed to have many of the colors 'She Who Wore White' wanted.

Fabric (by Fabric Traditions) used for binding & color selection.

All the cut fabrics were placed next to it. Any (but not all) that didn't look good in this new color scheme were discarded. Then I added medium and dark blues, teal, greens from yellow-green to blue-green, darker browns and a few mustard, rusty orange, purple and black. Fabrics didn't have to match but they had to blend with the others. The lights run from white to tan. I like how the bright whites "pop" - something unexpected. Almost every print style is included: Civil War, 30's reproductions, baby fabrics, batiks, modern, stripes, plaids, geometrics, florals, etc. No solids, although some may appear to be.

Pebble quilting on muslin
Pebbled quilt edge

Feather quilting on muslin
A section with lighter triangles

With so much muslin on the front, the back had to be muslin to prevent shadowing. This is my first time using a wide fabric (108") for a back. I doubt I'll ever do it again. Although it is nice to have no seaming, it didn't have the same the quality. Ocean Waves drew up more than other quilts I've made. The top was 102" but after quilting it's 98". I'm uncertain if the cause was the thread, the backing, the construction or the heavy quilting. On previous quilts I've tried everything except the wide backing so perhaps the looser weave on the backing caused some of the shrinkage.

I free motion quilted with white YLI 100 weight silk on top and beige Soft Touch 60 weight cotton in the bobbin. These fine threads require shorter stitch length. (Thicker thread need larger designs and slightly longer stitches.) Make samples before starting.

Fret not; enjoy the day.

Ann

Wednesday, April 24, 2013

Writing with Thread

When you want to write on a quilt, try thread writing instead. No need for a label; no need to worry that the ink will fade; this will last as long as the quilt.  I usually thread write after the quilt is sandwiched so I don't use stabilizer. Here are four ways.

A. Use the programmed alphabet on your machine. Punch in your name and the date to sign the corner. Try it on a scrap piece before stitching on the quilt to make sure the letters and spaces are entered in the correct order. Make sure your quilt has room to move with the stitching; feed dogs are up with this method.

B. Sew in cursive using a narrow free motion zig-zag stitch. This is my favorite way to write on a quilt. I do not try to satin stitch; I just want a thicker line than a single row of stitching. Unlike the programmed stitches, this can be as large as you like or as small as you're able to write.

Zig-zag with white Aurifil 50/2 cotton thread.

Want the words to stand out? Use contrasting thread. My favorite is Metler Poly Sheen in neon green (5940), neon yellow (501) or neon orange (1306). (These are the numbers on my current spools; check with the manufacturer.) The colors may sound awful and look harsh on the spool BUT... they aren't neon on your quilt and the zig-zag writing is readable.

Metler Poly Sheen threads.

Zig-zag with neon green thread.

Zig-zag with Metler neon yellow thread.

C. Recently I found the Graffiti stitch on Leah Day's Free Motion Quilting blog. The echo stitching is what makes this writing show up at all. It's another good way to sign your quilts. For an understated look, match the thread to the fabric.

Straight Graffiti stitch.

D. If machine writing isn't your style, try hand embroidery. Check out this very informative tutorial  How to Make an Embroidered Signature at Pretty by Hand. Kristyne's color combinations are a treat for the eyes and the workmanship is inspirational.


What could you write on a t-shirt quilt, or any quilt for that matter?
  1. Nicknames
  2. Names of family, friends, pets
  3. Classes, activities, frat/sorority, clubs
  4. Band, sports & instruments/positions played
  5. Names of moves: wrestling holds, cheerleading jumps, chess moves
  6. School name
  7. Religious organizations
  8. Offices held
  9. Honors earned
  10. Class year
  11. Major
  12. Mascot
  13. Lyrics
  14. Code phrases, cheers, chemical compounds
  15. Poems, haikus, quotes
Fret not; enjoy the day.

Ann

P.S. Paul Burega commented about thread writing on his quilts. He posted a photo on his blog A Dad who dyes fabrics and quilts. Click to see his photo. It looks great with the softly waving lines surrounding it.

Saturday, April 20, 2013

Nine Patch Snowball

Last year I began cutting a few project remnants into 2.25 inch squares. But by the time there were enough I was in a machine quilting funk. My sketchbook was boring; I couldn't quilt designs I'd previously mastered. I wallowed in this misery for a week. Boring, tiring and non-productive.

Google searches led to Leah Day's Free Motion Quilting Project. Making small samples didn't appeal. Finally I realized I could make a nine-patch snowball quilt which would:
  1. Use up scraps
  2. Have small areas similar to Leah's samples 
  3. Give me a warmup piece to practice on before moving to larger quilts AND
  4. Finish a quilt for the ready-to-go stack.
Cheerful pastel and medium prints on white. Border creates stars for nine-patch snowball quilt.
Nine-Patch Snowball Scrap Quilt

How to make this quilt:
  1. Cut 353 squares 2.25". Use the Value Finder to sort the squares by value, keeping only lights and mediums (Gray Scale 9-4.) Darks go back into storage. 
  2. Randomly sew 225 squares into 25 nine-patch blocks. Don't make x's or o's. 
  3. Press seams to the center (because the snowball seams press out.)
  4. Cut muslin into 24 squares of 5.75 inches each.
  5. Take 96 colored squares, turn them over and draw a diagonal line on the back.
  6. Pin to each corner of a muslin square and sew along the drawn line. 
  7. Flip and press towards the corner; make sure the colored square (now a triangle) reaches the original muslin corner. Then carefully cut the excess muslin & colored part underneath leaving a quarter inch seam allowance.
  8. Lay out blocks alternating nine-patch and snowball. Match seams and sew. (The seams won't butt each other because they have different angles. Pin the intersections well.)
  9. The border is simply a row to finish the "stars." Cut 28 muslin rectangles 5.75 by 2.5 inches and 4 muslin squares 2.5 inches. 
  10. Take 32 colored squares and repeat step 4.
  11. Pin and sew two colored squares to each of 16 muslin rectangles as shown on the quilt. Since the muslin is slightly wider, the squares won't reach all  the way to both sides.
  12. Press & trim the excess from the rectangles as done in step 6.
  13. Lay out border alternating rectangles with colored triangles & plain rectangles. Put muslin squares in the corner. Sew.
  14. By cutting the border muslin slightly wider, the star points finish 1/4"before the edge of the quilt. Now you don't have to bind exactly to those points. Let it float a bit! Easier.
Step 5
Pressed snowball block


Step 6 (second part)
Additional information: I made this completely from scraps but if you need to buy something, here's the yardage I calculated.

  1. 1 yard muslin for the top
  2. 1.125 yards for the back (it's 41' by 41")
  3. 0.33 yard (12 inches) for binding (quarter inch double fold)
  4. 1.375 yards assorted scraps for the squares and triangles

Wouldn't six inch blocks be easier? Perhaps. However, this quilt finishes just under 41 inches, so the back can be made from one width of fabric. With six inch blocks it would be 46.5 inches.

After sandwiching and pinning the quilt I used the walking foot to ditch stitch the block edges and quilt diagonal lines across the surface through the colored squares. Only the muslin areas were unquilted. Every morning I chose a different design from Leah's website and sketched it by hand a few times before quilting one of the muslin areas. Warmed up, I'd move to Ocean Waves. This baby quilt was completed in about a month and only took that long because I just quilted one design a day.

Over that month my quilting improved and I finally created my own designs on some of the blocks.

Tree Bark design from FMQ Project 

Swirling Petals design from FMQ Project


My Baby Owl design (in the border this time)
Three varying sketches as I worked through ear tufts, eyes and beak.

From the "Can't Do" whine to the "Happy Dance" hooray. Thank you, Leah, for sharing your expertise so generously. It's finally linked to the FMQ Friday here. 

Fret not; enjoy the day.

Ann

Wednesday, April 17, 2013

Pretty in Pink T-Shirt Quilt

Here's a young friend's t-shirt quilt. Since her drill team was named Red Jackets, red was the obvious choice for the sashing or border. Wrong. She wanted pink only. All that pink needed some separation so I added a narrow inner border. But even that black fabric has small pink dots on it.


In addition to t-shirts, this quilt has part of her team jacket, a pocket from band practice shorts, the logo from a ball cap and the poodle from a dance costume. Anything washable can be included.

Ball Cap Logo

Practice shorts pocket (top right) & Poodle with leash
Fret not; enjoy the day.

Ann