Tuesday, July 23, 2019

Well Basted; Finally Finished

This quilt was basted two years ago. At that time the sashing was SID but I never could decide how to quilt it. Finally I hung it neatly alongside some tops where it remained until this week. Enough! Propellers turn so they make spiraling air currents and that's a good enough design.

The more I fret about quilting, the more I try to "match" it to the fabric prints. So I considered tracing those large circles, small daisies, and wavy lines. Too constrained. Too many thread changes. The spiral looks cleaner and more effective.
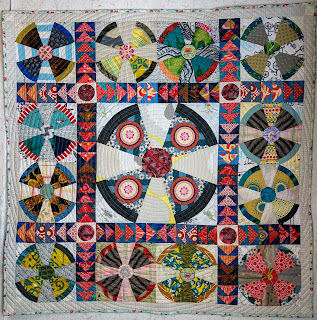
Baby quilt with two sizes of airplane propellers and orange flying geese on dark blue sashing.
Propeller baby quilt

The only problem was the center of the spiral. It's very hard to turn the quilt smoothly in such a tiny radius. I have used FMQ in the center and switched to the walking foot when the circle was larger but it's hard to enough keep the spacing the same with one foot. It's almost impossible with two different feet. Marking a spiral wasn't a good option this time because my marking pens blended into the print.

Because the diameter was too small for a walking foot, the original quilting in the center is not well aligned.
Original spiral quilting
in the center is not well aligned

I resewed it by simply following the printed design of the center. The spiraling starts at the edge of the center circle. The lines still have some irregularities but those are much less obvious.

Center is re-quilted by following the print with a walking foot and transitioning to a spiral when the diameter is larger.
Center is quilted by following
the print with a walking foot

Then I pulled fabric for the binding. Lots and lots of fabrics. Red, blue, light blue, grey, white, striped. You name it; I tried it. Most were too harsh. The pale grey striped border called for a light- colored binding. Here are three of my final ideas. The black at the bottom made a very severe line as did all those strong blues and reds. I liked the grey and yellow but preferred the soft blue with orange-red flowers... even though it looks like a 30's reproduction print. It ties to the center better.

Light blue, yellow, and black prints are laid out as possible bindings.
Binding choices for Propeller baby quilt

The back is a soft twill-like weave in baby pink that was a bit wider than normal so it didn't need piecing. I wish I knew the name of the weave. It drapes beautifully; not a bit stiff like my idea of twill.

The light blue print makes a quiet binding that does not compete with the quilt blocks.
Binding detail of Propeller baby quilt

One more detail photo. Without realizing it,  Propeller baby quilt is a small exercise in scale change, too. Woo-hoo; invitation met - even if it is a bit late.
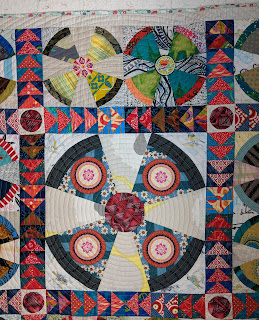
The large center propeller block has four fussy cut blades with medallions. It is surrounded by orange flying geese on bright blue as sashing.
Propeller baby quilt detail

Previous posts:
  1. Leftover blocks
  2. Designing the top
  3. Basted and ready to quilt

Quilt Details
Size: 44" x 44"
Designs: Airplane Propellers and Flying Geese
Batting: Mountain Mist 100% cotton
Thread: Gutterman 50 wt cotton, grey on front, pink on back
Quilting: SID and Spiral with walking foot

Enjoy the day, Ann
Tuesday, July 16, 2019

Is the Tethys Waves Quilt Top Finished?

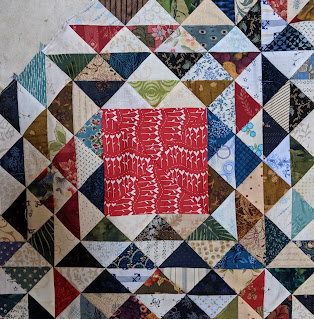
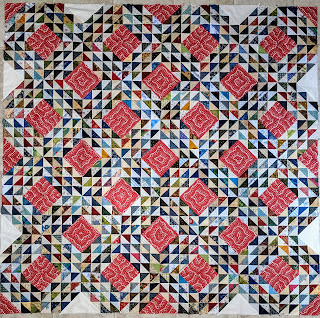
I'm uncertain whether I like this top or not. These are all the red triangles. After testing several other red fabrics I thought a cream solid looked best to fill in the missing sections. Now I'm not so sure.

Small HSTS in blues, reds, greens, golds, and creams surround the large red and white print squares
Tethys Waves, an Ocean Waves quilt top

Perhaps the cream should have been an inner round? Or perhaps it should be dark? Would applique help? Does it need a narrow cream border? I will ponder this for a while.

Meanwhile, DH and I saw the Van Gogh exhibit at the Houston Museum of Art. It was the last week and I was determined to make it. And I’m glad I did. So much in exhibitions has changed for the better. The layout made the show as much a biography, travelogue, and art history lesson as a simple art exhibit.

The curators enlarged several of van Gogh’s sketches and placed them, along with large aerial maps in each room to highlight the different areas Vincent traveled while painting. BTW, did you know he only painted during the last decade of his life and still left over 900 works?

Enlarged sketches by Vincent van Gogh cover many walls and highlight his creative journey
Enlarged sketches by Vincent van Gogh
highlight his creative journey
at the Houston Museum of Fine Arts

The exhibit brought together complimentary sketches and paintings like this pair of Montmartre.

A sketch and a painting of the same view of Montmartre by Vincent van Gogh
Sketch and painting of Montmartre
by Vincent van Gogh

It highlighted his friendship with Paul Gaugin who visited Vincent in Arles where they set frequently set their easels side by side as each painted the same scene or model. For example, Portrait of a Man (Joseph-Michel Ginoux?) by van Gogh is believed to be the proprietor of the Cafe de la Gare in Place Lamartine, Arles. A photocopy of Gaugin's painting with the same name was included on the information card. Although at a different angle, it is the same man in the same clothes with the same lime background.

The cafe owner wears a formal suit and is painted on a lime green background.
Portrait of a Man (Joseph-Michel Ginoux?)
 by Vincent van Gogh


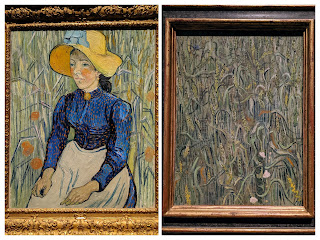
Van Gogh considered wheat a symbol of life. He used it repeatedly as the focus and background of his portraits of peasants such as this pair.

A peasant woman with a straw hat and a blue dress sits in a field of wheat in the painting on the left. On the right is a painting of a similar field of wheat.


As you all know, van Gogh was repeatedly entered an asylum near the end of his life but continued to paint there. I think The Garden of the Asylum at Saint-Remy is my favorite in the exhibit for the movement of the leaves and his masterful use of black outlining.

Two collaged photos show a portion of the painting and a detail of the brushstrokes.
The Garden of the Asylum at Saint-Remy
by Vincent van Gogh

Mel Beach's Summer Lovin' projects, with their black thread outlining and writing invoke a similar feeling in fabric.

Enjoy the day, Ann

Tuesday, July 9, 2019

Still Sewing

Sewing continues although I see little progress. {Sigh.} However, I do like the way the triangles twinkle. It's the mix of mediums and darks that causes it. It just takes a bit of careful placement so the lightest of the darks is still darker than the surrounding lights. Make sense?

Here's an example of a light green surrounded by several cream triangles.

One scrap quilt block with a large red and white print square in the center.
Ocean Waves quilt in progress

The same green fabric appears again next to one of the red diamonds but this time it's next to a darker light... much closer in value to the green than the creams above. This green won't twinkle as much because the neighboring value is so close. At least, that’s what I think.

A detail view of four blocks sewn together.
Ocean Waves quilt in progress

The San Jose Museum of Quilts and Textiles is currently exhibiting H2OH, a SAQA member show juried by Linda Gass who gave a lecture one evening about how she approaches her art. Linda made a second career as an artist focusing on water resources. Her beautiful work combines silk fabrics, hand dyeing and machine quilting as she interprets maps of various areas of concern.

Front and back views of the soft sculpture. The front is a woman's head.The back shows the view in her mind of a child with a yellow inner tube jumping into a pool
Memory of Water by Susan Else

This three-dimensional sculpture intrigued me most - Memory of Water by Susan Else. It looks like wood but it's all fabric. Growing up in Sacramento, Susan remembers that water was free and wasted. Great fun for a child but a sorrowful memory of an adult.

On another note, I saw this picture at a San Francisco hotel. It glittered in the light so at first I thought it was a diamond painting like Julie's been making recently.

The portrait is made of painted Phillips head screws with subtle variations of height to enhance the image.
Art made of screws

A closer look revealed it's made of screws, attached at different heights and painted single and double colors.

Enjoy the day, Ann

Tuesday, July 2, 2019

Tethys Waves Quilt in Progress

About the time the first Ocean Waves quilt was laid out, I had an epiphany. Just combine both triangles in one quilt. The concentric triangles are in the center with a round of perpendicular ones circling the outside.

Quilt pieces laid out on the design wall for form an Ocean Waves pattern.
Tethys Waves quilt top in progress

And it has a name. The Tethys Sea existed during the Mesozoic Era but modern remnants include the Mediterranean, Black, Caspian, and Aral Seas. Since many of these scraps are both ancient and reproduction, Tethys Waves sounds like the perfect name.  At least it amuses me.

But there's a problem I constantly forget... Once all the design decisions are made, there is nothing left but to sew the units together. Tethys Waves is many, many tiny QSTs.

Two collaged photos show sewing progress on the Ocean Waves quilt blocks.
Tethys Waves quilt in progress

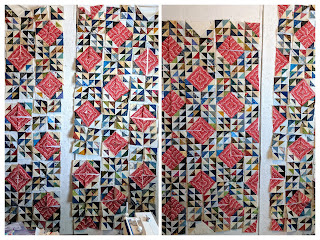
When the first units were sewed and laid out it looked so neat. "Almost done!" I thought. But no. I match more points and pin. Sewing sections together dislocates them from the next section. I have to put them back on the wall to ensure I'm sewing them correctly. And I added some cream triangles on the border so all the red triangles are used... which just makes more sewing. And I unsew the intersections at the back to allow them to spin. And I press carefully without steam because of the bias edges.

Two collaged photos show more progress in construction of the Ocean Waves quilt top
Tethys Waves quilt in progress -
only ten more seams to go

And  all I want is to be done. Sigh.

Enjoy the day, Ann

Tuesday, June 25, 2019

Ancient Ocean Waves

Not in the scrap bag {where I frequently toss leftovers.} Nor in the drawer that holds extended projects {that actually get forgotten most of the time.} These little HSTs were hiding in an old shoe box at the back of the closet. Truth to tell, I knew a box was sitting with the shoes but was surprised to find three boxes. Go figure.

How did I get so many? Well, several people hinted quite strongly that they'd like an Ocean Waves quilt after I made one for DD. Somehow I started using lots of darker blues with lights. I do remember not having many white/beige lights and eventually cutting up some reproduction fabrics. And that's where I lost interest. At least a decade ago.

Julie mentioned putting a "Discard by" date on her leftover scrap packets. I need to commandeer that tip.

Anyway, I pulled these out determined to use them up this week. Here are the four fabrics I considered for the centers. I like the bunnies but they seem to clash with the reproduction fabrics. The taupe is lovely, too. Probably not the best choice for a baby quilt though. {Actually I'm uncertain how well these dark beauties will make into a baby quilt at all.}

Four possible centers: cream, red, blue or brown print.
Possible centers for Ocean Waves scrap quilt

In the end I went with the red print. Then I cut it wrong. Grr. Instead of cutting long strips and subcutting the triangles from that {you know, so all the lines run the same direction} I foolishly cut them into squares and subcut into QSTs. Now half the lines go across and half run perpendicular.

So I have a small quilt like this...

The blocks are arranged on the design wall in a straight set.
Ocean Waves quilt block with red centers, straight set

And another like this, which is the one I wanted. The wavy lines on these red triangles make them look like roses. But it will be small.

The blocks arranged on point on the design wall.
Ocean Waves quilt block with red centers, on point

I'm pushing forward anyway. It's past time to move these scraps to a finish.

The final chapter of The Golden Thread discussed this fabulous cape by Peers and Godley. Gold and gorgeous, it debuted at the V&A Museum which is currently exhibiting a definitive Dior show.

Enjoy the day, Ann

Tuesday, June 18, 2019

Chinese Coins with Rabbit Baby Quilt Finished

Spiral quilting is successful. After considering another centered spiral for this quilt, I chose to use concentric circles here. I've done it before. Instructions on how/where I started are at the end of this post from 2015.

Narrow Chinese Coin columns are sashed with solid pastels. A narrow black border and a wide green and yellow striped border frame the quilt. The silhouette of a rabbit in a large floral print on white sits in the bottom right corner.
Chinese Coins with Rabbit baby quilt (CCXIV)

It much easier to start with a gentle quarter circle starting halfway down one side and then echo quilt along each side than to try to echo from a tight corner. When you look closely, it's obviously not marked. I simply eyeballed a width based on the foot. Those wobbles are not visible in the overall photo and will disappear even more as the quilt is washed, used, and loved to pieces.

Concentric quarter circles are quilted starting at the top left corner of the quilt
Chinese Coins with Rabbit
baby quilt (CCXIV) detail

The back is a collection of blues. Not quite as dull as this photo shows. Again, the narrow border was stitched-in-the-ditch first to keep it nice and straight.

The back is a collection of four different blue prints.
Chinese Coins with Rabbit
baby quilt (CCXIV) back

Here's a closeup of the bunny. The large floral print looks like Spring. It was fun to use fabric that is not realistic. {I'm such a stick-in-the-mud, I usually try to match real items with their real colors.}

The folded quilt shows the  of rabbit on the front, portions of the back, and yellow print binding.
Chinese Coins with Rabbit baby quilt (CCXIV)
detail of rabbit and binding

Looking through the binding strips, these yellows worked best. I even pulled some choices from my stash to see if anything worked better but the quilt says, "Enough. Give me a soft, low-key edge, please."


Quilt Details
Size: 41" x 43"
Design: Chinese Coins
Batting: Mountain Mist 100% cotton
Thread: dark and light blue Gutterman 50 wt cotton
Quilting: Stitch in the Ditch and spiral quilting with walking foot

I am still reading St. Clair's The Golden Thread and finished the chapter on Vikings last week. She writes about the longship discovery at Gokstad which I think Kaja visited last year although I can't find her post. She had some great photos.

 Kassia also mentions Ibn Fadlan who I recall from Michael Crichton's novel Eaters of the Dead. The title sounds more gruesome than the book really is. Published in the 70's, it mixes Ibn's journals with the story of Beowulf. I remember the first two chapters were difficult to read as he wrote it in an archaic transcript; however, it then switches to modern language which made it much more easy and interesting. Michael added addendums to his early novels that listed his sources. Oh, how I loved to research those. 

Enjoy the day, Ann

Tuesday, June 11, 2019

Chinese Coins with Spirals Quilt

Wasting no time, I spiral quilted this Chinese Coins baby quilt. It one went more smoothly due to for repeated {recent} practice.

Narrow Chinese Coins are sashed with soft tints of yellow and orange solids. A narrow black inner border and a wide yellow and white stripe frame the quilt. Three spirals of magenta shot cotton are  appliqued on the surface.
Spiral Chinese Coins baby quilt (CCXIV)

The quilting enhances the appliqué spirals although it required a few extra pins to keep the fabric flat. Even though I tried, those appliqués stretched the background fabric a bit although those improved with practice, too.

This photo highlights the spiral quilting in the center and part of one of the appliqued spirals.
Detail of Spiral Chinese Coins baby quilt (CCXIV)

The back shows off the quilting better. Why is that? It also shows the SID on the inner border.

Four orange prints form the back of the quilt and the spiral quilting shows up beautifully here.
Back of Spiral Chinese Coins baby quilt (CCXIV)

Any wiggling of narrow borders is extremely noticeable so I always SID those first in a color that matches the border. You can't see it on the front...

The border and the various orange prints used to bind the quilt are shown.
Detail of Spiral Chinese Coins baby quilt (CCXIV)

but it's visible on the back.

The stitch-in-the-ditch around the inner border and the spiral quilting show clearly on the back of the quilt.
Detail of back of Spiral Chinese Coins baby quilt (CCXIII)

Can you believe this is the fourteenth Coins quilt I've made in this series? I can't.

Quilt Details
Size: 41" x 42"
Design: Chinese Coins
Batting: Mountain Mist 100% cotton
Thread: Black and variegated yellow Gutterman 50 wt cotton 
Quilting: Stitch in the Ditch and spiral, both with walking foot

Previous posts:
  1. The Chinese Coin columns that didn't work and the sashing strips {because this one was made from the narrow columns of the same foundation as the Square Deal baby quilt.}
  2. Chinese Coins with Tulips
  3. Adding the spirals
Enjoy the day, Ann

Tuesday, June 4, 2019

A Gifted Deal

Quilted, bound, washed, and dried. These darling blocks made a {fairly} quick quilt for a new baby. It went in the mail and arrived before the new dad's paternity leave ended. Whew!

HSTs of strings pair with red, orange, and pink solid triangles to form The Square Deal block in the center of this quilt. It is surrounded by a narrow turquoise inner border and a wider print of colorful triangles.
The Square Deal baby quilt

As frequently happens, I nearly drove myself crazy with the quilting. It needed to keep the quilt together and hold up to rigorous use. Additionally, it needed to be simple with a minimum of starts and stops. Burying threads is such a time consumer.

The inner border is SID with matching thread. This is my usual way to keep the line straight through all the subsequent quilting.

After asking my small group, I determined to try a squared-off spiral. It was a disaster. Not only were my "straight" lines wobbly, they were also too far apart. In desperation I switched to a regular spiral. It didn't seem like it would work well but I was wrong about that, too. It looks great. Yes, those curved lines are wobbly but I bet you can't tell!

This shows part of the center, both borders, the pink binding, and the spiral quilting.
Detail of the Square Deal baby quilt

The main back fabric was too short and too narrow. A bit of another blue lengthened the base and the last of the border fabric widened it. The spiral shows up so much better on the back.

The back is composed of a large floral on light blue extended with a quiet blue print. A remnant of the wide border from the front cuts across these fabrics dividing the sides about a third of the way across.
Back of the Square Deal baby quilt

I've used this design twice before, but it's been a while. The first time on the Neutral String baby quilt and later on Spiderweb 3.  I like it and plan to use it again. Echo quilting is one of the few designs that shows on patterned fabric. Spirals are a version of echos.


Quilt Details
Size: 40" x 40"
Design: Original
Batting: Mountain Mist 100% cotton
Thread: Blue and peach Gutterman 50 wt cotton
Quilting: Stitch in the Ditch and spiral, both with walking foot

Previous posts: 
1. The Chinese Coin columns that didn't work
2. Making HSTs
3. Playing with HSTs
4. Square Deal block
5. Using the extra blocks

I borrowed The Golden Thread by Kassia St. Clair, a collection of stories about fabric through history rather than a history of fabric. Thirteen chapters cover pre-historic cave dwellers through the Space Age astronauts and include several stories, each beginning with a literary quote involving thread or textiles. That alone is worthwhile. Kassia writes fluently and persuasively; she based this book on some of her magazine articles. 

The cover is printed with the title and author and embellished with loops of golden thread.
The Golden Thread
by Kassia St. Clair

All in all, The Golden Thread is much more interesting than the news programs so I will be check her other book on color next.

Enjoy the day, Ann

Tuesday, May 28, 2019

Queueing up the Quilting

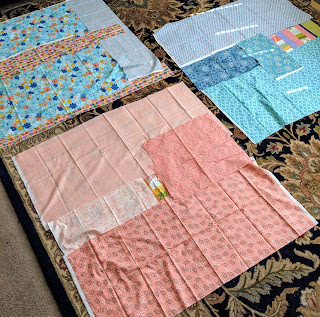
Three new tops are ready to sandwich once the backs are sewed. I've found it easiest to lay the top on the floor and cover it with fabrics until the back is large enough. Sometime I'll make a back like Julie's. What a great way to dress up the back side of a quilt. But not this time. After I sew them up, I'll spend the day pinning all of these plus the Chinese Coins with Roses top. All four will take one queen-size batt and I won't have to worry about storing a partial batt.

Three small tops are laid out so backing fabric can be properly sized. The fabrics are grouped by color to create monochromatic backs in blue or peach.
Designing three quilt backs

I'm keeping the Roses because I've been asked to show my guild how to make them but the baby quilts are all promised. I'd still like to have some finished ones on hand. I'll have to look through the bin again. Surely there are more partial blocks hanging around.

In the meantime, it's been flooding in Houston and Dallas. Fortunately my traveling has been on the dry days because you definitely want to stay inside in these downpours. Then we went to Oregon for a graduation. Precipitation accompanied that trip.

My brilliant idea was to go to Crater Lake on the way up. We've always wanted to see it; the Lodge just opened for the season. We drove past Klamath Lake, the largest fresh-water body in Oregon. It's the geologic remnant of pluvial Lake Modoc which was ten times larger and formed about 10,000 years ago during the last Ice Age. {Pluvial lakes form when temperature rises near glacial regions.}

A view from the highway running along the east side of the lake shows the train tracks, the grey water, and the lowering clouds.
Klamath Lake on a cloudy day

Bits of snow hid in the shade as we entered the park but it was waist high by the time we got to the Lodge which sits at the rim of Crater Lake.


The lobby of the lodge has rustic rocking chairs and easy chairs as well a wooden staircase to the second floor.
Crater Lake Lodge

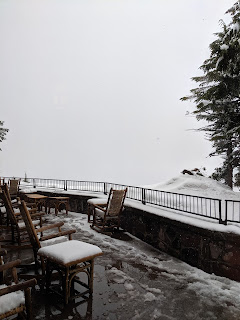
And then it started to snow.

The view from the deck is completely shrouded by falling snow. It's piling up on the deck chairs and tables, too.
The deck at Crater Lake Lodge

We were told this is a wonderful view of the Lake... if hadn't been snowing. We are {allegedly} right on the edge of the lake. Not that we could see anything. Neither the near nor far side.

Still, we enjoyed touring the Lodge and reading about it's reconstruction. And we hope to return on a more auspicious day.

The sun broke out as we crossed the border so DH took a photo of Mt. Shasta. Another future trip.

View of Mount Shasta against a bright blue sky.
Mt Shasta

Enjoy the day, Ann

Tuesday, May 21, 2019

One More Sashed Chinese Coins Baby Quilt

This is not the last of the Chinese Coins from the "top that didn't work" but it's the last of the pastel solids I cut. Why, oh why do I always overcut? These baby quilts are heading to children in different cities so it's {a bit more} acceptable to have similar layouts. Ok, I'll admit it. I gave into temptation to move them out because they are cute, easy, and the right size. Less thinking required.

The inner border is navy, not black, and the border is a fun green and yellow stripe I purchased in abundance because stripes are great for borders and binding. But the quilt looks unfinished.

Five narrow columns of Chinese Coin strips are each sashed with a different solid pastel cotton. They are enclosed by a narrow black border and a wider green and yellow striped outer border.
Chinese Coins with sherbet sashing quilt (CCXIV)

What can I applique on it? What about tulips? The two Coins in the center row with printed tulips gave me the idea. Plus those rows of them looked so good on the first quilt like this. Audrey's Scrappy Tulips is a stellar example of the flowers running through my mind. I almost made them but then wondered if they would clash against the Coins background. Also, the center doesn't bother me as much as the boring border.

What about rabbits instead? Sue Garman designed Bunny Block Sampler, a charming quilt with running hares around the border. Unfortunately my border is too narrow to hold rabbits.

A silhouette of a rabbit made with a large scale floral on white is appliqued in the lower right corner of the quilt.
Chinese Coins with sherbet sashing quilt
and an applique rabbit (CCXIV)

Eventually I chose one upright rabbit that fits well in the corner. The template is here. I tried to draw my own rabbit. My folk-art ones are not too bad but they were either too small or too large; I could never get them just right. This one is more realistic and... I'm not an artist. Besides, I wasn't sure if this would work at all.

I traced it on a white print, turned the seams under and machined stitched it with an overlock design. Not too bad for a first attempt. Success built my confidence. I believe I can hand draw my own designs in future. Several ideas are running through my mind. {Breeding like rabbits.} Hooray. Practice with a known design is building my creativity.

Enjoy the day, Ann

Tuesday, May 14, 2019

Chinese Coins in Yellow Baby Quilt

As I wrote recently, I haven't felt very creative lately; I still don't. Sewing is relaxing but making all the decisions for a new quilt overwhelms me. Working on leftovers, extras, and older projects fits my abilities for now. Plus, they are {finally} moving along. {Go, team, go. On the floor and out the door.}

Case in point: If you recall Chinese Coins XII, made for my co-grandmother, started with columns from a Coin that didn't work. Adding sashing makes a few Coins go a long way so there are still loads of these columns left. As you would expect, I cut several extra WOF solids strips, too. How easy to sew them into another baby quilt.

At the end of last year I had five baby quilts; now they are all gifted. Nothing in the queue and DH's co-workers are still having babies!

This time I pulled the yellows and ochers. The yellow and white stripe sets them off well, especially after  the strong inner border was added. It looks as if these fabric purchases were planned but that is not the case. Buying fabric at one time for a quilt usually is a recipe for disaster for me.

As Audrey wrote recently, it's much better to pull from different years and brands. Making things work that aren't dyed to match gives me so much pleasure. After all, when all the decisions are made, there's nothing else to do but sew them up. That may be why we have so many UFOs. All the creative parts are done and we're left with the chores of sewing, pressing, and trimming.

scrap quilt with yellow and ocher sashing
Chinese Coins in Yellows (CCXIII) baby quilt

However, compared to Chinese Coins XII, this top seems unfinished. It lacks the snappiness the rows of tulips gave the previous quilt. What to do?

The spirals in the border gave me the idea to add spirals in the center. They are black so it was my original choice but when the fabric was laid on the quilt, anyone can see it's too severe. Back to the stash where I pulled this marsala shade of shot cotton. Much improved.

Possible applique fabrics for
Chinese Coins in Yellow (CCXIII) baby quilt

With only a ten-inch WOF, I cut it on the diagonal and made two bias strips to put through bias tape makers of 9- and 12-mm. Pinned on the top, they are much too small and insignificant.


It either needs a larger spiral or many more small spirals. I've never had much luck sewing strips together and putting them through the bias tape maker. They always pooch out where the seams join. Shot cotton is very thin so I decided to try it again but didn't have confidence it would work. Wrong-o. No trouble at all.

One larger spiral of 12-mm bias tape pinned on the quilt scales better.


"This is just a baby quilt," I kept repeating but the tiny spirals looked too ... tiny. Eventually I replaced the narrowest one with new, large 12-mm spiral. Then I left it on the wall for a couple of days.


scrap quilt with yellow and ocher sashing and marsala spirals
Chinese Coins in Yellows
with Spirals (CCXIII) baby quilt

I like the mixed spiral sizes {and I liked not having to replace the third} so I sewed each side of the spirals down. The inner end is tucked under the spiral; that wasn't difficult. The outer end had to be turned; that took a while. Obviously I need more practice.

detail of Chinese Coins in Yellows
with Spirals (CCXIII) baby quilt

The thread ends need to be pulled to the back and tied. And look. Those aren't spirals in the border; they're concentric circles. Someone needs new glasses.

Enjoy the day, Ann
Tuesday, May 7, 2019

Using the Extra Blocks

I didn't intend to reprise The Square Deal so closely but, while clearing up, four sets of HSTs already sewed into nine-patches surfaced. They surprised me so I dug around extensively but didn't find any more. These are the last of this combination and I need several baby quilts. Soonest! So here we are, choosing between two very similar white prints for the center cross: frogs in a pond or sea creatures.

Comparing two white prints as the central cross in The Square Deal quilt block.

At the last minute I added the squares to make a Churn Dash center again. It makes the center more interesting; however, the inner border is blue {instead of white.} A small change.

Final decision: which print for the outer border? My first thought was the lovely one at the bottom but after looking at the photo, the triangle print floats my boat. Why does it look better? When it was in the box, the colors looked quite different than the center blocks. Viewed through the reducing lens of a camera, it changed appearance somehow. It has a richness the other lacks.

Components of The Square Deal are arranged with a narrow turquoise inner border and two choices for the outer border. Both are multi-colored. One is made printed of small rectangles and the other of small triangles.

After looking at this photo for a few days, I've decided the scale of the right border relates to the center better than the bottom border. They are nearly the same colors but the slightly larger design on the right gives them more presence. What do you think?

Enjoy the day, Ann