Wednesday, November 27, 2013

Déjà vu All Over Again

I've been very busy doing everything but quilt for the past two months. But my daughter shared a photo she took of friends expecting their first child. Why am I writing about it? The quilt "prop" is the first scrap bee quilt I ever made... about thirty years ago. So fun to see it again!

The Bow Tie blocks are grouped by similar colors across the surface of this queen-sized quilt.
Bow Tie scrap quilt

Inserting her Flickr photo eludes me; however, here's a link to her site. It looks so good with a happy couple snuggled inside.

Fall Maternity Collage

Happy Thanksgiving!
Enjoy the day, Ann

Monday, November 18, 2013

Take Your Pick

Do you prefer Texas Mink or no Mink on the border?

Black, red, orange, pink & white  t-shirts are combined with bright blue sashing, hot pink posts and multi-colored Texas Mink fringed border..
The quilt with Texas Mink.

Black, red, orange, pink & white  t-shirts are combined with bright blue sashing, hot pink posts and yellow striped borders.
The same quilt before Texas Mink.

Fret not; enjoy the day.

Ann

Monday, October 28, 2013

Trips Around the Block Tutorial

They are made with the same simple block using similar black & white fabrics. Streak of Lightning is so bright and cheerful but I also like the shadings of grey in the next. It was set with dark grey crosses centered on a multi-colored friendship star then sashed with very light greys.There's finally time to work on this quilt again after a long hiatus for baby gifts and traveling. I'm still working on the border but here's a tutorial for Trips Around the Block, a two-block quilt of X- and O- layouts.

Trip Around the World variation called Trip Around the Block made from scraps
Trip Around the Block without border
My basic plan for this quilt:
  1. Make the main diagonal grid medium to dark blues and greens. (1-4 on the value finder.)
  2. Group two or more rows of darks or lights together frequently.
  3. Use lots of spring and summer colors and white, some black, very little brown. 
Use or change at will; I did.

Fabric Requirements:
My squares finished 1.5". Each 10.5"-block is a seven-patch with 49 squares. I chose an odd number of columns and rows with an X-block in the corners. A 5-by-7-block quilt finishes 52.5" by 73.5" without borders and takes 1715 squares, about 4.875 yards of fabric.

Cutting:
Cut strips 2" wide and subcut into 2" squares.

If you prefer 2" finished squares use five-patch blocks instead. In this case, each 10"-block contains 25 squares. A 5-by-7-block quilt finishes 50" by 70" and takes 875 squares - about 3.875 yards of fabric. Cut strips 2.5" wide and subcut into 2.5" squares. 

Pressing:
Consistent pressing enables seams to butt together perfectly. For O-blocks finger-press odd rows up and even rows down. For X-blocks finger-press the odd rows down and evens rows up. Press the columns of the O's to the right and those of the X's to the left.

Sewing:
After laying out the O- or X-block, sew squares into columns and then sew columns together to complete the block.
The first block, a Mini-Trip Around the World, is laid out with fabrics encircling the center square.
The two left columns are sewn.
After all squares are sewn into columns, sew columns together.

Make seventeen O-blocks first. Any combination works. Vary the darkest round of each block. You can use different fabrics in the same round. Here are some examples I posted previously or go to this post for more examples. 

Three examples of Mini-Trip Around the World showing a different fabric placements for the O-block
The middle block has four dark corners.
The darkest fabrics of the right-hand block
are round 6 (counting from the center.)

When completed, lay out an alternate set.

O-blocks laid out in an alternate set.
The second block in row three has different fabrics in round six.

Now it's time to make eighteen X-blocks. Start with the main X of 13 squares to divide your block into four quadrants. Think of opposite v's as a round and again make them any way you like. The fabrics in a "round" can be the same or different.

Starting the X-blocks.
The blue round in the bottom O-block is made of two fabrics.

Originally it seemed important to have a darker and lighter side of the X. However, the X itself is very strong and the O's establish the diamond shape. So whatever you put in the V area should work.

I had more trouble sewing the X-blocks correctly; I kept trying to sew them into O's. It helped to keep them laid out as I sewed. This post has more examples of X-blocks.

X-blocks laid out but unsewn.
They look much larger than the O-blocks
because the squares are not sewn.

I'd love to see what you create!

Enjoy the day. Ann

Wednesday, October 16, 2013

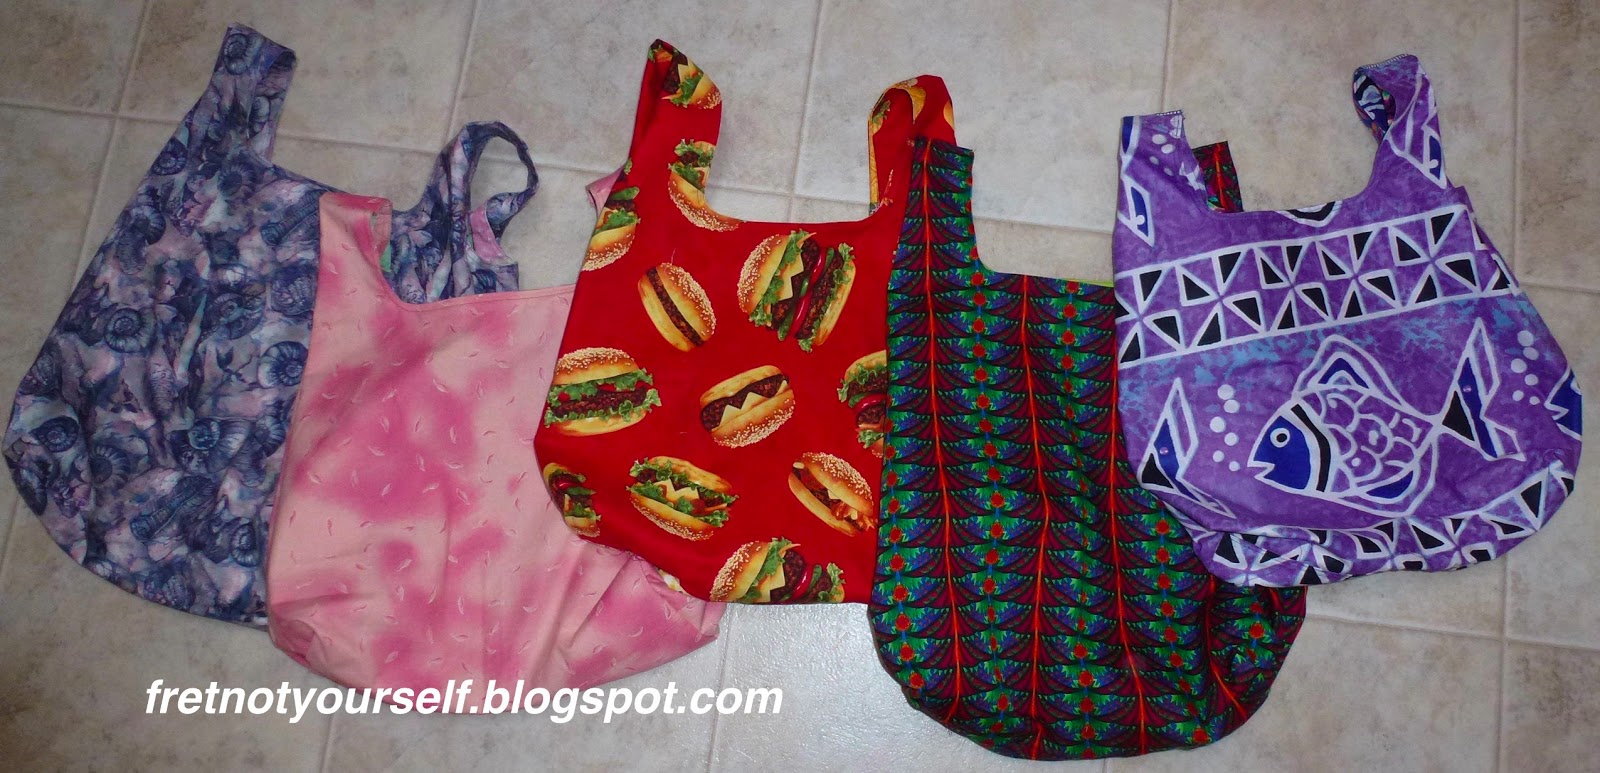
Grocery Bags

Baby bibs, aprons and now reusable grocery bags are helping reduce my fabric hoard. These are very simple, lined bags with no pockets. I keep one in my purse and another in my backpack so they're always at hand. My last plastic bag was the pattern template. After making two bags with pleats at the bottom like the plastic ones, I decided boxing the bottom would sew through fewer layers. The box is easier but pleated bags fold up more neatly. Here's a tutorial for boxing a bag by Drago[knit]fly.


These are great gifts in California where everyone must bring their own shopping bags to the stores. Instead of piles of unused yardage I have many new scraps.
Fret not. Enjoy the day.

Ann

Wednesday, October 9, 2013

Big Tex Star Quilt

Here's what I made with those last few Puddin' and Pie blocks. Just in time for the State Fair of Texas and another baby shower. What fun that this baby's quilt connects with his cousins' quilts.

Red, yellow, blue and white fabrics create four large star blocks and a secondary Churn Dash appears when they are set.
Big Tex Star Quilt

I decided to arrange the blocks to fit a star in the center. The four new blocks are twenty-four inches each.

Combining leftover Puddin' and Pie blocks with red and yellow fabrics created this original star design.
Big Tex Star block

I used a variety of free motion quilting designs in the lights and the blues, parallel lines in the Ts and curved line quilting in the stars and yellow fabrics. I also quilted the baby's name in free motion zig-zag in the border. It doesn't show much from the front but it's a nice touch.

Enjoy the day! Ann

Wednesday, October 2, 2013

Puddin' and Pie Quilts

Several years ago I exchanged these blocks with friends. Basically it's a modified Rail Fence with most strips cut 2.5 by 6.5 inches. They are so simple to make; the two points are in the middle of the block making it easily trimmable. Four together make a traditional Puddin' and Pie block. Over the years I've made several quilts with them.

This is one of my favorite borders. The notched ends give it a ribbon effect.

The Puddin' and Pie blocks are alternately set with Boot blocks to create this nine-block baby quilt.
Alternate set with boot fabric

The outer border was made with original blocks and some mirrored blocks to look like "T"s.

Western-themed fabric is used to create a baby quilt in red, black, brown, blue, tan and white.
Straight set Puddin' and Pie

These two were given to brothers. I waited years for their cousins to appear but finally gave up and made a quilt for the local hospice.

Western fabrics in red, black, brown and blue alternating with white and tan fabrics create the windmill shape of the block.
Puddin' and Pie straight set 

Never give up. A cousin arrives this year. There were only sixteen blocks and their mirrors left. I don't want another alternate set so I'll play around for a while.

Fret not; enjoy the day. Ann

Wednesday, September 25, 2013

Another String Quilt

There were just enough Red and String blocks left for this toddler quilt. Perfect for one of the four baby quilts. Although I didn't intend to repeat a top, it's practically the same setting I used here. Cheerful and bright!

Blocks are made of large red triangles one one side and strings in random widths on the other side.
String Quilt

Ditch quilted along the sashing then quilted a simple grid across the quilt. The border has printed spirals so I quilted more of them. They look great.

Enjoy the day! Ann

Wednesday, September 18, 2013

Four Patch Log Cabin Tutorial and Settings

Some people asked the directions for Four-Patch Log Cabin. It's an easy six-inch finished block using six fabrics. Here's a cutting chart.

Fabric Color       Number of Pieces       Cut Size
Bright A                       2                      2" by 2"
Bright B                       2                      2" by 2"
Black A                        1                      2" by 3.5"
Black B                        1                      2" by 5"
White A                       1                      2" by 5"
White B                       1                      2" by 6.5"

Four bright squares are surrounded by two black fabrics and two white fabrics to create this block.
Pieces for Four-Patch Log Cabin block
Using quarter-inch seams sew the four-patch together, pressing seams to one side and butting them together to finish the four-patch. Next sew Black A rectangle to the four-patch, pressing to the outside.

The four bright squares are sewn first;  then the first black rectangle is attached to begin the log cabin.
Partially sewn Four-Patch Log Cabin
Add Black B rectangle and again press to the outside. Double check that you are adding rectangles in the same direction on each block. Mine are clockwise. It doesn't matter whether they turn clockwise or counterclockwise as long as all blocks are consistent. Finally, add White A and finally White B, pressing to the outside.

What about the setting? Regular Log Cabins on point make a Straight Furrows set.

Log Cabins of light and dark scraps are laid out to demonstrate a straight furrow set.
Straight Furrows layout, log cabin blocks
When Four-Patch Log Cabin blocks are laid out the same way, they appear more like Streak of Lightning. Log Cabin blocks look like dark and light triangles. This block looks like a dark/bright square with a white L. That makes the difference in the layout.

These four-patch log cabins are set on point with red triangles surrounding them and a black and white striped border.
Four-Patch Log Cabin. Layout is Straight Furrow but looks like Streak of Lightning.
Here's one variation of regular Log Cabin Streak of Lightning layout.

Log Cabins of light and dark scraps are laid out to demonstrate a streak of lightning set.
Streak of Lightning set, log cabin blocks
The fabrics in FPLC are so strongly patterned that simple quilting seemed best. The black and white logs are simple straight line and ditch quilting; the bright squares are free-motion orange peel. I thought about heavier quilting but decided they should match the logs in density. There are lovely feathers in the bright red that don't show up. Finally, the border just needed simple echo quilting to highlight the prints. Sometimes less is more. But looking at the regular log cabins inspires me to use some of the designs Leah is using in her locks of hair. I'll have to sew these tops now.

Enjoy the day! Ann

Wednesday, September 11, 2013

Four-Patch Log Cabin Quilts

I've gotten a bit sidetracked. Somehow four friends are having baby boys... soon. How did I not know? Fortunately I keep extra blocks for these events. I need to dig them out to see what can be done. Here are some I made last time.

Four-Patch Log Cabin, Streak of Lightning set

They are made with the same simple block using similar black & white fabrics. Streak of Lightning is so bright and cheerful but I also like the shadings of grey in the next. It was set with dark grey crosses centered on a multi-colored friendship star then sashed with very light greys.

Four-Patch Log Cabin, Cross set

Here's the original block: a four patch of 2" unfinished squares combined with one row of log cabin strips. Notice the darks were sewn before the lights. You can also see the quilting design. I squared off the individual feathers so it looks like a philodendron in my backyard. Linking up with the Free Motion Quilting Project.

Four-Patch Log Cabin block
Edit: I posted a tutorial here.

Fret not; enjoy the day. Ann

Wednesday, September 4, 2013

Flower Power Bullseye

This was the final bullseye quilt finished around 2006 using the leftovers from my first one. I wanted to see how Texas Mink held up over time and thought it complemented the raw edge of the bullseye blocks. It has lasted very well. The quilt has been heavily used, washed and stored in a chest for several years. The border has flattened. Washing reinvigorates it but it never looks as pristine once it's folded or washed.

Thirty-six bullseye blocks are arranged by color into four 'flower petal' shapes on a quilt with a Texas Mink fringe border.
Four-Square Bullseye with Texas Mink border in 2013

Strips of bright fabrics, ribbons and braids are used to make a fringed Texas Mink border on this quilt.
Texas Mink border in 2006
Fret not; enjoy the day. Ann

Saturday, August 31, 2013

Comparing Trips

While I continue to play with the border I thought it would be fun to look at different trips. They've been posted before, but I like grouping smaller photos for easy comparison. Block choice really affects the quilt, as does fabric. Google search to find more examples.

A single-bed sized Trip Around the World quilt in oranges and blues.
Trip Around the World

Blocks of scrap fabrics are laid out as Mini-Trips Around the World
Mini Trips Around the World (layout)


Two alternate blocks laid out in Trip Around the Block format
Trip Around the Block (layout)

Scrappy Trip made of mostly green and pink fabrics
Scrappy Trips

Original Trip Around the World creates one large diamond. (If you don't want the diamond effect, Postage Stamps looks like one quadrant of the original trip.) Mini Trips Around the World are made with multiple smaller Trips... more trips but fewer rounds in each trip.

Scrappy Trip block is composed of squares laid on one diagonal like a mini postage stamp. Rotating the blocks creates diamond shapes and strong sides that disappear at block boundaries. But blocks don't have to be rotated. Look at Sujata Shah's gorgeous quilts for alternative settings. Asymmetrical blocks like Scrappy Trip have more setting variations than ones like the other trips. Bonnie Hunter has examples and instructions for these quilts on her site: Quiltsville Trip and Quiltsville Scrappy Trip. (Note: I didn't use her method for my first Trip; the rounds don't repeat regularly.)

Trip Around the Block uses two blocks to establish strong center diamonds and grids. Value variations occur at block boundaries again but are subtly different than Scrappy Trip.

Isn't it amazing the different quilts you can make with only squares?

Fret not; enjoy the day. Ann

Wednesday, August 28, 2013

Trip Around the Block Border Ideas

The blocks are together. To make the quilt large enough I need to make another set of blocks around all sides or add a border. Here are some borders I've been considering.

A scrap of this border made a star center in the middle of one of the O-blocks and reminded me to look for this fabric in my stash. It influenced the direction of my fabric choices but the border is a bit narrow for such a large quilt. And there is not enough to complete the border. So I either need to find some fabrics to enlarge (and lengthen) it or save it for a lap quilt.

Auditioning brightly printed fabric for quilt border
Sawtooth border fabric

I bought this Henry Glass fabric recently because it looked like a perfect binding or narrow border. The colors actually blend with the sawtooth border fabric.

Auditioning striped fabric for a quilt border
Repeat stripe border fabric

This is a border I drafted using six-pointed stars. It's not pieced yet so the stars are still too large. If I use it the stars will be multicolored. The innermost fabric is an old Nancy Crow ombre stripe followed by a sweet pink random dot print. I love the black & white stripe but are there too many dots?

Auditioning six-pointed stars for a quilt border
Pieced star border

On graph paper the space between the stars is the same length as the star width. But what if the stars lined up with the X-block centers?

Arranging blue six-pointed stars for a quilt border
Pieced star border aligned with X-blocks

Fret not; enjoy the day. Ann

Wednesday, August 21, 2013

Bullseye Quilt

My husband and I bought a California King bed for our California apartment. The quilts I had looked like toppers on this gigantic bed so I finally decided to make one to fit. Then I recalled this one - never quilted because it was so big (98" by 118".)

Bullseye blocks paired with alternating blue and brown fabric strips create an original quilt
Blue & Brown Bullseye Quilt

It was one of my 'brilliant' ideas. My sister and I make usually make a small project when I visit her home. Why not instead start a large project and put it in storage between visits? Great idea except... we couldn't remember exactly what-we-planned/where-we-stopped from one visit to the next. In 2004 I finally snuck blocks home to finish the tops.

We used her dinner and salad plates to cut circles from all our leftover fabric. (We were going to use the saucers too but the blocks were already very thick since we didn't trim behind the circles.) We cut the circles into quarters and topstitched them onto 5" finished beige blocks. At the end of that visit there were enough blocks to make three queen-size tops and a lap quilt. Yikes. Guess we forgot to count.

Two Bullseye blocks surrounded by light blue-dark brown or dark blue-tan sashing.
The two alternately colored bullseye blocks

I found the two 'cross' fabrics in my stash and realized they had the same colors with different backgrounds. The light one is a leaf print while the dark one is a Civil War reproduction. Those made 2" by 5" light and dark brown rectangles in the bullseyes. Then I paired a dark blue with a tan or a light blue with a dark brown to enlarge each bullseye to a 20" block. The border is a similar treatment. And that's how it got so large.

Detail of free-motion quilting on Bullseye quilt block
Quilting detail on Bullseye quilt

Last year I finally quilted this top. I stippled the beige areas, quilted Orange Peels in the blue/brown borders of each block and concentric circle patterns in the bullseyes. The only problem was that the orange peel grid had to be hand-drawn since it was on the diagonal of two-inch strips. Perhaps someone will make a linear stencil with a "square root of two" spacing soon.

All the quilting was done with Metler Fine Embroidery thread on my home machine - a Bernina 1230. The batting is Mountain Mist Blue Ribbon Cotton.

Quilt back highlights detailed quilting
Back and binding of bullseye quilt

This is currently on the California bed. But since we installed heavier drapes to dim the streetlights, the room is very dark. Now the room needs a lighter quilt... like the Trips Around the Block. Or perhaps I just need to make another excessively large quilt.

Fret not; enjoy the day. Ann